Tag: Exadata

  • Configure VNC on Exadata Database Machine

    You can access database servers remotely by using tools such as PuTTY and Virtual Network Computing (VNC) which are freely available for download. In most cases, accessing a database server in a command-line mode via PuTTY is enough. Sometimes we may need to access a database server to run GUI-based software. For example, to run runInstaller to install Oracle software or DBCA to create databases. In these cases, VNC comes handy as it support GUI-based interface.


    VNC allows you to run GUI interface on database server. It allows you to execute programs locally on the server, while only the screen output is sent to the VNC client on your desktop. you can use the vncserver command to configure VNC.


    In this article we will demonstrate how to install VNC package using 2 different methods, start VNC session and run some Graphical interface tools to ensure VNC is configured correctly on the server.


    Step 1: Installing VNC Package 


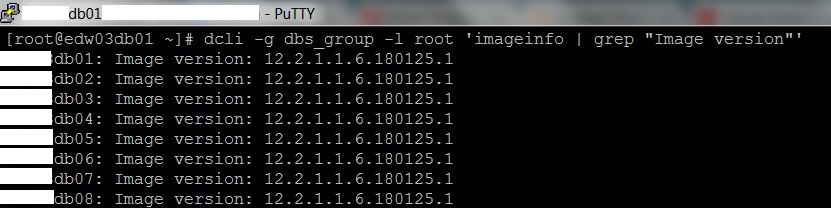
    • Get the Exadata software version (optional)

    [root@dm01db01 ~]# imageinfo


    Kernel version: 4.1.12-94.7.8.el6uek.x86_64 #2 SMP Thu Jan 11 20:41:01 PST 2018 x86_64
    Image kernel version: 4.1.12-94.7.8.el6uek
    Image version: 12.2.1.1.6.180125.1
    Image activated: 2018-05-03 01:49:58 -0500
    Image status: success
    System partition on device: /dev/mapper/VGExaDb-LVDbSys1


    • Get the Exadata Model (optional)

    [root@dm01db01 ~]# dbmcli -e list dbserver attributes makeModel
             Oracle Corporation SUN SERVER X4-2


    • Check if VNC package already exists. In my case VNC is not configured.

    [root@dm01db01 ~]# rpm -qa tigervnc*


    • Get the Operating System version and update

    [root@dm01db01 yum.repos.d]# cat /etc/oracle-release
    Oracle Linux Server release 6.9


    • You can install packages in 2 ways:
      1. Using proxy server. This should be configured by your Organization network engineer already.
      2. Using Local Yum repository

    Using proxy server


    • Get the proxy server details from your network engineer
    • Set the http_proxy environment variable

    [root@dm01db01 ~]# export http_proxy=webproxy:80


    • Navigate to YUM repository directory

    [root@dm01db01 ~]# cd /etc/yum.repos.d/


    [root@dm01db01 yum.repos.d]# ls -ltr
    total 24
    -rw-r–r– 1 root root 6843 May  7  2016 public-yum-ol6.repo
    -r–r—– 1 root root  896 Jan 26 05:19 Exadata-computenode.repo.sample
    -rw-r—– 1 root root  291 May  3 01:59 Exadata-computenode.repo


    • Open the public-yum-ol6.repo and uncomment enabled=1 for the following 2 stanza

    [root@dm01db01 yum.repos.d]# vi public-yum-ol6.repo


    [ol6_latest]
    name=Oracle Linux $releasever Latest ($basearch)
    baseurl=http://yum.oracle.com/repo/OracleLinux/OL6/latest/$basearch/
    gpgkey=file:///etc/pki/rpm-gpg/RPM-GPG-KEY-oracle
    gpgcheck=1
    enabled=1


    [ol6_u9_base]
    name=Oracle Linux $releasever Update 9 installation media copy ($basearch)
    baseurl=https://yum.oracle.com/repo/OracleLinux/OL6/9/base/$basearch/
    gpgkey=file:///etc/pki/rpm-gpg/RPM-GPG-KEY-oracle
    gpgcheck=1
    enabled=1


    [root@dm01db01 yum.repos.d]# ls -ltr
    total 36
    -r–r—– 1 root root   896 Jan 26 05:19 Exadata-computenode.repo.sample
    -rw-r—– 1 root root   291 May  3 01:59 Exadata-computenode.repo
    -rw-r–r– 1 root root 10544 May  9 10:09 public-yum-ol6.repo


    • Perform the Yum clean up

    [root@dm01db01 yum.repos.d]# yum clean all
    Cleaning repos: ol6_latest ol6_u8_base ol6_u9_base
    Cleaning up Everything


    • List the yum repositories

    [root@dm01db01 yum.repos.d]# yum repolist
    ol6_latest                                                                                                                            | 1.4 kB     00:00
    ol6_latest/primary                                                                                                                    |  68 MB     00:01
    ol6_latest                                                                                                                                         40153/40153
    ol6_u7_base                                                                                                                           | 1.4 kB     00:00
    ol6_u7_base/primary                                                                                                                   | 3.2 MB     00:00
    ol6_u7_base                                                                                                                                        8428/8428
    repo id                                                        repo name                                                                           status
    ol6_latest                                                     Oracle Linux 6Server Latest (x86_64)                                                32,690+7,463
    repolist: 39,319


    • Install the VNC package as shown below

    [root@dm01db01 yum.repos.d]# yum install tigervnc*
    Setting up Install Process
    Resolving Dependencies
    –> Running transaction check
    —> Package tigervnc.x86_64 0:1.1.0-24.el6 will be installed
    —> Package tigervnc-server.x86_64 0:1.1.0-24.el6 will be installed
    –> Processing Dependency: libxshmfence.so.1()(64bit) for package: tigervnc-server-1.1.0-24.el6.x86_64
    —> Package tigervnc-server-applet.noarch 0:1.1.0-24.el6 will be installed
    —> Package tigervnc-server-module.x86_64 0:1.1.0-24.el6 will be installed
    –> Processing Dependency: xorg-x11-server-Xorg for package: tigervnc-server-module-1.1.0-24.el6.x86_64
    –> Running transaction check
    —> Package libxshmfence.x86_64 0:1.2-1.el6 will be installed


    Transaction Summary
    =============================================================================================================================================================================================
    Install      24 Package(s)


    Total download size: 4.3 M
    Installed size: 11 M
    Is this ok [y/N]: y


    Installed:
      tigervnc.x86_64 0:1.1.0-24.el6        tigervnc-server.x86_64 0:1.1.0-24.el6        tigervnc-server-applet.noarch 0:1.1.0-24.el6        tigervnc-server-module.x86_64 0:1.1.0-24.el6


    Dependency Installed:
      acl.x86_64 0:2.2.49-7.el6_9.1           cryptsetup-luks.x86_64 0:1.2.0-11.el6   cryptsetup-luks-libs.x86_64 0:1.2.0-11.el6           hal.x86_64 0:0.5.14-14.el6
      hal-info.noarch 0:20090716-5.el6        hal-libs.x86_64 0:0.5.14-14.el6         hdparm.x86_64 0:9.43-4.el6                           libepoxy.x86_64 0:1.2-3.el6
      libevdev.x86_64 0:1.4.5-2.el6           libxshmfence.x86_64 0:1.2-1.el6         mesa-libEGL.x86_64 0:11.0.7-4.el6                    mesa-libgbm.x86_64 0:11.0.7-4.el6
      mtdev.x86_64 0:1.1.5-1.el6              pm-utils.x86_64 0:1.2.5-11.el6          system-setup-keyboard.x86_64 0:0.7-4.el6             xorg-x11-drv-evdev.x86_64 0:2.9.2-1.el6
      xorg-x11-drv-vesa.x86_64 0:2.3.4-1.el6  xorg-x11-drv-void.x86_64 0:1.4.1-1.el6  xorg-x11-server-Xorg.x86_64 0:1.17.4-16.0.1.el6_9.1  xorg-x11-server-common.x86_64 0:1.17.4-16.0.1.el6_9.1


    Complete!


    • Verify the VNC package is installed

    [root@dm01db01 yum.repos.d]# rpm -qa | grep tigervnc*
    tigervnc-server-applet-1.1.0-24.el6.noarch
    tigervnc-server-1.1.0-24.el6.x86_64
    tigervnc-server-module-1.1.0-24.el6.x86_64
    tigervnc-1.1.0-24.el6.x86_64


    Using Local Yum repository 


    This method is useful when you don’t have internet access through proxy.


    Refer to the blog article below on how to configure a local yum repository on Exadata
    http://netsoftmate.blogspot.com/2018/05/create-local-yum-repository-on-Exadata.html


    Step 2: Configure VNC Server


    • Login as root or any other user you want to configure VNC server
    • Execute the vncserver command. On the prompt enter any password of your choice

    [root@dm01db01 ~]# vncserver


    You will require a password to access your desktops.


    Password:
    Verify:


    Warning: dm01db01.netsoftmate.com:1 is taken because of /tmp/.X1-lock
    Remove this file if there is no X server dm01db01.netsoftmate.com:1


    New ‘dm01db01.netsoftmate.com:2 (root)’ desktop is dm01db01.netsoftmate.com:2


    Creating default startup script /root/.vnc/xstartup
    Starting applications specified in /root/.vnc/xstartup
    Log file is /root/.vnc/dm01db01.netsoftmate.com:2.log


    3. Verify VNC server is running and note down the port number. Here the VNC server is running at dm01db01.netsoftmate.com:3 for root user


    [root@dm01db01 ~]# ps -ef|grep vnc
    root     141816 297951  0 12:14 pts/1    00:00:00 grep vnc
    root     356225      1  0 11:02 pts/1    00:00:00 /usr/bin/Xvnc :3 -desktop dm01db01.netsoftmate.com:3 (root) -httpd /usr/share/vnc/classes -auth /root/.Xauthority -geometry 1024×768 -rfbwait 30000 -rfbauth /root/.vnc/passwd -rfbport 5903 -fp catalogue:/etc/X11/fontpath.d -pn
    root     356351      1  0 11:02 pts/1    00:00:00 vncconfig -iconic


    Step 3: Test VNC Connection and GUI interface


    • Download and Install VNC Viewer. Here I am using VNC Tiger for Windows
    • Double Click on VNC Viewer icon to launch VNC Viewer

    • Enter the host name and port. You can get these by execute the command “ps -ef|grep vnc” on the server

    • Enter the password provided at the time of configuring vncserver

    • The VNC session is displayed

    • Now test the GUI interface by starting some GUI tool. Here I am going to start DBCA to test the GUI interface


    Conclusion


    In this article we have learned how to install, configure and test VNC server on Exadata compute node. VNC allows you to run GUI interface on database server. It allows you to execute programs locally on the server, while only the screen output is sent to the VNC client on your desktop. you can use the vncserver command to configure VNC.

  • Storage Server Flash Memory is not Configured as Exadata Smart Flash Cache

    While working on an Exadata database machine X4-2 half rack we found that the Smart Flash Cache on a storage cell was missing. We ran an Exachk and found the Smart Flash cache was indeed missing on Storage Cell 05.


    Here is the message printed in the Exachk report.


    FAIL Storage Server Check Storage Server Flash Memory is not configured as Exadata Smart Flash Cache dm01cel05 


    Exadata Smart Flash Cache:


    Oracle first introduced Exadata Flash Cache in the version Exadata V2. Exadata Smart Flash Cache, caches the data on flash based Storage. Exadata uses a caching algorithm to cache data intelligently in the flash card on the Storage cells. It improves the performance for OLTP databases. Exadata Flash Cache is used for Smart Flash Cache and Smart Flash log features. 


    Courtesy Oracle


    In this article we will demonstrate how to create a missing Smart Flash Cache on Exadata Storage cell.


    Step to create/configure Smart Flash Cache


    • List the Flash cache

    From the output below we can clearly see that the storge cell 05 is missing.


    [root@dm01db01 ~]# dcli -g ~/cell_group -l root cellcli -e list flashcache attributes name,size,status
    dm01cel01: dm01cel01_FLASHCACHE  2978.75G        normal
    dm01cel02: dm01cel02_FLASHCACHE  2978.75G        normal
    dm01cel03: dm01cel03_FLASHCACHE  2978.75G        normal
    dm01cel04: dm01cel04_FLASHCACHE  2978.75G        normal
    dm01cel06: dm01cel06_FLASHCACHE  2978.75G        normal
    dm01cel07: dm01cel07_FLASHCACHE  2978.75G        normal


    • List the Flash log. Flash Log are is fine

    [root@dm01db01 ~]# dcli -g ~/cell_group -l root cellcli -e list flashlog attributes name,size
    dm01cel01: dm01cel01_FLASHLOG    512M
    dm01cel02: dm01cel02_FLASHLOG    512M
    dm01cel03: dm01cel03_FLASHLOG    512M
    dm01cel04: dm01cel04_FLASHLOG    512M
    dm01cel05: dm01cel05_FLASHLOG    512M
    dm01cel06: dm01cel06_FLASHLOG    512M
    dm01cel07: dm01cel07_FLASHLOG    512M


    • Connect to Storage cell 05 and list the flash cache

    [root@dm01cel05 ~]# cellcli
    CellCLI: Release 12.2.1.1.6 – Production on Tue Jun 16 03:57:24 CDT 2018


    Copyright (c) 2007, 2013, Oracle.  All rights reserved.
    Cell Efficiency Ratio: 1,656


    • List flash cache. We can’t find flash cache on it as there is no output of the command reported

    CellCLI> list flashcache detail


    • Create Flash Cache as shown below

    CellCLI> create flashcache all
    Flash cache dm01cel05_FLASHCACHE successfully created


    • List flash cache

    CellCLI>  list flashcache detail
             name:                   dm01cel05_FLASHCACHE
             cellDisk:               FD_04_dm01cel05,FD_05_dm01cel05,FD_10_dm01cel05,FD_06_dm01cel05,FD_11_dm01cel05,FD_13_dm01cel05,FD_08_dm01cel05,FD_15_dm01cel05,FD_12_dm01cel05,FD_01_dm01cel05,FD_00_dm01cel05,FD_07_dm01cel05,FD_09_dm01cel05,FD_14_dm01cel05,FD_02_dm01cel05,FD_03_dm01cel05
             creationTime:           2015-06-16T04:03:21-05:00
             degradedCelldisks:
             effectiveCacheSize:     2978.75G
             id:                     ce4589c7-183c-4346-965d-3f43a4e47de5
             size:                   2978.75G
             status:                 normal


    • List flash cache for all cells now. From compute node 1 , execute the following command

    [root@dm01db01 ~]# dcli -g ~/cell_group -l root cellcli -e list flashcache attributes name,size,status
    dm01cel01: dm01cel01_FLASHCACHE  2978.75G        normal
    dm01cel02: dm01cel02_FLASHCACHE  2978.75G        normal
    dm01cel03: dm01cel03_FLASHCACHE  2978.75G        normal
    dm01cel04: dm01cel04_FLASHCACHE  2978.75G        normal
    dm01cel05: dm01cel05_FLASHCACHE  2978.75G        normal
    dm01cel06: dm01cel06_FLASHCACHE  2978.75G        normal
    dm01cel07: dm01cel07_FLASHCACHE  2978.75G        normal


    Conclusion


    In this article we have learned how to create missing flash cache on  Exadata Storage cell. Exadata Smart Flash Cache, caches the data on flash based Storage. Exadata Flash Cache is used for Smart Flash Cache and Smart Flash log features. Exachk utility helps you diagnose and report the hardware problems and it also recommends the solution,

  • Oracle SuperCluster Health Check Using Exachk Utility

    Oracle provides “Exachk” utility to conduct a comprehensive Health Check on Oracle SuperCluster to validate hardware, firmware and configuration. Exachk Utility is available for Oracle Engineered Systems such as Exadata (V2 and above), Exalogic, Exalytics, SuperCluster, MiniCluster, ZDLRA & Big Data. 


    When Exachk is run from the primary LDOM as user ‘root’ it will discover and run exachk utility for each component:

    • Configuration checks for Compute nodes, Storage cells and InfiniBand Switches
    • Grid Infrastructure, Database and ASM and Operating System software checks

    When Exachk is run in a Database zone or Virtualized environment it will collect data for:

    • All RAC Node
    • All Database Instance
    • Grid Infrastructure

    You can also run Exachk on a specific component such as:

    • Database Servers
    • Storage Cells
    • Infiniband Switches
    • Grid Infrastructure, Database & ASM and so on

    It is recommended to run Exachk as root user and have SSH equivalence setup in the SuperCluster. But you can run Exachk as ordinary user and without having root ssh setup.


    It is recommended to execute the latest exachk at the following situation:

    • Monthly
    • Before any planned maintenance activity
    • Immediately after completion of planned maintenance activity
    • Immediately after an outage or incident

    Exachk Binary and output file location:

    • Default Exachk Location: /opt/oracle.SupportTools/exachk
    • Defautl Exachk Output Location: /opt/oracle.SupportTools/exachk

    Courtesy Oracle


    Steps to Deploy and Execute Exachk utility on SuperCluster


    • Download Latest Exachk Utility

    You can download the latest Exachk from MOS note 1070954.1

    • Download deploy_exachk.sh script to deploy and install Exachk in all Primary LDOM and in each Zone

    • Copy the downloaded Exachk utility and deploy_exachk.sh into /opt/oracle.SupportTools

    # cd /opt/oracle.SupportTools
    # mv exachk Exachk-bkp

    • Deploy Exachk as follows

    # cd /opt/oracle.SupportTools/
    # ./deploy_exachk.sh exachk.zip
    # ls -ltr
    # cd exachk
    # ls -l exachk


    As of writing the latest Exachk available is 18.2.0_20180518

    • Verify Exachk Version on LDOM

    # cd /opt/oracle.SupportTools/exachk
    # ./exachk -v

    • To verify Exachk version on all zones in a LDOM

    # zoneadm list | grep -v global > zone_list
    # hostname >> zone_list
    # /opt/oracle.supercluster/bin/dcli -g zone_list -l root /opt/oracle.SupportTools/exachk/exachk -v


    Note: root RSA keys should be set up for SSH

    • Execute Exachk on Primary LDOM or Global Zone

    # cd /opt/oracle.SupportTools/exachk
    # ./exachk

    • Execute Exachk in non-global zone local zone

    Login to non-global zone local zone using zlogin and execute the following commands


    # zlogin <hostname>
    # cd /opt/oracle.SupportTools/exachk
    # ./exachk


    Important Note: In zones there is currently an issue with discovery, and so one must set the RAT_ORACLE_HOME and RAT_GRID_HOME environment variables in some cases.


    Conclusion
    In this article we have learned to perform Oracle SuperCluster Stack Health Check using Exachk utility. Exachk Utility is available for Oracle Engineered Systems such as Exadata (V2 and above), Exalogi, Exalytics, SuperCluster, MiniCluster, ZDLRA & Big Data.

  • ASRexacheck Utility – Validate Exadata Oracle ASR Deployment

    ASRexacheck utility can be executed to verify the ASR deployment. Oracle Auto Service Request (ASR) is a secure, scalable, customer-installable software feature of warranty and Oracle Support Services that provides auto-case generation when common hardware component faults occur.


    It is important to note that, ASR is not a system management or monitoring tool. It is developed & designed to open Oracle Automatic Service Requests when specific hardware faults are detected on Oracle products that are qualified for ASR. Oracle Exadata Database Machine is a qualified production for Oracle ASR.


    You can execute ASRexacheck in any of the following 2 ways:

    • As part of the Oracle Exadata Database Machine exachk
    • Stand-alone mode on a single node or multiple nodes

    In this article we will demonstrate how to execute ASRexacheck on in Stand-alone mode on a single server and mutliple servers using dcli.


    • Ensure that the ASRexacheck verison is 4.x. If is is older than 4.x, then download the latest ASRexacheck from the MOS note below.

    Engineered Systems ASR Configuration Check tool (asrexacheck version 4.x) (Doc ID 2103715.1)

    • ASRexacheck Download and & Upgrade steps
      • Download the asrexacheck zip file from the MOS note.
      • Copy the asrexacheck zip to the following directory: /opt/oracle.SupportTools/
      • Unzip the asrexacheck utility
              # cd /opt/oracle.SupportTools/
              # unzip asrexacheck_43.zip
      • Change the running permissions to execute

                        # chmod 755 /opt/oracle.SupportTools/asrexacheck

      • Verify the asrexacheck version

                        # /opt/oracle.SupportTools/asrexacheck –v


    • ASRexacheck execution On a single Exadata server

    [root@dm01db01 oracle.SupportTools]# /opt/oracle.SupportTools/asrexacheck
    asrexacheck version: 4.0
    Current time: 2018-04-09 10:42:51


    ================================================================================
    SYSTEM CONFIGURATION
    ================================================================================
    Product name           : Exadata X5-2
    Product serial         : AK003XXXXX
    Component name         : ORACLE SERVER X5-2
    Component serial       : 1546XX111X
    Engineered System type : Exadata
    Server type            : COMPUTE
    Image version          : 18.1.4.0.0.180125.3
    OS IP Address          : 10.10.10.1
    OS Hostname            : dm01db01
    OS version             : 4.1.12-94.7.8.el6uek.x86_64
    ILOM IP Address        : 10.10.10.14
    ILOM Hostname          : dm01db01-ilom
    ILOM version           : 4.0.0.24


    ================================================================================
    NETWORK
    ================================================================================
    Interface  IP Address                      Hostname        Route   fromIP
    ——————————————————————————–
    bondeth0   10.20.16.1                     dm0101          NO
    eth0       10.10.10.1                     dm01db01        YES


    ================================================================================
    ASR
    ================================================================================
    Destination     Hostname        Rule Type  DBMCLI Port Level   Community Version
    ——————————————————————————–
    10.10.10.1     dm01db01          1               8162 minor   LocalMSV3user       3
    192.168.10.1  oragwserver                   YES   162           public
    192.168.10.1  oragwserver        2                162 minor     public      2c


    [OK] Exactly one OS and ILOM IP coincide (192.168.10.1)
    * Validation:
    [OK] OS Test event sent to 192.168.10.1:162
    [OK] ILOM Test event sent to 192.168.10.1:162


    Time elapsed script execution: 00:04:44
    Zipfile /var/log/asrexacheck/asrexacheck_dm01db01_20180409T154251.zip of the outputs created


    • ASRexacheck execution on all Exadata Compute nodes

    [root@dm01db01 oracle.SupportTools]# dcli -g ~/dbs_group -l root ‘/opt/oracle.SupportTools/asrexacheck’
    dm01db01: asrexacheck version: 4.0
    dm01db01: Current time: 2018-04-09 10:42:51
    dm01db01:
    dm01db01: ================================================================================
    dm01db01: SYSTEM CONFIGURATION
    dm01db01: ================================================================================
    dm01db01: Product name           : Exadata X5-2
    dm01db01: Product serial         : AK003XXXXX
    dm01db01: Component name         : ORACLE SERVER X5-2
    dm01db01: Component serial       : 1546XX111X
    dm01db01: Engineered System type : Exadata
    dm01db01: Server type            : COMPUTE
    dm01db01: Image version          : 18.1.4.0.0.180125.3
    dm01db01: OS IP Address          : 10.10.10.1
    dm01db01: OS Hostname            : dm01db01
    dm01db01: OS version             : 4.1.12-94.7.8.el6uek.x86_64
    dm01db01: ILOM IP Address        : 10.10.10.14
    dm01db01: ILOM Hostname          : dm01db01-ilom
    dm01db01: ILOM version           : 4.0.0.24
    dm01db01:
    dm01db01: ================================================================================
    dm01db01: NETWORK
    dm01db01: ================================================================================
    dm01db01: Interface  IP Address                      Hostname        Route   fromIP
    dm01db01: ——————————————————————————–
    dm01db01: bondeth0   10.20.16.1                     dm0101          NO
    dm01db01: eth0       10.10.10.1                     dm01db01        YES
    dm01db01:
    dm01db01: ================================================================================
    dm01db01: ASR
    dm01db01: ================================================================================
    dm01db01: Destination     Hostname        Rule Type  DBMCLI Port Level   Community Version
    dm01db01: ——————————————————————————–
    dm01db01: 10.10.10.1     dm01db01          1               8162 minor   LocalMSV3user       3
    dm01db01: 192.168.10.1  oragwserver                   YES   162           public
    dm01db01: 192.168.10.1  oragwserver        2                162 minor     public      2c
    dm01db01:
    dm01db01: [OK] Exactly one OS and ILOM IP coincide (192.168.10.1)
    dm01db01: * Validation:
    dm01db01: [OK] OS Test event sent to 192.168.10.1:162
    dm01db01: [OK] ILOM Test event sent to 192.168.10.1:162
    dm01db01:
    dm01db01: Time elapsed script execution: 00:04:44
    dm01db01: Zipfile /var/log/asrexacheck/asrexacheck_dm01db01_20180409T154251.zip of the outputs created
    dm01db02: asrexacheck version: 4.0
    dm01db02: Current time: 2018-04-09 10:42:51
    dm01db02:
    dm01db02: ================================================================================
    dm01db02: SYSTEM CONFIGURATION
    dm01db02: ================================================================================
    dm01db02: Product name           : Exadata X5-2
    dm01db02: Product serial         : AK003XXXXX
    dm01db02: Component name         : ORACLE SERVER X5-2
    dm01db02: Component serial       : 1546XX11XX
    dm01db02: Engineered System type : Exadata
    dm01db02: Server type            : COMPUTE
    dm01db02: Image version          : 18.1.4.0.0.180125.3
    dm01db02: OS IP Address          : 10.10.10.2
    dm01db02: OS Hostname            : dm01db02
    dm01db02: OS version             : 4.1.12-94.7.8.el6uek.x86_64
    dm01db02: ILOM IP Address        : 10.10.10.15
    dm01db02: ILOM Hostname          : dm01db02-ilom
    dm01db02: ILOM version           : 4.0.0.24
    dm01db02:
    dm01db02: ================================================================================
    dm01db02: NETWORK
    dm01db02: ================================================================================
    dm01db02: Interface  IP Address                      Hostname        Route   fromIP
    dm01db02: ——————————————————————————–
    dm01db02: bondeth0   10.20.16.3                     dm0102          NO
    dm01db02: eth0       10.10.10.2                     dm01db02        YES
    dm01db02:
    dm01db02: ================================================================================
    dm01db02: ASR
    dm01db02: ================================================================================
    dm01db02: Destination     Hostname        Rule Type  DBMCLI Port Level   Community Version
    dm01db02: ——————————————————————————–
    dm01db02: 10.10.10.2     dm01db02          1               8162 minor   LocalMSV3user       3
    dm01db02: 192.168.10.1  oragwserver                   YES   162           public
    dm01db02: 192.168.10.1  oragwserver        2                162 minor     public      2c
    dm01db02:
    dm01db02: [OK] Exactly one OS and ILOM IP coincide (192.168.10.1)
    dm01db02: * Validation:
    dm01db02: [OK] OS Test event sent to 192.168.10.1:162
    dm01db02: [OK] ILOM Test event sent to 192.168.10.1:162
    dm01db02:
    dm01db02: Time elapsed script execution: 00:04:46
    dm01db02: Zipfile /var/log/asrexacheck/asrexacheck_dm01db02_20180409T154251.zip of the outputs created
    dm01db03: asrexacheck version: 4.0
    dm01db03: Current time: 2018-04-09 10:42:51
    dm01db03:
    dm01db03: ================================================================================
    dm01db03: SYSTEM CONFIGURATION
    dm01db03: ================================================================================
    dm01db03: Product name           : Exadata X5-2
    dm01db03: Product serial         : AK003XXXXX
    dm01db03: Component name         : ORACLE SERVER X5-2
    dm01db03: Component serial       : 1547XX10XX
    dm01db03: Engineered System type : Exadata
    dm01db03: Server type            : COMPUTE
    dm01db03: Image version          : 18.1.4.0.0.180125.3
    dm01db03: OS IP Address          : 10.10.10.3
    dm01db03: OS Hostname            : dm01db03
    dm01db03: OS version             : 4.1.12-94.7.8.el6uek.x86_64
    dm01db03: ILOM IP Address        : 10.10.10.16
    dm01db03: ILOM Hostname          : dm01db03-ilom
    dm01db03: ILOM version           : 4.0.0.24
    dm01db03:
    dm01db03: ================================================================================
    dm01db03: NETWORK
    dm01db03: ================================================================================
    dm01db03: Interface  IP Address                      Hostname        Route   fromIP
    dm01db03: ——————————————————————————–
    dm01db03: bondeth0   10.20.16.5                     dm0103          NO
    dm01db03: eth0       10.10.10.3                     dm01db03        YES
    dm01db03:
    dm01db03: ================================================================================
    dm01db03: ASR
    dm01db03: ================================================================================
    dm01db03: Destination     Hostname        Rule Type  DBMCLI Port Level   Community Version
    dm01db03: ——————————————————————————–
    dm01db03: 10.10.10.3     dm01db03          1               8162 minor   LocalMSV3user       3
    dm01db03: 192.168.10.1  oragwserver                   YES   162           public
    dm01db03: 192.168.10.1  oragwserver        2                162 minor     public      2c
    dm01db03:
    dm01db03: [OK] Exactly one OS and ILOM IP coincide (192.168.10.1)
    dm01db03: * Validation:
    dm01db03: [OK] OS Test event sent to 192.168.10.1:162
    dm01db03: [OK] ILOM Test event sent to 192.168.10.1:162
    dm01db03:
    dm01db03: Time elapsed script execution: 00:04:43
    dm01db03: Zipfile /var/log/asrexacheck/asrexacheck_dm01db03_20180409T154251.zip of the outputs created


    • At the end of successful ASRexacheck execution, you will receive 2 Test ASR emails, one from Management host and another from Management ILOM host. If you don’t receive the Test ASR emails then you must work with Oracle ASR Management team to resolve the ASR Manager issue.

    • You can also execute ASRexacheck on Exadata Storage cells using below commands.

    [root@dm01cel01 ~]# /opt/oracle.SupportTools/asrexacheck
    [root@dm01db01 ~]# dcli -g ~/cell_group -l root ‘/opt/oracle.SupportTools/asrexacheck’


    Conclusion


    In this article we have learned how to verify ASR deployment using ASRexacheck utility. ASR is not a monitoring tool, it is designed to open ASR when specific hardware faults are detected on Oracle products that are qualified for ASR. Oracle Exadata Database Machine is a qualified production for Oracle ASR.

  • Rename Oracle ASM Disk Group On Exadata

    When Oracle ACS build Exadata Database Machine, they use the OEDA file that you sent them over for Exadata Install. The Exadata is built with default ASM Disk Group name DATAC1, RECOC1 & DBFS_DG. If you want to rename the DATAC1 and RECOC1 to something different to match your Organization standards you can do that by using the Oracle renamedg utility. The number Database version required to rename an ASM Disk Group is 11.2.


    In this article we will demonstrate how to rename ASM Disk Group on Exadata Database Machine running Oracle Database 11.2


    Here we want to change the following ASM Disk Group Names:
    DATAC1 to DATA
    RECOC1 to RECO


    Steps to rename ASM Disk Group


    • Get the Database version

    ORACLE_SID = [+ASM1] ? dbm011
    The Oracle base remains unchanged with value /u01/app/oracle


    [oracle@dm01db01 ~]$ sqlplus / as sysdba


    SQL*Plus: Release 11.2.0.4.0 Production on Thu May 24 16:36:34 2018
    Copyright (c) 1982, 2013, Oracle.  All rights reserved.


    Connected to:
    Oracle Database 11g Enterprise Edition Release 11.2.0.4.0 – 64bit Production
    With the Partitioning, Real Application Clusters, Automatic Storage Management, OLAP,
    Data Mining and Real Application Testing options


    SQL> select * from v$version;


    BANNER
    ——————————————————————————–
    Oracle Database 11g Enterprise Edition Release 11.2.0.4.0 – 64bit Production
    PL/SQL Release 11.2.0.4.0 – Production
    CORE    11.2.0.4.0      Production
    TNS for Linux: Version 11.2.0.4.0 – Production
    NLSRTL Version 11.2.0.4.0 – Production

    • Connect to asmcmd and make a note of the Disk Group Names

    [oracle@dm01db01 ~]$ . oraenv


    ORACLE_SID = [oracle] ? +ASM1
    The Oracle base has been set to /u01/app/oracle


    [oracle@dm01db01 ~]$ asmcmd -p


    ASMCMD [+] > lsdg
    State    Type    Rebal  Sector  Block       AU   Total_MB    Free_MB  Req_mir_free_MB  Usable_file_MB  Offline_disks  Voting_files  Name
    MOUNTED  HIGH    N         512   4096  4194304  272154624  271558968          6479872        88359698              0             N  DATAC1/
    MOUNTED  HIGH    N         512   4096  4194304    2404640    2402468            68704          777921              0             Y  DBFS_DG/
    MOUNTED  NORMAL  N         512   4096  4194304   45389568   45386648           540352        22423148              0             N  RECOC1/

    • Check the versions

    ASMCMD [+] > lsct
    DB_Name  Status     Software_Version  Compatible_version  Instance_Name  Disk_Group
    +ASM     CONNECTED        11.2.0.4.0          11.2.0.4.0  +ASM1          DBFS_DG
    DBM01    CONNECTED        11.2.0.4.0          11.2.0.4.0  dbm011         DATAC1

    • Check the database status

    [oracle@dm01db01 ~]$ srvctl status database -d dbm01
    Instance dbm011 is running on node dm01db01
    Instance dbm012 is running on node dm01db02
    Instance dbm013 is running on node dm01db03
    Instance dbm014 is running on node dm01db04

    • Make a note of the control files, Datafiles, Redo logfiles before stopping the database.

    SQL> select name from v$controlfile;
    SQL> select name from v$datafile;
    SQL> select member from v$logfile;
    SQL> select * from v$block_change_tracking;

    • Stop database database

    [oracle@dm01db01 ~]$ srvctl stop database -d dbm01


    [oracle@dm01db01 ~]$ srvctl status database -d dbm01
    Instance dbm011 is not running on node dm01db01
    Instance dbm012 is not running on node dm01db02
    Instance dbm013 is not running on node dm01db03
    Instance dbm014 is not running on node dm01db04

    • Umount the ASM disk group(s) that you want to rename. Connect to ASM command prompt and umount the disk group. umount the disk group from all nodes.

    ASMCMD [+] > umount DATAC1


    ASMCMD [+] > umount RECOC1


    ASMCMD [+] > lsdg
    State    Type  Rebal  Sector  Block       AU  Total_MB  Free_MB  Req_mir_free_MB  Usable_file_MB  Offline_disks  Voting_files  Name
    MOUNTED  HIGH  N         512   4096  4194304   2404640  2402468            68704          777921              0             Y  DBFS_DG/


    Note: If you don’t stop the databases using ASM disk group you will get the following error message:


    ASMCMD [+] > umount DATAC1
    ORA-15032: not all alterations performed
    ORA-15027: active use of diskgroup “DATAC1” precludes its dismount (DBD ERROR: OCIStmtExecute)


    *** Repeat the above steps on all the remaining nodes in the Cluster***


    [oracle@dm01db01 ~]$ ssh dm01db02
    Last login: Thu May 17 15:23:31 2018 from dm01db01


    [oracle@dm01db02 ~]$ . oraenv
    ORACLE_SID = [oracle] ? +ASM2
    The Oracle base has been set to /u01/app/oracle


    [oracle@dm01db02 ~]$ asmcmd lsdg
    State    Type    Rebal  Sector  Block       AU   Total_MB    Free_MB  Req_mir_free_MB  Usable_file_MB  Offline_disks  Voting_files  Name
    MOUNTED  HIGH    N         512   4096  4194304  272154624  271558968          6479872        88359698              0             N  DATAC1/
    MOUNTED  HIGH    N         512   4096  4194304    2404640    2402468            68704          777921              0             Y  DBFS_DG/
    MOUNTED  NORMAL  N         512   4096  4194304   45389568   45385040           540352        22422344              0             N  RECOC1/


    [oracle@dm01db02 ~]$ asmcmd umount DATAC1


    [oracle@dm01db02 ~]$ asmcmd umount RECOC1


    [oracle@dm01db02 ~]$ asmcmd lsdg
    State    Type  Rebal  Sector  Block       AU  Total_MB  Free_MB  Req_mir_free_MB  Usable_file_MB  Offline_disks  Voting_files  Name
    MOUNTED  HIGH  N         512   4096  4194304   2404640  2402468            68704          777921              0             Y  DBFS_DG/


    [oracle@dm01db01 ~]$ ssh dm01db03
    Last login: Thu May 17 15:23:31 2018 from dm01db01


    [oracle@dm01db03 ~]$ . oraenv
    ORACLE_SID = [oracle] ? +ASM3
    The Oracle base has been set to /u01/app/oracle


    [oracle@dm01db03 ~]$ asmcmd umount DATAC1


    [oracle@dm01db03 ~]$ asmcmd umount RECOC1


    [oracle@dm01db03 ~]$ asmcmd lsdg
    State    Type  Rebal  Sector  Block       AU  Total_MB  Free_MB  Req_mir_free_MB  Usable_file_MB  Offline_disks  Voting_files  Name
    MOUNTED  HIGH  N         512   4096  4194304   2404640  2402468            68704          777921              0             Y  DBFS_DG/


    [oracle@dm01db01 ~]$ ssh dm01db04
    Last login: Thu May 17 15:23:31 2018 from dm01db01


    [oracle@dm01db04 ~]$ . oraenv
    ORACLE_SID = [oracle] ? +ASM4
    The Oracle base has been set to /u01/app/oracle


    [oracle@dm01db04 ~]$ asmcmd umount DATAC1


    [oracle@dm01db04 ~]$ asmcmd umount RECOC1


    [oracle@dm01db04 ~]$ asmcmd lsdg
    State    Type  Rebal  Sector  Block       AU  Total_MB  Free_MB  Req_mir_free_MB  Usable_file_MB  Offline_disks  Voting_files  Name
    MOUNTED  HIGH  N         512   4096  4194304   2404640  2402468            68704          777921              0             Y  DBFS_DG/

    • Verify that renamedg is in PATH

    [oracle@dm01db01 ~]$ which renamedg
    /u01/app/11.2.0.4/grid/bin/renamedg

    • As owner of the Grid Infrastruture software execute the renamdg command. Here the owner of GI home is ‘oracle’ user. First I am renaming DATAC1 disk group to DATA

    [oracle@dm01db01 ~]$ renamedg phase=both dgname=DATAC1 newdgname=DATA verbose=true


    NOTE: No asm libraries found in the system
    Parsing parameters..
    Parameters in effect:


             Old DG name       : DATAC1
             New DG name       : DATA
             Phases            :
                     Phase 1
                     Phase 2
             Discovery str      : (null)
             Clean              : TRUE
             Raw only           : TRUE
    renamedg operation: phase=both dgname=DATAC1 newdgname=DATA verbose=true
    Executing phase 1
    Discovering the group
    Performing discovery with string:
    Identified disk OSS::o/192.168.10.9;192.168.10.10/DATAC1_CD_02_dm01cel01 with disk number:74 and timestamp (33068591 612262912)
    Identified disk OSS::o/192.168.10.9;192.168.10.10/DATAC1_CD_11_dm01cel01 with disk number:83 and timestamp (33068591 612262912)
    Identified disk OSS::o/192.168.10.9;192.168.10.10/DATAC1_CD_07_dm01cel01 with disk number:79 and timestamp (33068591 612262912)
    Identified disk OSS::o/192.168.10.9;192.168.10.10/DATAC1_CD_04_dm01cel01 with disk number:76 and timestamp (33068591 612262912)
    Identified disk OSS::o/192.168.10.9;192.168.10.10/DATAC1_CD_05_dm01cel01 with disk number:77 and timestamp (33068591 612262912)
    Identified disk OSS::o/192.168.10.9;192.168.10.10/DATAC1_CD_10_dm01cel01 with disk number:82 and timestamp (33068591 612262912)
    Identified disk OSS::o/192.168.10.9;192.168.10.10/DATAC1_CD_06_dm01cel01 with disk number:78 and timestamp (33068591 612262912)
    Identified disk OSS::o/192.168.10.9;192.168.10.10/DATAC1_CD_03_dm01cel01 with disk number:75 and timestamp (33068591 612262912)
    Identified disk OSS::o/192.168.10.9;192.168.10.10/DATAC1_CD_00_dm01cel01 with disk number:72 and timestamp (33068591 612262912)
    Identified disk OSS::o/192.168.10.9;192.168.10.10/DATAC1_CD_08_dm01cel01 with disk number:80 and timestamp (33068591 612262912)
    Identified disk OSS::o/192.168.10.9;192.168.10.10/DATAC1_CD_01_dm01cel01 with disk number:73 and timestamp (33068591 612262912)
    Identified disk OSS::o/192.168.10.9;192.168.10.10/DATAC1_CD_09_dm01cel01 with disk number:81 and timestamp (33068591 612262912)


    Identified disk OSS::o/192.168.10.21;192.168.10.22/DATAC1_CD_09_dm01cel07 with disk number:69 and timestamp (33068591 612262912)
    Identified disk OSS::o/192.168.10.21;192.168.10.22/DATAC1_CD_03_dm01cel07 with disk number:63 and timestamp (33068591 612262912)
    Identified disk OSS::o/192.168.10.21;192.168.10.22/DATAC1_CD_06_dm01cel07 with disk number:66 and timestamp (33068591 612262912)
    Identified disk OSS::o/192.168.10.21;192.168.10.22/DATAC1_CD_08_dm01cel07 with disk number:68 and timestamp (33068591 612262912)
    Identified disk OSS::o/192.168.10.21;192.168.10.22/DATAC1_CD_04_dm01cel07 with disk number:64 and timestamp (33068591 612262912)
    Identified disk OSS::o/192.168.10.21;192.168.10.22/DATAC1_CD_07_dm01cel07 with disk number:67 and timestamp (33068591 612262912)
    Identified disk OSS::o/192.168.10.21;192.168.10.22/DATAC1_CD_01_dm01cel07 with disk number:61 and timestamp (33068591 612262912)
    Identified disk OSS::o/192.168.10.21;192.168.10.22/DATAC1_CD_05_dm01cel07 with disk number:65 and timestamp (33068591 612262912)
    Identified disk OSS::o/192.168.10.21;192.168.10.22/DATAC1_CD_02_dm01cel07 with disk number:62 and timestamp (33068591 612262912)
    Identified disk OSS::o/192.168.10.21;192.168.10.22/DATAC1_CD_00_dm01cel07 with disk number:60 and timestamp (33068591 612262912)
    Identified disk OSS::o/192.168.10.21;192.168.10.22/DATAC1_CD_11_dm01cel07 with disk number:71 and timestamp (33068591 612262912)
    Identified disk OSS::o/192.168.10.21;192.168.10.22/DATAC1_CD_10_dm01cel07 with disk number:70 and timestamp (33068591 612262912)
    Checking for hearbeat…
    Re-discovering the group
    Performing discovery with string:
    Identified disk OSS::o/192.168.10.9;192.168.10.10/DATAC1_CD_02_dm01cel01 with disk number:74 and timestamp (33068591 612262912)
    Identified disk OSS::o/192.168.10.9;192.168.10.10/DATAC1_CD_11_dm01cel01 with disk number:83 and timestamp (33068591 612262912)
    Identified disk OSS::o/192.168.10.9;192.168.10.10/DATAC1_CD_07_dm01cel01 with disk number:79 and timestamp (33068591 612262912)
    Identified disk OSS::o/192.168.10.9;192.168.10.10/DATAC1_CD_04_dm01cel01 with disk number:76 and timestamp (33068591 612262912)
    Identified disk OSS::o/192.168.10.9;192.168.10.10/DATAC1_CD_05_dm01cel01 with disk number:77 and timestamp (33068591 612262912)
    Identified disk OSS::o/192.168.10.9;192.168.10.10/DATAC1_CD_10_dm01cel01 with disk number:82 and timestamp (33068591 612262912)
    Identified disk OSS::o/192.168.10.9;192.168.10.10/DATAC1_CD_06_dm01cel01 with disk number:78 and timestamp (33068591 612262912)
    Identified disk OSS::o/192.168.10.9;192.168.10.10/DATAC1_CD_03_dm01cel01 with disk number:75 and timestamp (33068591 612262912)
    Identified disk OSS::o/192.168.10.9;192.168.10.10/DATAC1_CD_00_dm01cel01 with disk number:72 and timestamp (33068591 612262912)
    Identified disk OSS::o/192.168.10.9;192.168.10.10/DATAC1_CD_08_dm01cel01 with disk number:80 and timestamp (33068591 612262912)
    Identified disk OSS::o/192.168.10.9;192.168.10.10/DATAC1_CD_01_dm01cel01 with disk number:73 and timestamp (33068591 612262912)
    Identified disk OSS::o/192.168.10.9;192.168.10.10/DATAC1_CD_09_dm01cel01 with disk number:81 and timestamp (33068591 612262912)


    Identified disk OSS::o/192.168.10.21;192.168.10.22/DATAC1_CD_09_dm01cel07 with disk number:69 and timestamp (33068591 612262912)
    Identified disk OSS::o/192.168.10.21;192.168.10.22/DATAC1_CD_03_dm01cel07 with disk number:63 and timestamp (33068591 612262912)
    Identified disk OSS::o/192.168.10.21;192.168.10.22/DATAC1_CD_06_dm01cel07 with disk number:66 and timestamp (33068591 612262912)
    Identified disk OSS::o/192.168.10.21;192.168.10.22/DATAC1_CD_08_dm01cel07 with disk number:68 and timestamp (33068591 612262912)
    Identified disk OSS::o/192.168.10.21;192.168.10.22/DATAC1_CD_04_dm01cel07 with disk number:64 and timestamp (33068591 612262912)
    Identified disk OSS::o/192.168.10.21;192.168.10.22/DATAC1_CD_07_dm01cel07 with disk number:67 and timestamp (33068591 612262912)
    Identified disk OSS::o/192.168.10.21;192.168.10.22/DATAC1_CD_01_dm01cel07 with disk number:61 and timestamp (33068591 612262912)
    Identified disk OSS::o/192.168.10.21;192.168.10.22/DATAC1_CD_05_dm01cel07 with disk number:65 and timestamp (33068591 612262912)
    Identified disk OSS::o/192.168.10.21;192.168.10.22/DATAC1_CD_02_dm01cel07 with disk number:62 and timestamp (33068591 612262912)
    Identified disk OSS::o/192.168.10.21;192.168.10.22/DATAC1_CD_00_dm01cel07 with disk number:60 and timestamp (33068591 612262912)
    Identified disk OSS::o/192.168.10.21;192.168.10.22/DATAC1_CD_11_dm01cel07 with disk number:71 and timestamp (33068591 612262912)
    Identified disk OSS::o/192.168.10.21;192.168.10.22/DATAC1_CD_10_dm01cel07 with disk number:70 and timestamp (33068591 612262912)
    Checking if the diskgroup is mounted or used by CSS
    Checking disk number:74
    Checking disk number:83
    Checking disk number:79
    Checking disk number:76
    Checking disk number:77
    Checking disk number:82
    Checking disk number:78
    Checking disk number:75
    Checking disk number:72
    Checking disk number:80
    Checking disk number:73
    Checking disk number:81
    Checking disk number:69
    Checking disk number:63
    Checking disk number:66
    Checking disk number:68
    Checking disk number:64
    Checking disk number:67
    Checking disk number:61
    Checking disk number:65
    Checking disk number:62
    Checking disk number:60


    Generating configuration file..
    Completed phase 1
    Executing phase 2
    Looking for o/192.168.10.9;192.168.10.10/DATAC1_CD_02_dm01cel01
    Modifying the header
    Looking for o/192.168.10.9;192.168.10.10/DATAC1_CD_11_dm01cel01
    Modifying the header
    Looking for o/192.168.10.9;192.168.10.10/DATAC1_CD_07_dm01cel01
    Modifying the header
    Looking for o/192.168.10.9;192.168.10.10/DATAC1_CD_04_dm01cel01
    Modifying the header
    Looking for o/192.168.10.9;192.168.10.10/DATAC1_CD_05_dm01cel01
    Modifying the header
    Looking for o/192.168.10.9;192.168.10.10/DATAC1_CD_10_dm01cel01
    Modifying the header
    Looking for o/192.168.10.9;192.168.10.10/DATAC1_CD_06_dm01cel01
    Modifying the header
    Looking for o/192.168.10.9;192.168.10.10/DATAC1_CD_03_dm01cel01
    Modifying the header
    Looking for o/192.168.10.9;192.168.10.10/DATAC1_CD_00_dm01cel01
    Modifying the header
    Looking for o/192.168.10.9;192.168.10.10/DATAC1_CD_08_dm01cel01
    Modifying the header
    Looking for o/192.168.10.9;192.168.10.10/DATAC1_CD_01_dm01cel01
    Modifying the header


    Modifying the header
    Completed phase 2
    Terminating kgfd context 0x7f9d346240a0

    • Now rename RECOC1 ASM disk group to RECO using renamdg command

    [oracle@dm01db01 ~]$ renamedg phase=both dgname=RECOC1 newdgname=RECO verbose=true


    NOTE: No asm libraries found in the system
    Parsing parameters..
    Parameters in effect:


             Old DG name       : RECOC1
             New DG name       : RECO
             Phases            :
                     Phase 1
                     Phase 2
             Discovery str      : (null)
             Clean              : TRUE
             Raw only           : TRUE
    renamedg operation: phase=both dgname=RECOC1 newdgname=RECO verbose=true
    Executing phase 1
    Discovering the group
    Performing discovery with string:
    Identified disk OSS::o/192.168.10.9;192.168.10.10/RECOC1_CD_03_dm01cel01 with disk number:75 and timestamp (33068591 628813824)
    Identified disk OSS::o/192.168.10.9;192.168.10.10/RECOC1_CD_04_dm01cel01 with disk number:76 and timestamp (33068591 628813824)
    Identified disk OSS::o/192.168.10.9;192.168.10.10/RECOC1_CD_05_dm01cel01 with disk number:77 and timestamp (33068591 628813824)
    Identified disk OSS::o/192.168.10.9;192.168.10.10/RECOC1_CD_00_dm01cel01 with disk number:72 and timestamp (33068591 628813824)
    Identified disk OSS::o/192.168.10.9;192.168.10.10/RECOC1_CD_10_dm01cel01 with disk number:82 and timestamp (33068591 628813824)
    Identified disk OSS::o/192.168.10.9;192.168.10.10/RECOC1_CD_07_dm01cel01 with disk number:79 and timestamp (33068591 628813824)
    Identified disk OSS::o/192.168.10.9;192.168.10.10/RECOC1_CD_02_dm01cel01 with disk number:74 and timestamp (33068591 628813824)
    Identified disk OSS::o/192.168.10.9;192.168.10.10/RECOC1_CD_01_dm01cel01 with disk number:73 and timestamp (33068591 628813824)
    Identified disk OSS::o/192.168.10.9;192.168.10.10/RECOC1_CD_11_dm01cel01 with disk number:83 and timestamp (33068591 628813824)
    Identified disk OSS::o/192.168.10.9;192.168.10.10/RECOC1_CD_08_dm01cel01 with disk number:80 and timestamp (33068591 628813824)
    Identified disk OSS::o/192.168.10.9;192.168.10.10/RECOC1_CD_09_dm01cel01 with disk number:81 and timestamp (33068591 628813824)
    Identified disk OSS::o/192.168.10.9;192.168.10.10/RECOC1_CD_06_dm01cel01 with disk number:78 and timestamp (33068591 628813824)


    Identified disk OSS::o/192.168.10.21;192.168.10.22/RECOC1_CD_01_dm01cel07 with disk number:61 and timestamp (33068591 628813824)
    Identified disk OSS::o/192.168.10.21;192.168.10.22/RECOC1_CD_08_dm01cel07 with disk number:68 and timestamp (33068591 628813824)
    Identified disk OSS::o/192.168.10.21;192.168.10.22/RECOC1_CD_06_dm01cel07 with disk number:66 and timestamp (33068591 628813824)
    Identified disk OSS::o/192.168.10.21;192.168.10.22/RECOC1_CD_11_dm01cel07 with disk number:71 and timestamp (33068591 628813824)
    Identified disk OSS::o/192.168.10.21;192.168.10.22/RECOC1_CD_10_dm01cel07 with disk number:70 and timestamp (33068591 628813824)
    Identified disk OSS::o/192.168.10.21;192.168.10.22/RECOC1_CD_05_dm01cel07 with disk number:65 and timestamp (33068591 628813824)
    Identified disk OSS::o/192.168.10.21;192.168.10.22/RECOC1_CD_00_dm01cel07 with disk number:60 and timestamp (33068591 628813824)
    Identified disk OSS::o/192.168.10.21;192.168.10.22/RECOC1_CD_03_dm01cel07 with disk number:63 and timestamp (33068591 628813824)
    Identified disk OSS::o/192.168.10.21;192.168.10.22/RECOC1_CD_09_dm01cel07 with disk number:69 and timestamp (33068591 628813824)
    Identified disk OSS::o/192.168.10.21;192.168.10.22/RECOC1_CD_07_dm01cel07 with disk number:67 and timestamp (33068591 628813824)
    Identified disk OSS::o/192.168.10.21;192.168.10.22/RECOC1_CD_02_dm01cel07 with disk number:62 and timestamp (33068591 628813824)
    Identified disk OSS::o/192.168.10.21;192.168.10.22/RECOC1_CD_04_dm01cel07 with disk number:64 and timestamp (33068591 628813824)
    Checking for hearbeat…
    Re-discovering the group
    Performing discovery with string:
    Identified disk OSS::o/192.168.10.9;192.168.10.10/RECOC1_CD_03_dm01cel01 with disk number:75 and timestamp (33068591 628813824)
    Identified disk OSS::o/192.168.10.9;192.168.10.10/RECOC1_CD_04_dm01cel01 with disk number:76 and timestamp (33068591 628813824)
    Identified disk OSS::o/192.168.10.9;192.168.10.10/RECOC1_CD_05_dm01cel01 with disk number:77 and timestamp (33068591 628813824)
    Identified disk OSS::o/192.168.10.9;192.168.10.10/RECOC1_CD_00_dm01cel01 with disk number:72 and timestamp (33068591 628813824)
    Identified disk OSS::o/192.168.10.9;192.168.10.10/RECOC1_CD_10_dm01cel01 with disk number:82 and timestamp (33068591 628813824)
    Identified disk OSS::o/192.168.10.9;192.168.10.10/RECOC1_CD_07_dm01cel01 with disk number:79 and timestamp (33068591 628813824)
    Identified disk OSS::o/192.168.10.9;192.168.10.10/RECOC1_CD_02_dm01cel01 with disk number:74 and timestamp (33068591 628813824)
    Identified disk OSS::o/192.168.10.9;192.168.10.10/RECOC1_CD_01_dm01cel01 with disk number:73 and timestamp (33068591 628813824)
    Identified disk OSS::o/192.168.10.9;192.168.10.10/RECOC1_CD_11_dm01cel01 with disk number:83 and timestamp (33068591 628813824)
    Identified disk OSS::o/192.168.10.9;192.168.10.10/RECOC1_CD_08_dm01cel01 with disk number:80 and timestamp (33068591 628813824)
    Identified disk OSS::o/192.168.10.9;192.168.10.10/RECOC1_CD_09_dm01cel01 with disk number:81 and timestamp (33068591 628813824)
    Identified disk OSS::o/192.168.10.9;192.168.10.10/RECOC1_CD_06_dm01cel01 with disk number:78 and timestamp (33068591 628813824)


    Identified disk OSS::o/192.168.10.21;192.168.10.22/RECOC1_CD_01_dm01cel07 with disk number:61 and timestamp (33068591 628813824)
    Identified disk OSS::o/192.168.10.21;192.168.10.22/RECOC1_CD_08_dm01cel07 with disk number:68 and timestamp (33068591 628813824)
    Identified disk OSS::o/192.168.10.21;192.168.10.22/RECOC1_CD_06_dm01cel07 with disk number:66 and timestamp (33068591 628813824)
    Identified disk OSS::o/192.168.10.21;192.168.10.22/RECOC1_CD_11_dm01cel07 with disk number:71 and timestamp (33068591 628813824)
    Identified disk OSS::o/192.168.10.21;192.168.10.22/RECOC1_CD_10_dm01cel07 with disk number:70 and timestamp (33068591 628813824)
    Identified disk OSS::o/192.168.10.21;192.168.10.22/RECOC1_CD_05_dm01cel07 with disk number:65 and timestamp (33068591 628813824)
    Identified disk OSS::o/192.168.10.21;192.168.10.22/RECOC1_CD_00_dm01cel07 with disk number:60 and timestamp (33068591 628813824)
    Identified disk OSS::o/192.168.10.21;192.168.10.22/RECOC1_CD_03_dm01cel07 with disk number:63 and timestamp (33068591 628813824)
    Identified disk OSS::o/192.168.10.21;192.168.10.22/RECOC1_CD_09_dm01cel07 with disk number:69 and timestamp (33068591 628813824)
    Identified disk OSS::o/192.168.10.21;192.168.10.22/RECOC1_CD_07_dm01cel07 with disk number:67 and timestamp (33068591 628813824)
    Identified disk OSS::o/192.168.10.21;192.168.10.22/RECOC1_CD_02_dm01cel07 with disk number:62 and timestamp (33068591 628813824)
    Identified disk OSS::o/192.168.10.21;192.168.10.22/RECOC1_CD_04_dm01cel07 with disk number:64 and timestamp (33068591 628813824)


    Checking if the diskgroup is mounted or used by CSS
    Checking disk number:75
    Checking disk number:76
    Checking disk number:77
    Checking disk number:72
    Checking disk number:82
    Checking disk number:79
    Checking disk number:74
    Checking disk number:73
    Checking disk number:83
    Checking disk number:80
    Checking disk number:81
    Checking disk number:78
    Checking disk number:61
    Checking disk number:68
    Checking disk number:66
    Checking disk number:71
    Checking disk number:70
    Checking disk number:65
    Checking disk number:60
    Checking disk number:63
    Checking disk number:69
    Checking disk number:67
    Checking disk number:62
    Checking disk number:64
    Checking disk number:49


    Generating configuration file..
    Completed phase 1
    Executing phase 2
    Looking for o/192.168.10.9;192.168.10.10/RECOC1_CD_03_dm01cel01
    Modifying the header
    Looking for o/192.168.10.9;192.168.10.10/RECOC1_CD_04_dm01cel01
    Modifying the header
    Looking for o/192.168.10.9;192.168.10.10/RECOC1_CD_05_dm01cel01
    Modifying the header
    Looking for o/192.168.10.9;192.168.10.10/RECOC1_CD_00_dm01cel01
    Modifying the header
    Looking for o/192.168.10.9;192.168.10.10/RECOC1_CD_10_dm01cel01
    Modifying the header
    Looking for o/192.168.10.9;192.168.10.10/RECOC1_CD_07_dm01cel01
    Modifying the header
    Looking for o/192.168.10.9;192.168.10.10/RECOC1_CD_02_dm01cel01
    Modifying the header
    Looking for o/192.168.10.9;192.168.10.10/RECOC1_CD_01_dm01cel01
    Modifying the header
    Looking for o/192.168.10.9;192.168.10.10/RECOC1_CD_11_dm01cel01
    Modifying the header
    Looking for o/192.168.10.9;192.168.10.10/RECOC1_CD_08_dm01cel01
    Modifying the header
    Looking for o/192.168.10.9;192.168.10.10/RECOC1_CD_09_dm01cel01
    Modifying the header
    Looking for o/192.168.10.9;192.168.10.10/RECOC1_CD_06_dm01cel01
    Modifying the header


    Modifying the header
    Completed phase 2
    Terminating kgfd context 0x7f8d42f6c0a0

    • Mount the DATA and RECO ASM disk groups on all the nodes.

    [oracle@dm01db01 ~]$ asmcmd -p


    ASMCMD [+] > lsdg
    State    Type  Rebal  Sector  Block       AU  Total_MB  Free_MB  Req_mir_free_MB  Usable_file_MB  Offline_disks  Voting_files  Name
    MOUNTED  HIGH  N         512   4096  4194304   2404640  2402468            68704          777921              0             Y  DBFS_DG/


    ASMCMD [+] > mount DATA


    ASMCMD [+] > mount RECO


    ASMCMD [+] > lsdg
    State    Type    Rebal  Sector  Block       AU   Total_MB    Free_MB  Req_mir_free_MB  Usable_file_MB  Offline_disks  Voting_files  Name
    MOUNTED  HIGH    N         512   4096  4194304  272154624  271558968          6479872        88359698              0             N  DATA/
    MOUNTED  HIGH    N         512   4096  4194304    2404640    2402468            68704          777921              0             Y  DBFS_DG/
    MOUNTED  NORMAL  N         512   4096  4194304   45389568   45385040           540352        22422344              0             N  RECO/


    *** Repeat the above steps on all the remaning compute nodes in the Cluster***


    Note: 

    • renamedg utility cannot rename the associated ASM/Grid disk disk name
    • renamedg utility cannot rename/update the control files, datafiles, redo log files and any other files that reference ASM DG for all databases


    Steps to rename control files, datafiles, redo log files and other database files


    • Update SPFILE location

    [oracle@dm01db01 ~]$ cd $ORACLE_HOME/dbs


    [oracle@dm01db01 dbs]$ cat initdbm011.ora
    SPFILE=’+DATAC1/dbm01/spfiledbm01.ora’


    [oracle@dm01db01 dbs]$ vi initdbm011.ora


    [oracle@dm01db01 dbs]$ cat initdbm011.ora
    SPFILE=’+DATA/dbm01/spfiledbm01.ora’


    [oracle@dm01db01 dbs]$ scp initdbm011.ora dm01db02:/u01/app/oracle/product/11.2.0.4/dbhome/dbs/initdbm012.ora
    initdbm011.ora                                                                                                                                             100%   42     0.0KB/s   00:00


    [oracle@dm01db01 dbs]$ scp initdbm011.ora dm01db03:/u01/app/oracle/product/11.2.0.4/dbhome/dbs/initdbm013.ora
    initdbm011.ora                                                                                                                                             100%   42     0.0KB/s   00:00


    [oracle@dm01db01 dbs]$ scp initdbm011.ora dm01db04:/u01/app/oracle/product/11.2.0.4/dbhome/dbs/initdbm014.ora
    initdbm011.ora                                                                                                                                             100%   42     0.0KB/s   00:00

    • Update control file location

    [oracle@dm01db01 dbs]$ . oraenv
    ORACLE_SID = [dbm011] ?
    The Oracle base remains unchanged with value /u01/app/oracle


    [oracle@dm01db01 dbs]$ sqlplus / as sysdba


    SQL*Plus: Release 11.2.0.4.0 Production on Fri May 25 10:17:49 2018
    Copyright (c) 1982, 2013, Oracle.  All rights reserved.
    Connected to an idle instance.


    SQL> startup nomount;
    ORACLE instance started.


    Total System Global Area 2.5655E+10 bytes
    Fixed Size                  2265224 bytes
    Variable Size            4160753528 bytes
    Database Buffers         2.1341E+10 bytes
    Redo Buffers              151113728 bytes


    SQL> show parameter control_files


    NAME                                 TYPE        VALUE
    ———————————— ———– ——————————
    control_files                        string      +DATAC1/dbm01/controlfile/current.256.976374731


    SQL> alter system set control_files=’+DATA/dbm01/controlfile/current.256.976374731′ scope=spfile;


    System altered.


    SQL> shutdown immediate;
    ORA-01507: database not mounted


    ORACLE instance shut down.
    SQL> startup mount
    ORACLE instance started.


    Total System Global Area 2.5655E+10 bytes
    Fixed Size                  2265224 bytes
    Variable Size            4160753528 bytes
    Database Buffers         2.1341E+10 bytes
    Redo Buffers              151113728 bytes
    Database mounted.


    SQL> select name from v$controlfile;


    NAME
    ——————————————————————————–
    +DATA/dbm01/controlfile/current.256.976374731

    • Update datafile and redo log file locations

    SQL> select name from v$datafile;


    NAME
    ——————————————————————————–
    +DATAC1/dbm01/datafile/system.259.976374739
    +DATAC1/dbm01/datafile/sysaux.260.976374743
    +DATAC1/dbm01/datafile/undotbs1.261.976374745
    +DATAC1/dbm01/datafile/undotbs2.263.976374753
    +DATAC1/dbm01/datafile/undotbs3.264.976374755
    +DATAC1/dbm01/datafile/undotbs4.265.976374757
    +DATAC1/dbm01/datafile/users.266.976374757


    7 rows selected.


    SQL> select member from v$logfile;


    MEMBER
    ——————————————————————————–
    +DATAC1/dbm01/onlinelog/group_1.257.976374733
    +DATAC1/dbm01/onlinelog/group_2.258.976374735
    +DATAC1/dbm01/onlinelog/group_7.267.976375073
    +DATAC1/dbm01/onlinelog/group_8.268.976375075
    +DATAC1/dbm01/onlinelog/group_5.269.976375079
    +DATAC1/dbm01/onlinelog/group_6.270.976375083
    +DATAC1/dbm01/onlinelog/group_3.271.976375085
    +DATAC1/dbm01/onlinelog/group_4.272.976375087
    +DATAC1/dbm01/onlinelog/group_9.274.976375205
    +DATAC1/dbm01/onlinelog/group_10.275.976375209
    +DATAC1/dbm01/onlinelog/group_11.276.976375211
    +DATAC1/dbm01/onlinelog/group_12.277.976375215
    +DATAC1/dbm01/onlinelog/group_13.278.976375217
    +DATAC1/dbm01/onlinelog/group_14.279.976375219
    +DATAC1/dbm01/onlinelog/group_15.280.976375223
    +DATAC1/dbm01/onlinelog/group_16.281.976375225


    16 rows selected.


    SQL> alter database rename file ‘+DATAC1/dbm01/datafile/system.259.976374739’ to ‘+DATA/dbm01/datafile/system.259.976374739’;


    Database altered.


    SQL> alter database rename file ‘+DATAC1/dbm01/datafile/sysaux.260.976374743’ to ‘+DATA/dbm01/datafile/sysaux.260.976374743’;


    Database altered.


    SQL> alter database rename file ‘+DATAC1/dbm01/datafile/undotbs1.261.976374745’ to ‘+DATA/dbm01/datafile/undotbs1.261.976374745’;


    Database altered.


    SQL> alter database rename file ‘+DATAC1/dbm01/datafile/undotbs2.263.976374753’ to ‘+DATA/dbm01/datafile/undotbs2.263.976374753’;


    Database altered.


    SQL> alter database rename file ‘+DATAC1/dbm01/datafile/undotbs3.264.976374755’ to ‘+DATA/dbm01/datafile/undotbs3.264.976374755’;


    Database altered.


    SQL> alter database rename file ‘+DATAC1/dbm01/datafile/undotbs4.265.976374757’ to ‘+DATA/dbm01/datafile/undotbs4.265.976374757’;


    Database altered.


    SQL> alter database rename file ‘+DATAC1/dbm01/datafile/users.266.976374757’ to ‘+DATA/dbm01/datafile/users.266.976374757’;


    Database altered.


    SQL> alter database rename file ‘+DATAC1/dbm01/onlinelog/group_1.257.976374733’  to ‘+DATA/dbm01/onlinelog/group_1.257.976374733’;


    Database altered.


    SQL> alter database rename file ‘+DATAC1/dbm01/onlinelog/group_2.258.976374735’  to ‘+DATA/dbm01/onlinelog/group_2.258.976374735’;


    Database altered.


    SQL> alter database rename file ‘+DATAC1/dbm01/onlinelog/group_7.267.976375073’  to ‘+DATA/dbm01/onlinelog/group_7.267.976375073’;


    Database altered.


    SQL> alter database rename file ‘+DATAC1/dbm01/onlinelog/group_8.268.976375075’  to ‘+DATA/dbm01/onlinelog/group_8.268.976375075’;


    Database altered.


    SQL> alter database rename file ‘+DATAC1/dbm01/onlinelog/group_5.269.976375079’  to ‘+DATA/dbm01/onlinelog/group_5.269.976375079’;


    Database altered.


    SQL> alter database rename file ‘+DATAC1/dbm01/onlinelog/group_6.270.976375083’  to ‘+DATA/dbm01/onlinelog/group_6.270.976375083’;


    Database altered.


    SQL> alter database rename file ‘+DATAC1/dbm01/onlinelog/group_3.271.976375085’  to ‘+DATA/dbm01/onlinelog/group_3.271.976375085’;


    Database altered.


    SQL> alter database rename file ‘+DATAC1/dbm01/onlinelog/group_4.272.976375087’  to ‘+DATA/dbm01/onlinelog/group_4.272.976375087’;


    Database altered.


    SQL> alter database rename file ‘+DATAC1/dbm01/onlinelog/group_9.274.976375205’  to ‘+DATA/dbm01/onlinelog/group_9.274.976375205’;


    Database altered.


    SQL> alter database rename file ‘+DATAC1/dbm01/onlinelog/group_10.275.976375209’ to ‘+DATA/dbm01/onlinelog/group_10.275.976375209’;


    Database altered.


    SQL> alter database rename file ‘+DATAC1/dbm01/onlinelog/group_11.276.976375211’ to ‘+DATA/dbm01/onlinelog/group_11.276.976375211’;


    Database altered.


    SQL> alter database rename file ‘+DATAC1/dbm01/onlinelog/group_12.277.976375215’ to ‘+DATA/dbm01/onlinelog/group_12.277.976375215’;


    Database altered.


    SQL> alter database rename file ‘+DATAC1/dbm01/onlinelog/group_13.278.976375217’ to ‘+DATA/dbm01/onlinelog/group_13.278.976375217’;


    Database altered.


    SQL> alter database rename file ‘+DATAC1/dbm01/onlinelog/group_14.279.976375219’ to ‘+DATA/dbm01/onlinelog/group_14.279.976375219’;


    Database altered.


    SQL> alter database rename file ‘+DATAC1/dbm01/onlinelog/group_15.280.976375223’ to ‘+DATA/dbm01/onlinelog/group_15.280.976375223’;


    Database altered.


    SQL> alter database rename file ‘+DATAC1/dbm01/onlinelog/group_16.281.976375225’ to ‘+DATA/dbm01/onlinelog/group_16.281.976375225’;


    Database altered.

    • Verify the datafiles and redo log files names

    SQL> select name from v$datafile;


    NAME
    ——————————————————————————–
    +DATA/dbm01/datafile/system.259.976374739
    +DATA/dbm01/datafile/sysaux.260.976374743
    +DATA/dbm01/datafile/undotbs1.261.976374745
    +DATA/dbm01/datafile/undotbs2.263.976374753
    +DATA/dbm01/datafile/undotbs3.264.976374755
    +DATA/dbm01/datafile/undotbs4.265.976374757
    +DATA/dbm01/datafile/users.266.976374757


    7 rows selected.


    SQL> select member from v$logfile;


    MEMBER
    ——————————————————————————–
    +DATA/dbm01/onlinelog/group_1.257.976374733
    +DATA/dbm01/onlinelog/group_2.258.976374735
    +DATA/dbm01/onlinelog/group_7.267.976375073
    +DATA/dbm01/onlinelog/group_8.268.976375075
    +DATA/dbm01/onlinelog/group_5.269.976375079
    +DATA/dbm01/onlinelog/group_6.270.976375083
    +DATA/dbm01/onlinelog/group_3.271.976375085
    +DATA/dbm01/onlinelog/group_4.272.976375087
    +DATA/dbm01/onlinelog/group_9.274.976375205
    +DATA/dbm01/onlinelog/group_10.275.976375209
    +DATA/dbm01/onlinelog/group_11.276.976375211
    +DATA/dbm01/onlinelog/group_12.277.976375215
    +DATA/dbm01/onlinelog/group_13.278.976375217
    +DATA/dbm01/onlinelog/group_14.279.976375219
    +DATA/dbm01/onlinelog/group_15.280.976375223
    +DATA/dbm01/onlinelog/group_16.281.976375225


    16 rows selected.

    • Update block change tracking file location

    SQL> alter database rename file ‘+DATAC1/dbm01/changetracking/ctf.282.976375227’ to ‘+DATA/dbm01/changetracking/ctf.282.976375227’;


    Database altered.


    SQL> select * from v$block_change_tracking;


    STATUS
    ———-
    FILENAME
    ——————————————————————————–
         BYTES
    ———-
    ENABLED
    +DATA/dbm01/changetracking/ctf.282.976375227
      11599872

    • Update OMF related parameters

    SQL> show parameter db_create_online_log_dest_1


    NAME                                 TYPE        VALUE
    ———————————— ———– ——————————
    db_create_online_log_dest_1          string      +DATAC1


    SQL> alter system set db_create_online_log_dest_1=’+DATA’;


    System altered.


    SQL> show parameter db_create_online_log_dest_1


    NAME                                 TYPE        VALUE
    ———————————— ———– ——————————
    db_create_online_log_dest_1          string      +DATA

    • Update Fast Recovery Area location

    SQL> show parameter db_recovery_file_dest


    NAME                                 TYPE        VALUE
    ———————————— ———– ——————————
    db_recovery_file_dest                string      +RECOC1
    db_recovery_file_dest_size           big integer 20425000M


    SQL> alter system set db_recovery_file_dest=’+RECO’;


    System altered.


    SQL> show parameter db_recovery_file_dest


    NAME                                 TYPE        VALUE
    ———————————— ———– ——————————
    db_recovery_file_dest                string      +RECO
    db_recovery_file_dest_size           big integer 20425000M

    • Shutdown the database

    SQL> shutdown immediate;
    Database closed.
    Database dismounted.
    ORACLE instance shut down.
    SQL> exit

    • Update the database configuration

    [oracle@dm01db01 dbs]$ srvctl config database -d dbm01
    Database unique name: dbm01
    Database name: dbm01
    Oracle home: /u01/app/oracle/product/11.2.0.4/dbhome
    Oracle user: oracle
    Spfile: +DATAC1/dbm01/spfiledbm01.ora
    Domain:
    Start options: open
    Stop options: immediate
    Database role: PRIMARY
    Management policy: AUTOMATIC
    Server pools: dbm01
    Database instances: dbm011,dbm012,dbm013,dbm014
    Disk Groups: DATAC1,RECOC1,DATA
    Mount point paths:
    Services:
    Type: RAC
    Database is administrator managed


    [oracle@dm01db01 dbs]$ srvctl modify database -p +DATA/dbm01/spfiledbm01.ora -a DATA,RECO -d dbm01


    [oracle@dm01db01 dbs]$ srvctl config database -d dbm01
    Database unique name: dbm01
    Database name: dbm01
    Oracle home: /u01/app/oracle/product/11.2.0.4/dbhome
    Oracle user: oracle
    Spfile: +DATA/dbm01/spfiledbm01.ora
    Domain:
    Start options: open
    Stop options: immediate
    Database role: PRIMARY
    Management policy: AUTOMATIC
    Server pools: dbm01
    Database instances: dbm011,dbm012,dbm013,dbm014
    Disk Groups: DATA,RECO
    Mount point paths:
    Services:
    Type: RAC
    Database is administrator managed

    • Start the database and verify

    [oracle@dm01db01 dbs]$ srvctl start database -d dbm01


    [oracle@dm01db01 dbs]$ srvctl status database -d dbm01
    Instance dbm011 is running on node dm01db01
    Instance dbm012 is running on node dm01db02
    Instance dbm013 is running on node dm01db03
    Instance dbm014 is running on node dm01db04


    [oracle@dm01db01 dbs]$ sqlplus / as sysdba


    SQL*Plus: Release 11.2.0.4.0 Production on Fri May 25 10:40:34 2018
    Copyright (c) 1982, 2013, Oracle.  All rights reserved.


    Connected to:
    Oracle Database 11g Enterprise Edition Release 11.2.0.4.0 – 64bit Production
    With the Partitioning, Real Application Clusters, Automatic Storage Management, OLAP,
    Data Mining and Real Application Testing options


    SQL> select name, open_mode,database_role from gv$database;


    NAME      OPEN_MODE            DATABASE_ROLE
    ——— ——————– —————-
    DBM01     READ WRITE           PRIMARY
    DBM01     READ WRITE           PRIMARY
    DBM01     READ WRITE           PRIMARY
    DBM01     READ WRITE           PRIMARY


    ORACLE_SID = [+ASM1] ? dbm011
    The Oracle base remains unchanged with value /u01/app/oracle


    [oracle@dm01db01 ~]$ sqlplus / as sysdba


    SQL*Plus: Release 11.2.0.4.0 Production on Thu May 24 16:36:34 2018
    Copyright (c) 1982, 2013, Oracle.  All rights reserved.


    Connected to:
    Oracle Database 11g Enterprise Edition Release 11.2.0.4.0 – 64bit Production
    With the Partitioning, Real Application Clusters, Automatic Storage Management, OLAP,
    Data Mining and Real Application Testing options


    SQL> select * from v$version;


    BANNER
    ——————————————————————————–
    Oracle Database 11g Enterprise Edition Release 11.2.0.4.0 – 64bit Production
    PL/SQL Release 11.2.0.4.0 – Production
    CORE    11.2.0.4.0      Production
    TNS for Linux: Version 11.2.0.4.0 – Production
    NLSRTL Version 11.2.0.4.0 – Production


    [oracle@dm01db01 ~]$ . oraenv


    ORACLE_SID = [oracle] ? +ASM1
    The Oracle base has been set to /u01/app/oracle


    [oracle@dm01db01 ~]$ asmcmd -p


    ASMCMD [+] > lsdg
    State    Type    Rebal  Sector  Block       AU   Total_MB    Free_MB  Req_mir_free_MB  Usable_file_MB  Offline_disks  Voting_files  Name
    MOUNTED  HIGH    N         512   4096  4194304  272154624  271558968          6479872        88359698              0             N  DATAC1/
    MOUNTED  HIGH    N         512   4096  4194304    2404640    2402468            68704          777921              0             Y  DBFS_DG/
    MOUNTED  NORMAL  N         512   4096  4194304   45389568   45386648           540352        22423148              0             N  RECOC1/


    ASMCMD [+] > lsct
    DB_Name  Status     Software_Version  Compatible_version  Instance_Name  Disk_Group
    +ASM     CONNECTED        11.2.0.4.0          11.2.0.4.0  +ASM1          DBFS_DG
    DBM01    CONNECTED        11.2.0.4.0          11.2.0.4.0  dbm011         DATAC1


    [oracle@dm01db01 ~]$ srvctl status database -d dbm01
    Instance dbm011 is running on node dm01db01
    Instance dbm012 is running on node dm01db02
    Instance dbm013 is running on node dm01db03
    Instance dbm014 is running on node dm01db04


    Conclusion


    In this article we have learned how to rename an ASM Disk group on Exadata running Oracle Database 11.2. Starting with Oracle Database 11.2 you can use the renamedg command to rename an ASM Disk Group. renamedg utility cannot rename the associated ASM/Grid disk disk name. Also renamedg cannot rename/update the control files, datafiles, redo log files and any other files that reference ASM DG for all databases. You must update database files manually after renaming ASM disk groups.

  • Create Cell Disk and Grid Disk Manually on Exadata

    We had a failed hard disk on a Exadata Storage cell X6-2. So we scheduled the Oracle Field Engineer to replace the bad disk. Oracle Field Engineer came onsite and replaced the faulty hard disk. Post hard disk replacement we found that the physical disk and luns are created successfully but the Cell disk and Grid disks were not created automatically. When a hard disk is replaced, the lun, cell disk and grid disks are created automatically and grid disks are added to ASM disk group for you without any manual intervention. In some odd cases, the Cell disk and grid disks are not created automatically, in those cases you must manually create the Cell disk, create the Grid disks with proper sizes and add them to the ASM disk group.


    In this article we will demonstrate how to create the Cell disk, Grid disks manually and add them to the respective ASM Disk Group.


    Environment

    • Exadata X6-2 Elastic Configuration
    • 4 Compute nodes and 6 Storage cells
    • Hard Disk Size: 8TB
    • 3 ASM Disk Group: DATA, RECO & DBFS_DG
    • Total Number of Grid disks: DATA – 72, RECO – 72 & DBFS_DG – 60

    Here the disk in the location 8:5 was back and replaced.


    Before Replacing Hard Disk:


    CellCLI> list physicaldisk
             8:0             PYJZKV                  normal
             8:1             PMU3LV                  normal
             8:2             P1Y2KV                  normal
             8:3             PYH48V                  normal
             8:4             PY7MAV                  normal
             8:5             PPZ47V                  not present
             8:6             PEJKHR                  normal
             8:7             PY4XSV                  normal
             8:8             PYL00V                  normal
             8:9             PV5RGV                  normal
             8:10            PSU26V                  normal
             8:11            PY522V                  normal
             FLASH_1_1       CVMD522500AG1P6NGN      normal
             FLASH_2_1       CVMD522401AC1P6NGN      normal
             FLASH_4_1       CVMD522500AC1P6NGN      normal
             FLASH_5_1       CVMD5230000Y1P6NGN      normal


    CellCLI> list lun
             0_0     0_0     normal
             0_1     0_1     normal
             0_2     0_2     normal
             0_3     0_3     normal
             0_4     0_4     normal
             0_5     0_5     not present
             0_6     0_6     normal
             0_7     0_7     normal
             0_8     0_8     normal
             0_9     0_9     normal
             0_10    0_10    normal
             0_11    0_11    normal
             1_1     1_1     normal
             2_1     2_1     normal
             4_1     4_1     normal
             5_1     5_1     normal


    After replacing Hard Disk:


    CellCLI> list physicaldisk
             8:0             PYJZKV                  normal
             8:1             PMU3LV                  normal
             8:2             P1Y2KV                  normal
             8:3             PYH48V                  normal
             8:4             PY7MAV                  normal
             8:5             PPZ47V                  normal
             8:6             PEJKHR                  normal
             8:7             PY4XSV                  normal
             8:8             PYL00V                  normal
             8:9             PV5RGV                  normal
             8:10            PSU26V                  normal
             8:11            PY522V                  normal
             FLASH_1_1       CVMD522500AG1P6NGN      normal
             FLASH_2_1       CVMD522401AC1P6NGN      normal
             FLASH_4_1       CVMD522500AC1P6NGN      normal
             FLASH_5_1       CVMD5230000Y1P6NGN      normal


    CellCLI> list lun
             0_0     0_0     normal
             0_1     0_1     normal
             0_2     0_2     normal
             0_3     0_3     normal
             0_4     0_4     normal
             0_5     0_5     normal
             0_6     0_6     normal
             0_7     0_7     normal
             0_8     0_8     normal
             0_9     0_9     normal
             0_10    0_10    normal
             0_11    0_11    normal
             1_1     1_1     normal
             2_1     2_1     normal
             4_1     4_1     normal
             5_1     5_1     normal


    [root@dm01cel03 ~]# cellcli -e list physicaldisk 8:5 detail
             name:                   8:5
             deviceId:               21
             deviceName:             /dev/sdf
             diskType:               HardDisk
             enclosureDeviceId:      8
             errOtherCount:          0
             luns:                   0_5
             makeModel:              “HGST    H7280A520SUN8.0T”
             physicalFirmware:       PD51
             physicalInsertTime:     2018-05-18T10:52:29-05:00
             physicalInterface:      sas
             physicalSerial:         PPZ47V
             physicalSize:           7.1536639072000980377197265625T
             slotNumber:             5
             status:                 normal


    [root@dm01cel03 ~]# cellcli -e list celldisk where lun=0_5 detail


    [root@dm01cel03 ~]# cellcli -e list griddisk where cellDisk=CD_05_cm01cel01 attributes name,status
    DATA_CD_05_dm01cel03 not present
    DBFS_DG_CD_05_dm01cel03 not present
    RECO_CD_05_dm01cel03 not present


    [root@dm01cel03 ~]# cellcli -e list griddisk where celldisk=CD_05_dm01cel03 detail
             name:                   DATA_CD_05_dm01cel03
             availableTo:
             cachingPolicy:          default
             cellDisk:               CD_05_dm01cel03
             comment:                “Cluster dm01-cluster diskgroup DATA”
             creationTime:           2016-03-29T20:25:56-05:00
             diskType:               HardDisk
             errorCount:             0
             id:                     db221d77-25b0-4f9e-af6f-95e1c3134af5
             size:                   5.6953125T
             status:                 not present


             name:                   DBFS_DG_CD_05_dm01cel03
             availableTo:
             cachingPolicy:          default
             cellDisk:               CD_05_dm01cel03
             comment:                “Cluster dm01-cluster diskgroup DBFS_DG”
             creationTime:           2016-03-29T20:25:53-05:00
             diskType:               HardDisk
             errorCount:             0
             id:                     216fbec9-6ed4-4ef6-a0d4-d09517906fd5
             size:                   33.796875G
             status:                 not present


             name:                   RECO_CD_05_dm01cel03
             availableTo:
             cachingPolicy:          none
             cellDisk:               CD_05_dm01cel03
             comment:                “Cluster dm01-cluster diskgroup RECO”
             creationTime:           2016-03-29T20:25:58-05:00
             diskType:               HardDisk
             errorCount:             0
             id:                     e8ca6943-0ddd-48ab-b890-e14bbf4e591c
             size:                   1.42388916015625T
             status:                 not present


    We can clearly see that the GRID DISKs are not present. So we have to create the GRID DISKs Manually.


    Steps to create Celldisk, Griddisks and add them to ASM Disk Group


    • List Cell Disks

    [root@dm01cel03 ~]# cellcli -e list celldisk
             CD_00_dm01cel03         normal
             CD_01_dm01cel03         normal
             CD_02_dm01cel03         normal
             CD_03_dm01cel03         normal
             CD_04_dm01cel03         normal
             CD_05_dm01cel03         not present
             CD_06_dm01cel03         normal
             CD_07_dm01cel03         normal
             CD_08_dm01cel03         normal
             CD_09_dm01cel03         normal
             CD_10_dm01cel03         normal
             CD_11_dm01cel03         normal
             FD_00_dm01cel03         normal
             FD_01_dm01cel03         normal
             FD_02_dm01cel03         normal
             FD_03_dm01cel03         normal

    • List Grid Disks

    [root@dm01cel03 ~]# cellcli -e list griddisk
             DATA_CD_00_dm01cel03       active
             DATA_CD_01_dm01cel03       active
             DATA_CD_02_dm01cel03       active
             DATA_CD_03_dm01cel03       active
             DATA_CD_04_dm01cel03       active
             DATA_CD_05_dm01cel03       not present
             DATA_CD_06_dm01cel03       active
             DATA_CD_07_dm01cel03       active
             DATA_CD_08_dm01cel03       active
             DATA_CD_09_dm01cel03       active
             DATA_CD_10_dm01cel03       active
             DATA_CD_11_dm01cel03       active
             DBFS_DG_CD_02_dm01cel03    active
             DBFS_DG_CD_03_dm01cel03    active
             DBFS_DG_CD_04_dm01cel03    active
             DBFS_DG_CD_05_dm01cel03    not present
             DBFS_DG_CD_06_dm01cel03    active
             DBFS_DG_CD_07_dm01cel03    active
             DBFS_DG_CD_08_dm01cel03    active
             DBFS_DG_CD_09_dm01cel03    active
             DBFS_DG_CD_10_dm01cel03    active
             DBFS_DG_CD_11_dm01cel03    active
             RECO_CD_00_dm01cel03       active
             RECO_CD_01_dm01cel03       active
             RECO_CD_02_dm01cel03       active
             RECO_CD_03_dm01cel03       active
             RECO_CD_04_dm01cel03       active
             RECO_CD_05_dm01cel03       not present
             RECO_CD_06_dm01cel03       active
             RECO_CD_07_dm01cel03       active
             RECO_CD_08_dm01cel03       active
             RECO_CD_09_dm01cel03       active
             RECO_CD_10_dm01cel03       active
             RECO_CD_11_dm01cel03       active

    • List Physical Disk details

    [root@dm01cel03 ~]# cellcli -e list physicaldisk where physicalSerial=PPZ47V detail
             name:                   8:5
             deviceId:               21
             deviceName:             /dev/sdf
             diskType:               HardDisk
             enclosureDeviceId:      8
             errOtherCount:          0
             luns:                   0_5
             makeModel:              “HGST    H7280A520SUN8.0T”
             physicalFirmware:       PD51
             physicalInsertTime:     2018-05-18T10:52:29-05:00
             physicalInterface:      sas
             physicalSerial:         PPZ47V
             physicalSize:           7.1536639072000980377197265625T
             slotNumber:             5
             status:                 normal

    • Let’s try to create the Cell Disk

    [root@dm01cel03 ~]# cellcli -e create celldisk CD_09_dm01cel03 lun=0_5


    CELL-02526: Pre-existing cell disk: CD_09_dm01cel03


    It says the Cell Disk already exists.

    • Let’s try to create the Grid Disk. To create the Grid Disk with proper size, get the Grid Disk size from a good Cell Disk as shown below.

    [root@dm01cel03 ~]# cellcli -e list griddisk where celldisk=CD_07_dm01cel03 attributes name,size,offset
             DATA_CD_07_dm01cel03       5.6953125T              32M
             DBFS_DG_CD_07_dm01cel03         33.796875G         7.1192474365234375T
             RECO_CD_07_dm01cel03       1.42388916015625T       5.6953582763671875T

    • Now create the Grid Disk

    [root@dm01cel03 ~]# cellcli -e create griddisk DATA_CD_05_dm01cel03 celldisk=CD_05_dm01cel03,size=5.6953125T


    CELL-02701: Cannot create grid disk on cell disk CD_05_dm01cel03 because its status is not normal.


    Looks like we can’t create the Grid Disk. We will now drop the Cell Disk and recreate it.

    • Drop Cell Disk

    CellCLI> drop celldisk CD_05_dm01cel03 force
    CellDisk CD_05_dm01cel03 successfully dropped

    • Create Cell Disk

    CellCLI> create celldisk CD_05_dm01cel03 lun=0_5
    CellDisk CD_05_dm01cel03 successfully created

    • Create Grid Disks with proper sizes

    CellCLI> create griddisk DATA_CD_05_dm01cel03 celldisk=CD_05_dm01cel03,size=5.6953125T
    GridDisk DATA_CD_05_dm01cel03 successfully created


    CellCLI> create griddisk RECO_CD_05_dm01cel03 celldisk=CD_05_dm01cel03,size=1.42388916015625T
    GridDisk RECO_CD_05_dm01cel03 successfully created


    CellCLI> create griddisk DBFS_DG_CD_05_dm01cel03 celldisk=CD_05_dm01cel03,size=33.796875G
    GridDisk DBFS_DG_CD_05_dm01cel03 successfully created

    • List Grid Disks

    CellCLI> list griddisk where celldisk=CD_05_dm01cel03 attributes name,size,offset
             DATA_CD_05_dm01cel03       5.6953125T              32M
             DBFS_DG_CD_05_dm01cel03         33.796875G              7.1192474365234375T
             RECO_CD_05_dm01cel03       1.42388916015625T       5.6953582763671875T


    CellCLI> list griddisk
             DATA_CD_00_dm01cel03       active
             DATA_CD_01_dm01cel03       active
             DATA_CD_02_dm01cel03       active
             DATA_CD_03_dm01cel03       active
             DATA_CD_04_dm01cel03       active
             DATA_CD_05_dm01cel03       active
             DATA_CD_06_dm01cel03       active
             DATA_CD_07_dm01cel03       active
             DATA_CD_08_dm01cel03       active
             DATA_CD_09_dm01cel03       active
             DATA_CD_10_dm01cel03       active
             DATA_CD_11_dm01cel03       active
             DBFS_DG_CD_02_dm01cel03    active
             DBFS_DG_CD_03_dm01cel03    active
             DBFS_DG_CD_04_dm01cel03    active
             DBFS_DG_CD_05_dm01cel03    active
             DBFS_DG_CD_06_dm01cel03    active
             DBFS_DG_CD_07_dm01cel03    active
             DBFS_DG_CD_08_dm01cel03    active
             DBFS_DG_CD_09_dm01cel03    active
             DBFS_DG_CD_10_dm01cel03    active
             DBFS_DG_CD_11_dm01cel03    active
             RECO_CD_00_dm01cel03       active
             RECO_CD_01_dm01cel03       active
             RECO_CD_02_dm01cel03       active
             RECO_CD_03_dm01cel03       active
             RECO_CD_04_dm01cel03       active
             RECO_CD_05_dm01cel03       active
             RECO_CD_06_dm01cel03       active
             RECO_CD_07_dm01cel03       active
             RECO_CD_08_dm01cel03       active
             RECO_CD_09_dm01cel03       active
             RECO_CD_10_dm01cel03       active
             RECO_CD_11_dm01cel03       active


    The Grid Disks show active now. We can go ahead and add them to ASM disk Group Manually by connecting to ASM instance.


    • Log into +ASM1 instance and add the new disk.  Set the rebalance power higher (11) to perform faster rebalance operation.

    dm01db01-orcldb1 {/home/oracle}:. oraenv
    ORACLE_SID = [orcldb1] ? +ASM1
    The Oracle base remains unchanged with value /u01/app/oracle
    dm01db01-+ASM1 {/home/oracle}:sqlplus / as sysasm


    SQL*Plus: Release 11.2.0.4.0 Production on Wed May 23 09:30:13 2018
    Copyright (c) 1982, 2013, Oracle.  All rights reserved.


    Connected to:
    Oracle Database 11g Enterprise Edition Release 11.2.0.4.0 – 64bit Production
    With the Real Application Clusters and Automatic Storage Management options


    SQL> alter diskgroup DATA add failgroup dm01CEL03 disk ‘o/192.168.10.1;192.168.10.2/DATA_CD_05_dm01cel03’ name DATA_CD_05_dm01cel03 rebalance power 11;


    Diskgroup altered.


    SQL> alter diskgroup RECO add failgroup dm01CEL03 disk ‘o/192.168.10.1;192.168.10.2/RECO_CD_05_dm01cel03’ name RECO_CD_05_dm01cel03 rebalance power 11;


    Diskgroup altered.


    SQL> alter diskgroup DBFS_DG add failgroup dm01CEL03 disk ‘o/192.168.10.1;192.168.10.2/DBFS_DG_CD_05_dm01cel03’ name DBFS_DG_CD_05_dm01cel03 rebalance power 11;


    Diskgroup altered.


    SQL> select a.name,a.total_mb,a.free_mb,a.type,
        decode(a.type,’NORMAL’,a.total_mb/2,’HIGH’,a.total_mb/3) avail_mb,
        decode(a.type,’NORMAL’,a.free_mb/2,’HIGH’,a.free_mb/3) usable_mb,
        count(b.path) cell_disks  from v$asm_diskgroup a, v$asm_disk b
        where a.group_number=b.group_number group by a.name,a.total_mb,a.free_mb,a.type,
        decode(a.type,’NORMAL’,a.total_mb/2,’HIGH’,a.total_mb/3) ,
        decode(a.type,’NORMAL’,a.free_mb/2,’HIGH’,a.free_mb/3)
       order by 2,1;


                   Total MB    Free MB          Total MB    Free MB
    Disk Group          Raw        Raw TYPE       Usable     Usable     CELL_DISKS
    ———— ———- ———- —— ———- ———- ———-
    DBFS_DG    2076480    2074688 NORMAL    1038240    1037344         60
    RECO     107500032   57573496 HIGH     35833344   19191165         72
    DATA     429981696  282905064 HIGH    143327232   94301688         72


    SQL> select * from v$asm_operation;


    GROUP_NUMBER OPERA STAT      POWER     ACTUAL      SOFAR   EST_WORK   EST_RATE EST_MINUTES ERROR_CODE
    ———— —– —- ———- ———- ———- ———- ———- ———– ——————————————–
               1 REBAL RUN          11         11      85992    6697959      11260         587
               3 REBAL WAIT         11


    SQL> select * from gv$asm_operation;


    no rows selected


    Conclusion


    In this article we have learned how to create the Celldisk, Griddisks and add the newly created Griddisks to ASM Disk Group. When a hard disk is replaced, the lun, celldisk and griddisks are created automatically and griddisks are added to ASM disk group for you without any manual intervention. In some cases, if the Celldisk and grid disks are not created automatically, then you must manually create them and add them to the ASM disk group.

  • Installing Enterprise Manager 12c Agent on Exadata Using Agent Push Method

    Oracle Exadata Database Machine consists of several components such as Compute nodes, Storage Cells, ILOM, Infiniband Switches, Cisco Switch and PDUs. So we need a tool that can manage all these components from one single console. Oracle Enterprise manager Cloud Control is the recommended best practices for monitoring and managing Exadata Database machine. Once the Exadata database Machine is installed the next step is enable monitoring for it.


    The following Exadata components can be monitored and managed by OEM:

    • Compute Nodes
    • Storage Cells
    • Infiniband Switches
    • Cisco Switches
    • Power Distribution Units
    • KVM

    The first step in monitoring and managing Exadata using OEM is to install the EM Agent. You can install EM Agent in several ways, such as:

    • Using EM Kit Method
    • Using the Agent push method
    • Using an RPM file
    • Using the AgentPull script
    • Using the AgentDeploy script


    In this article we will demonstrate how to Install EM Agent 12c on Exadata using Agent Push method using OEM 12c. Agent Software is installed only on Compute nodes.


    Environment Details


    Here we will be installing EM Agent on a Exadata X5-2 Elastic Rack consists of:

    • 8 Compute Nodes
    • 7 Storage Cells
    • 2 Infiniband Switches
    • 1 Cisco Switches
    • 2 Power Distribution Units


    • Enter the OEM 12c URL into the web browser and
      hit enter
    • Enter the SYSMAN Credentials or any other user
      that have necessary permissions to Install Agent software

    • From the Home page, click on Setup à Add Target à
      Add Targets manually

    • Select Add Host Targets and Click on Add Host

    • On this page, click on the +Add button to add the Host
      targets. 

    • Enter all fully qualified Hostnames (8 compute
      nodes) and for Platform “Same for All Hosts” and click next

    • On this page, do the following:
    Enter the Installation Base Directory.
    The instance base directory will be populated automatically
    for you.
    Click on the + symbol on the Named credentials and enter
    oracle user and its password.
    Click Next

    • Review this information and click Deploy Agent

    • Initialization in progress

    • Initialization completed. Remote prerequisites Checks in progress

    • Remote prerequisites Checks in progress. Review the warnings. We can ignore this error as the Oracle user doesn’t have permissions to execute the root.sh script at the end of the Agent Deployment.

    • Click Continue and Continue, All Hosts

    • Now the Agent deployment in progress

    • Agent Deployment completed successfully. We need to run the root.sh script as root user on all the compute nodes to finish Agent Installation process.

    • Login in to compute node as root user and execute the root.sh script on all nodes using dcli command

    • Verify the OEM Agent status

    This concludes the OEM 12c Agent Installation on Exadata Compute nodes.

    Conclusion

    In this article we have learned how to install OEM Agent 12c on Exadata Database Machine using push Method.
  • Exadata Grid Infrastructure One-off Patch Application

    There are times when you encounter issues related to Database/ASM/Clusterware and Oracle recommends you to apply one-patches to fix the issue. These one-off patches can be applicable to Grid and Oracle Home or in some cases just specific to a particular home. In my cases we were adding Exadata X7-2 Compute nodes and Storage Cells to an Existing Exadata X6-2 Rack, and the prerequisite to do that was to apply the one-off (27965497) to GI home before upgrading the Exadata Cluster.


    In this article we will demonstrate how to apply a one-off patch to Grid Infrastructure home on Exadata Database Machine. Here my GI version is 11.2.0.4.180116


    Steps to apply the one-off patch to GI home


    Note: Read the readme.txt or readme.html file carefully as the steps may change for your environment.


    • Get the Database Status and role

    dm01db01-orcldb1 {/home/oracle}: sqlplus / as sysdba


    SQL> select name, open_mode,database_role from gv$database;


    NAME      OPEN_MODE            DATABASE_ROLE
    ——— ——————– —————-
    ORCLDB   MOUNTED              PHYSICAL STANDBY
    ORCLDB   MOUNTED              PHYSICAL STANDBY
    ORCLDB   MOUNTED              PHYSICAL STANDBY


    • Set Grid Infrastructure environmental variable

    dm01db01-orcldb1 {/home/oracle}: export ORACLE_SID=+ASM1


    dm01db01-orcldb1 {/home/oracle}: export ORACLE_HOME=/u01/app/11.2.0.4/grid


    dm01db01-+ASM1 {/home/oracle}:echo $ORACLE_HOME
    /u01/app/11.2.0.4/grid


    dm01db01-+ASM1 {/home/oracle}: export PATH=$PATH:/u01/app/11.2.0.4/grid/OPatch


    • List the current GI patches

    dm01db01-+ASM1 {/home/oracle}:opatch lspatches
    26925255;DATABASE PATCH FOR EXADATA (Jan 2018 – 11.2.0.4.180116) : (26925255)
    26609929;OCW Patch Set Update : 11.2.0.4.170814 (26609929)
    23727132;
    22502505;ACFS Patch Set Update : 11.2.0.4.160419 (22502505)


    OPatch succeeded.


    • Download, copy and unzip the one-off patch to a staging directory on Exadata Compute node 1.

    [root@dm01db01 GI]# ls -ltr
    total 442668
    -rw-rw-r– 1 oracle oinstall       267 May  8 02:21 bundle.xml
    -rw-rw-r– 1 oracle oinstall     91939 May 14 15:15 README.html
    -rw-rw-r– 1 oracle oinstall     50971 May 14 15:15 README.txt
    -rw-r–r– 1 oracle oinstall 453130872 May 15 12:02 p27965497_11204160419forACFS_Linux-x86-64.zip
    drwxr-xr-x 5 oracle oinstall      4096 May 17 09:40 27965497


    • Login as root user and Navigate to one-off patch directory

    [root@dm01db01 ~]# cd /u01/GI/27965497


    • Set the PATH to include opatch utility from GI home

     [root@dm01db01 27965497]# export PATH=$PATH:/u01/app/11.2.0.4/grid/OPatch


    • Verify opatch utility location

    [root@dm01db01 27965497]# which opatch
    /u01/app/11.2.0.4/grid/OPatch/opatch


    • Verify opatch version. Here the minimum verion required is 11.2.0.3.6

    [root@dm01db01 27965497]# opatch version
    OPatch Version: 11.2.0.3.18


    OPatch succeeded.


    • Make sure that the ASM and Database is up and running

    [root@dm01db01 27965497]# ps -ef|grep smon
    root     277568 254212  0 09:39 pts/1    00:00:00 grep smon
    root     322798      1  3 May02 ?        13:08:10 /u01/app/11.2.0.4/grid/bin/osysmond.bin
    oracle   326697      1  0 May02 ?        00:00:23 asm_smon_+ASM1
    oracle   328622      1  0 May02 ?        00:00:15 ora_smon_orcldb1


    • Create the OCM file as shown below

    [root@dm01db01 27965497]# /u01/app/11.2.0.4/grid/OPatch/ocm/bin/emocmrsp
    OCM Installation Response Generator 10.3.7.0.0 – Production
    Copyright (c) 2005, 2012, Oracle and/or its affiliates.  All rights reserved.


    Provide your email address to be informed of security issues, install and
    initiate Oracle Configuration Manager. Easier for you if you use your My
    Oracle Support Email address/User Name.
    Visit http://www.oracle.com/support/policies.html for details.
    Email address/User Name:


    You have not provided an email address for notification of security issues.
    Do you wish to remain uninformed of security issues ([Y]es, [N]o) [N]:  Y
    The OCM configuration response file (ocm.rsp) was successfully created.
    [root@dm01db01 27965497]#


    [root@dm01db01 27965497]# ls -ltr
    total 16
    drwxr-xr-x 4 oracle oinstall 4096 May  8 02:18 etc
    drwxr-xr-x 3 oracle oinstall 4096 May  8 02:18 custom
    drwxr-xr-x 6 oracle oinstall 4096 May  8 02:18 files
    -rw-r–r– 1 root   root      621 May 17 09:40 ocm.rsp


    • Apply the one-off patch to GI home as show below

    [root@dm01db01 cfgtoollogs]# /u01/app/11.2.0.4/grid/OPatch/opatch auto /u01/patches/GI -oh /u01/app/11.2.0.4/grid -ocmrf /u01/patches/GI/27965497/ocm.rsp
    Executing /u01/app/11.2.0.4/grid/perl/bin/perl /u01/app/11.2.0.4/grid/OPatch/crs/patch11203.pl -patchdir /u01/patches -patchn GI -oh /u01/app/11.2.0.4/grid -ocmrf /u01/patches/GI/27965497/ocm.rsp -paramfile /u01/app/11.2.0.4/grid/crs/install/crsconfig_params


    This is the main log file: /u01/app/11.2.0.4/grid/cfgtoollogs/opatchauto2018-05-17_10-28-13.log


    This file will show your detected configuration and all the steps that opatchauto attempted to do on your system:
    /u01/app/11.2.0.4/grid/cfgtoollogs/opatchauto2018-05-17_10-28-13.report.log


    2018-05-17 10:28:13: Starting Clusterware Patch Setup
    Using configuration parameter file: /u01/app/11.2.0.4/grid/crs/install/crsconfig_params


    Stopping CRS…
    Stopped CRS successfully


    patch /u01/patches/GI/27965497  apply successful for home  /u01/app/11.2.0.4/grid


    Starting CRS…
    Installing Trace File Analyzer
    CRS-4123: Oracle High Availability Services has been started.


    opatch auto succeeded.


    • Login as GI software owner and verify that the one-off patch is applied successfully

    [root@dm01db01 cfgtoollogs]# su – oracle


    dm01db01-+ASM1 {/home/oracle}:export PATH=$PATH:/u01/app/11.2.0.4/grid/OPatch


    dm01db01-+ASM1 {/home/oracle}:opatch lspatches
    27965497;ACFS Interim patch for 27965497
    26925255;DATABASE PATCH FOR EXADATA (Jan 2018 – 11.2.0.4.180116) : (26925255)
    26609929;OCW Patch Set Update : 11.2.0.4.170814 (26609929)
    23727132;


    OPatch succeeded.


    • Verify GI and Database status

    dm01db01-+ASM1 {/home/oracle}:ps -ef|grep pmon
    oracle   171755      1  0 10:40 ?        00:00:00 asm_pmon_+ASM1
    oracle   173484      1  0 10:41 ?        00:00:00 ora_pmon_orcldb1
    oracle   178926 176700  0 10:43 pts/0    00:00:00 grep pmon


    dm01db01-orcldb1 {/home/oracle}:/u01/app/11.2.0.4/grid/bin/crsctl check crs
    CRS-4638: Oracle High Availability Services is online
    CRS-4537: Cluster Ready Services is online
    CRS-4529: Cluster Synchronization Services is online
    CRS-4533: Event Manager is online
    dm01db01-orcldb1 {/home/oracle}:


    SQL> select name, open_mode,database_role from gv$database;


    NAME      OPEN_MODE            DATABASE_ROLE
    ——— ——————– —————-
    ORCLDB   MOUNTED              PHYSICAL STANDBY
    ORCLDB   MOUNTED              PHYSICAL STANDBY
    ORCLDB   MOUNTED              PHYSICAL STANDBY


    ***Repeat the above steps on all other Compute nodes in the Cluster***


    Start the Media Recovery process if it is not started automatically.


    SQL> alter database recover managed standby database using currently logfile disconnect;


    Conclusion


    In this article we have learned how to apply a one-off patch to Grid Infrastructure home on Exadata Database Machine.

  • Oracle Exadata Database Machine Health Check – Exachk 18c

    Oracle has released Exachk utility 18c on May 18th, 2018. Let’s quickly check if there are differences in Exachk 18c or it is similar to Exachk 12c.


    Download latest Exachk 18c utility from MOS note:
    Oracle Exadata Database Machine exachk or HealthCheck (Doc ID 1070954.1)


    Changes in Exachk 18.2 can be found at:
    https://docs.oracle.com/cd/E96145_01/OEXUG/changes-in-this-release-18-2-0.htm#OEXUG-GUID-88FCFBC6-C647-47D3-898C-F4C712117B8B


    Steps to Execute Exachk 18c on Exadata Database Machine


    Download the latest Exachk from MOS note. Here I am downloading Exachk 18c.

    Download Completed

    Using WinSCP copy the exachk.zip file to Exadata Compute node

    Copy completed. List the Exachk file on Compute node

    Unzip the Exachk zip file

    Verify Exachk version

    Execute Exachk Health by running the following command

    Exachk execution completed

    Review the Exachk report and take necessary action


    Conclusion
    In this article we have learned how to execute Oracle Exadata Database Machine health Check using Exachk 18c. Using Exachk 18c is NO different than it’s previous releases.

  • Exadata Setup SSH Equivalence

    You want to execute Operating System or Exadata commands on multiple Exadata Compute nodes and Storage Cell in parallel. To accomplish this you must setup passwordless SSH across compute nodes and storage cells.


    If SSH equivalence is NOT setup and you execute the dcli command you will see the follow messages. This mean the SSH equivalence is not configured.


    [root@dm01db01 ~]# dcli -g dbs_group -l root ‘uptime’
    The authenticity of host ‘dm01db03 (10.10.10.195)’ can’t be established.
    RSA key fingerprint is 40:81:3c:6d:ef:e7:1f:d7:a0:df:eb:f5:ea:92:a5:db.
    Are you sure you want to continue connecting (yes/no)? The authenticity of host ‘dm01db05 (10.10.10.197)’ can’t be established.
    RSA key fingerprint is 1b:95:47:0b:92:b4:13:9f:55:b7:a3:2a:56:27:9f:1c.
    Are you sure you want to continue connecting (yes/no)? The authenticity of host ‘dm01db02 (10.10.10.194)’ can’t be established.
    RSA key fingerprint is e1:0d:90:46:16:88:74:01:02:5a:11:90:63:b1:6b:1c.
    Are you sure you want to continue connecting (yes/no)? The authenticity of host ‘dm01db01 (10.10.10.193)’ can’t be established.
    RSA key fingerprint is 2b:6f:43:4b:86:29:bb:ed:a6:03:c5:34:75:cf:45:34.
    Are you sure you want to continue connecting (yes/no)? The authenticity of host ‘dm01db04 (10.10.10.196)’ can’t be established.
    RSA key fingerprint is 44:a7:ad:65:c3:1c:fb:0b:0b:28:2c:b6:a5:f3:59:99.
    Are you sure you want to continue connecting (yes/no)? The authenticity of host ‘dm01db07 (10.10.10.199)’ can’t be established.
    RSA key fingerprint is 25:5f:9a:e6:a4:7a:13:ba:e2:e7:7d:2e:79:53:49:2b.
    Are you sure you want to continue connecting (yes/no)? root@dm01db06’s password: root@dm01db08’s password:


    In this article we will demonstrate how to setup SSH equivalence on Exadata Database Machine.


    Steps to Setup SSH Equivalence


    1. Create the following files if doesn’t exist


    [root@dm01db08 ~]# cat dbs_group
    dm01db01
    dm01db02
    dm01db03
    dm01db04
    dm01db05
    dm01db06
    dm01db07
    dm01db08


    [root@dm01db08 ~]# cat cell_group
    dm01cel01
    dm01cel02
    dm01cel03
    dm01cel04
    dm01cel05
    dm01cel06
    dm01cel07


    [root@dm01db08 ~]# cat all_group
    dm01db01
    dm01db02
    dm01db03
    dm01db04
    dm01db05
    dm01db06
    dm01db07
    dm01db08
    dm01cel01
    dm01cel02
    dm01cel03
    dm01cel04
    dm01cel05
    dm01cel06
    dm01cel07
    dm01sw-iba01
    dm01sw-ibb01


    2. Navigate to Support directory on Compute node 1 as shown below

    [root@dm01db01 ~]# cd /opt/oracle.SupportTools/

    3. Oracle has provided a script *setup_ssh_eq.sh* to configure SSH equivalence across Exadata components. Execute the script as shown below. Here we are setting the SSH equivalence for root user

    [root@dm01db01 oracle.SupportTools]# ./setup_ssh_eq.sh ~/all_group root welcome1
    /root/.ssh/id_dsa already exists.
    Overwrite (y/n)?
    /root/.ssh/id_rsa already exists.
    Overwrite (y/n)?
    spawn dcli -c dm01db01 -l root -k
    dm01db01: ssh key already exists
    expect: spawn id exp4 not open
        while executing
    “expect “*?assword:*””
    spawn dcli -c dm01db02 -l root -k
    dm01db02: ssh key already exists
    expect: spawn id exp4 not open
        while executing
    “expect “*?assword:*””
    spawn dcli -c dm01db03 -l root -k
    dm01db03: ssh key already exists
    expect: spawn id exp4 not open
        while executing
    “expect “*?assword:*””
    spawn dcli -c dm01db04 -l root -k
    dm01db04: ssh key already exists
    expect: spawn id exp4 not open
        while executing
    “expect “*?assword:*””
    spawn dcli -c dm01db05 -l root -k
    dm01db05: ssh key already exists
    expect: spawn id exp4 not open
        while executing
    “expect “*?assword:*””
    spawn dcli -c dm01db06 -l root -k
    dm01db06: ssh key already exists
    expect: spawn id exp4 not open
        while executing
    “expect “*?assword:*””
    spawn dcli -c dm01db07 -l root -k
    dm01db07: ssh key already exists
    expect: spawn id exp4 not open
        while executing
    “expect “*?assword:*””
    spawn dcli -c dm01db08 -l root -k
    dm01db08: ssh key already exists
    expect: spawn id exp4 not open
        while executing
    “expect “*?assword:*””
    spawn dcli -c dm01cel01 -l root -k
    dm01cel01: ssh key already exists
    expect: spawn id exp4 not open
        while executing
    “expect “*?assword:*””
    spawn dcli -c dm01cel02 -l root -k
    dm01cel02: ssh key already exists
    expect: spawn id exp4 not open
        while executing
    “expect “*?assword:*””
    spawn dcli -c dm01cel03 -l root -k
    dm01cel03: ssh key already exists
    expect: spawn id exp4 not open
        while executing
    “expect “*?assword:*””
    spawn dcli -c dm01cel04 -l root -k
    dm01cel04: ssh key already exists
    expect: spawn id exp4 not open
        while executing
    “expect “*?assword:*””
    spawn dcli -c dm01cel05 -l root -k
    dm01cel05: ssh key already exists
    expect: spawn id exp4 not open
        while executing
    “expect “*?assword:*””
    spawn dcli -c dm01cel06 -l root -k
    dm01cel06: ssh key already exists
    expect: spawn id exp4 not open
        while executing
    “expect “*?assword:*””
    spawn dcli -c dm01cel07 -l root -k
    dm01cel07: ssh key already exists
    expect: spawn id exp4 not open
        while executing
    “expect “*?assword:*””
    spawn dcli -c dm01sw-iba01 -l root -k
    dm01sw-iba01: ssh key already exists
    expect: spawn id exp4 not open
        while executing
    “expect “*?assword:*””
    spawn dcli -c dm01sw-ibb01 -l root -k
    dm01sw-ibb01: ssh key already exists
    expect: spawn id exp4 not open
        while executing
    “expect “*?assword:*””

    4. Verify SSH equivalence is working fine

    [root@dm01db08 ~]# dcli -g ~/all_group -l root ‘uptime’
    dm01db01: 09:16:41 up 21 days, 15:47,  1 user,  load average: 1.80, 3.02, 3.35
    dm01db02: 09:16:41 up 21 days, 15:38,  0 users,  load average: 2.93, 2.44, 2.37
    dm01db03: 09:16:41 up 21 days, 15:19,  0 users,  load average: 2.16, 2.27, 2.77
    dm01db04: 09:16:41 up 21 days, 15:12,  0 users,  load average: 4.07, 4.33, 4.14
    dm01db05: 09:16:41 up 21 days, 15:09,  0 users,  load average: 2.45, 2.82, 2.75
    dm01db06: 09:16:41 up 21 days, 15:06,  0 users,  load average: 1.70, 2.04, 2.60
    dm01db07: 09:16:41 up 21 days, 15:02,  0 users,  load average: 6.39, 4.46, 4.20
    dm01db08: 09:16:41 up 21 days, 14:59,  1 user,  load average: 1.66, 1.81, 1.97
    dm01cel01: 09:16:41 up 203 days, 19:00,  0 users,  load average: 1.40, 1.97, 2.21
    dm01cel02: 09:16:41 up 203 days, 18:59,  0 users,  load average: 1.52, 2.08, 2.38
    dm01cel03: 09:16:41 up 203 days, 18:59,  0 users,  load average: 1.00, 1.71, 2.02
    dm01cel04: 09:16:41 up 203 days, 18:59,  0 users,  load average: 1.08, 1.59, 1.92
    dm01cel05: 09:16:41 up 203 days, 18:59,  0 users,  load average: 1.24, 1.53, 1.82
    dm01cel06: 09:16:41 up 203 days, 18:59,  0 users,  load average: 1.09, 1.60, 1.96
    dm01cel07: 09:16:41 up 203 days, 19:00,  0 users,  load average: 1.01, 1.37, 1.60
    dm01sw-iba01: 09:16:42 up 539 days,  6:21,  0 users,  load average: 0.79, 0.99, 1.07
    dm01sw-ibb01: 14:49:54 up 539 days,  9:43,  0 users,  load average: 1.26, 1.44, 1.41

    [root@dm01db08 ~]# dcli -g dbs_group -l root ‘imageinfo | grep “Image version”‘
    dm01db01: Image version: 12.1.2.3.6.170713
    dm01db02: Image version: 12.1.2.3.6.170713
    dm01db03: Image version: 12.1.2.3.6.170713
    dm01db04: Image version: 12.1.2.3.6.170713
    dm01db05: Image version: 12.1.2.3.6.170713
    dm01db06: Image version: 12.1.2.3.6.170713
    dm01db07: Image version: 12.1.2.3.6.170713
    dm01db08: Image version: 12.1.2.3.6.170713


    [root@dm01db08 ~]# dcli -g cell_group -l root ‘imageinfo | grep “Active image version”‘
    dm01cel01: Active image version: 12.1.2.3.6.170713
    dm01cel02: Active image version: 12.1.2.3.6.170713
    dm01cel03: Active image version: 12.1.2.3.6.170713
    dm01cel04: Active image version: 12.1.2.3.6.170713
    dm01cel05: Active image version: 12.1.2.3.6.170713
    dm01cel06: Active image version: 12.1.2.3.6.170713
    dm01cel07: Active image version: 12.1.2.3.6.170713

    [root@dm01db08 ~]# ssh dm01sw-iba01 version
    SUN DCS 36p version: 2.1.8-1
    Build time: Sep 18 2015 10:26:47
    SP board info:
    Manufacturing Date: 2015.05.13
    Serial Number: “NCDKO0980”
    Hardware Revision: 0x0200
    Firmware Revision: 0x0000
    BIOS version: SUN0R100
    BIOS date: 06/22/2010

    Conclusion

    In this article we have learned how to configure SSH equivalence on Exadata Database Machine. Using the setup_ssh_eq.sh script is very easy setup SSH equivalence.