Notice: Function _load_textdomain_just_in_time was called incorrectly. Translation loading for the wordpress-seo domain was triggered too early. This is usually an indicator for some code in the plugin or theme running too early. Translations should be loaded at the init action or later. Please see Debugging in WordPress for more information. (This message was added in version 6.7.0.) in /home/aoo6zmy4glfd/public_html/wp-includes/functions.php on line 6114

Notice: Function _load_textdomain_just_in_time was called incorrectly. Translation loading for the breadcrumb-navxt domain was triggered too early. This is usually an indicator for some code in the plugin or theme running too early. Translations should be loaded at the init action or later. Please see Debugging in WordPress for more information. (This message was added in version 6.7.0.) in /home/aoo6zmy4glfd/public_html/wp-includes/functions.php on line 6114
Uncategorized Archives | Netsoftmate

Good Contents Are Everywhere, But Here, We Deliver The Best of The Best.Please Hold on!
Uncategorized
After INDA, USA, SAUDI ARABIA, Its Time for UAE


Netsoftmate, a preferred Oracle partner and remote database management service provider, operated in the MENA region from its regional office in Riyadh, Saudi Arabia. Due to the strong growth and demand to cover multiple regions in MENA, Netsoftmate now opens up a new new regional office in Dubai, UAE. 

Through this regional office, our aim is to increase our footprint and penetrate further into the MENA region. Netsoftmate has been serving clients in USA, India & MENA mainly and has been growing at more than 100% YoY in revenue within these regions. The MENA region in particular has been the strongest contributor to Netsoftmate’s revenue and we have strong support from the regional Oracle account managers due to our best in class services and proven success with clients.

“It is the best time to penetrate further into the MENA region. We have seen immense success in KSA, so much that we have been increasing our team size to cater to just KSA. With growing demand and recognition, we are looking at expanding further to regions like UAE, Qatar, Kuwait, Egypt, Jordan. Our new office in Dubai is a stepping stone towards achieving our vision of becoming the go to partner for all remote database management related requirements in the region.”
– Mohd.Abdul Rahman Siddiqui, CEO, Netsoftmate

About Netsoftmate:

Netsoftmate is a full service Oracle partner founded in 2014, providing niche services in remote database management with staff augmentation, active-active database replication using GoldenGate and implementation with full after sales service for Oracle Engineered Systems. We have been serving large enterprises in BFSI, Utilities, Manufacturing, Oil&Gas, CPG in countries like USA, MENA & India. 

0

Uncategorized

Recently Oracle has announced Autonomous Database (ADB) on Oracle Exadata Cloud @ Customer (Exadata C@C). ADB on Exadata C@C provides the benefits of a self-driving, self-securing, and self-repairing database management system and the security and control offered by having it deployed securely on-premise Customer’s data centre.


With the new offering we now have 2 different Exadata Cloud At Customer offering:

1. Exadata Cloud @ Customer

2. Autonomous Database on Exadata Cloud @ Customer


With the new Autonomous Database on Exadata C@C offering there is confusion for many Customer such as:

1. What the new ADB on Exadata C@C offers?

2. What resources Customer needs to manage?

3. What are different accesses available to Customer?


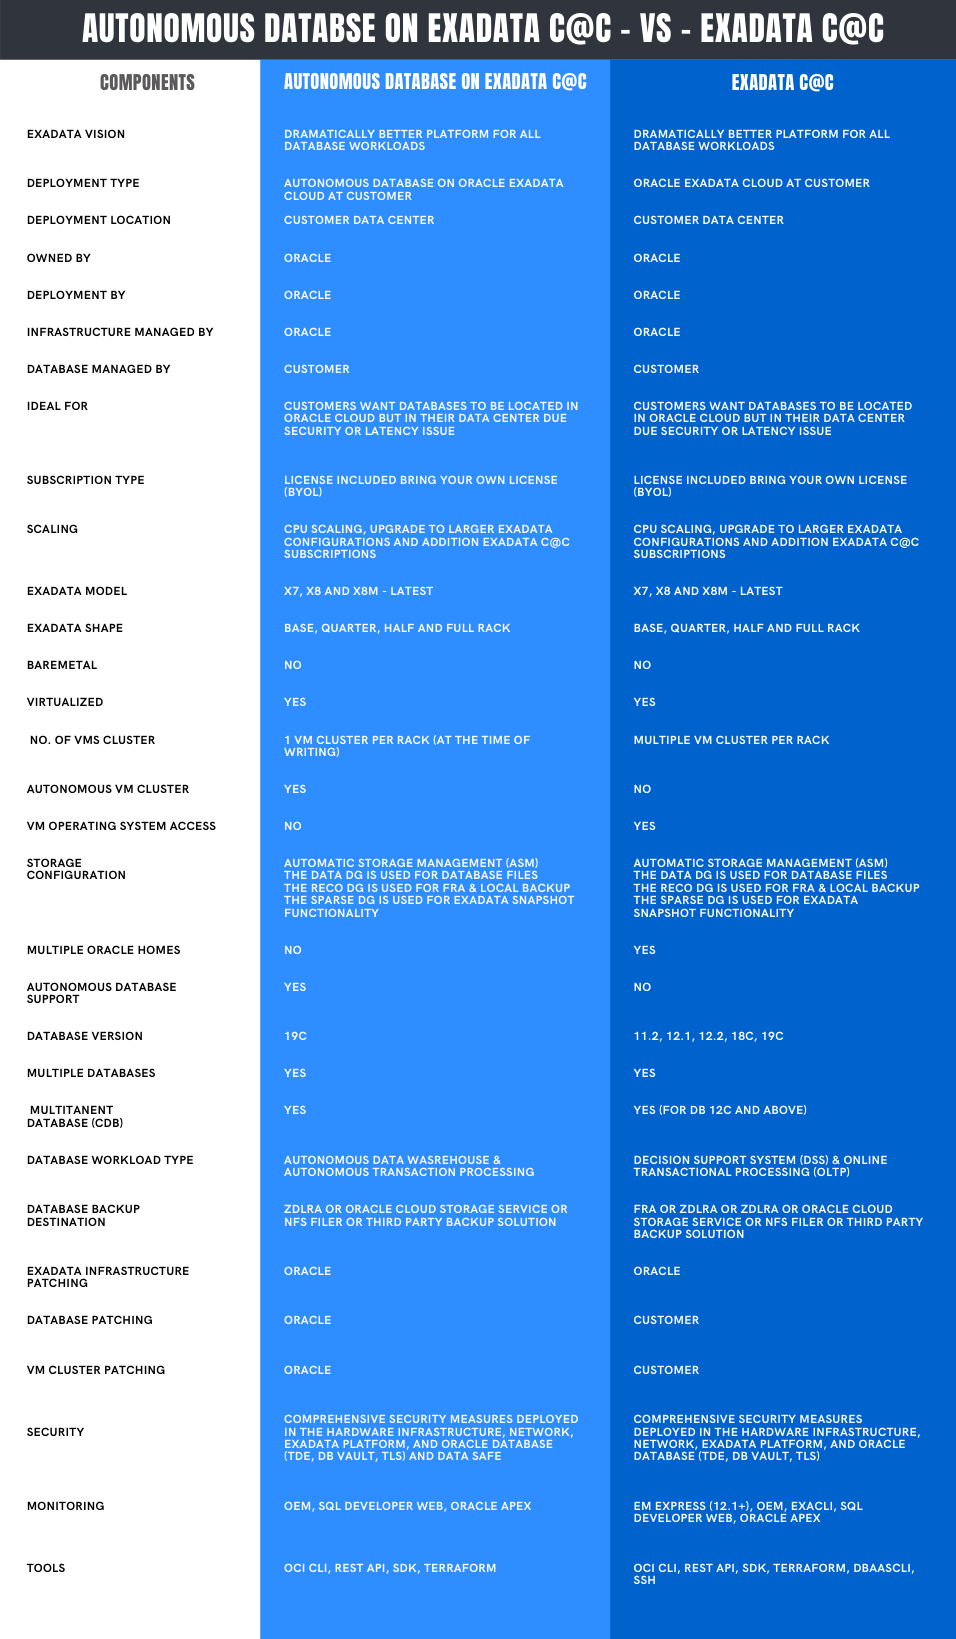
With this article we will help you clarify a lot of these confusion, help you understand the details around each of these offering and finally let you choose the right Exadata Cloud at Customer offering for your Business need.


Autonomous Database on Oracle Exadata Cloud@Customer -vs- Exadata Cloud@Customer


About Netsoftmate Technologies Inc.

Netsoftmate is an Oracle Gold Partner and a boutique IT services company specializing in installation, implementation and 24/7 support for Oracle Engineered Systems like Oracle Exadata, Oracle Database Appliance, Oracle ZDLRA, Oracle ZFS Storage and Oracle Private Cloud Appliance. Apart from OES, we have specialized teams of  experts providing round the clock remote database administration support for any type of database and cyber security compliance and auditing services.


Feel free to get in touch with us by signing up on the link below –

Priority Suport for Oracle Engineered Systems | Netsoftmate
0

Uncategorized


Recently Oracle has announced Autonomous Database (ADB) on Oracle Exadata Cloud @ Customer (Exadata C@C). ADB on Exadata C@C provides the benefits of a self-driving, self-securing, and self-repairing database management system and the security and control offered by having it deployed securely on-premise Customer’s data centre.


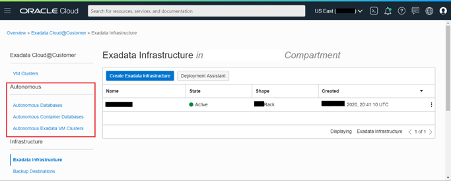
Once you purchase ADB on Exadata C@C, creating, provisioning and activating its Exadata Infrastructure hardware and Oracle Cloud resource, several additional resource types become available in the Exadata C@C section of the Oracle Cloud Infrastructure console: Autonomous Exadata VM Clusters, Autonomous Container Databases and Autonomous Databases. You use these resources to create and manage your secure, on-premise deployment of Oracle Autonomous Database. Here is the screenshot how ADB on Exadata C@C looks like.


Autonomous Database on Exadata Cloud@Customer


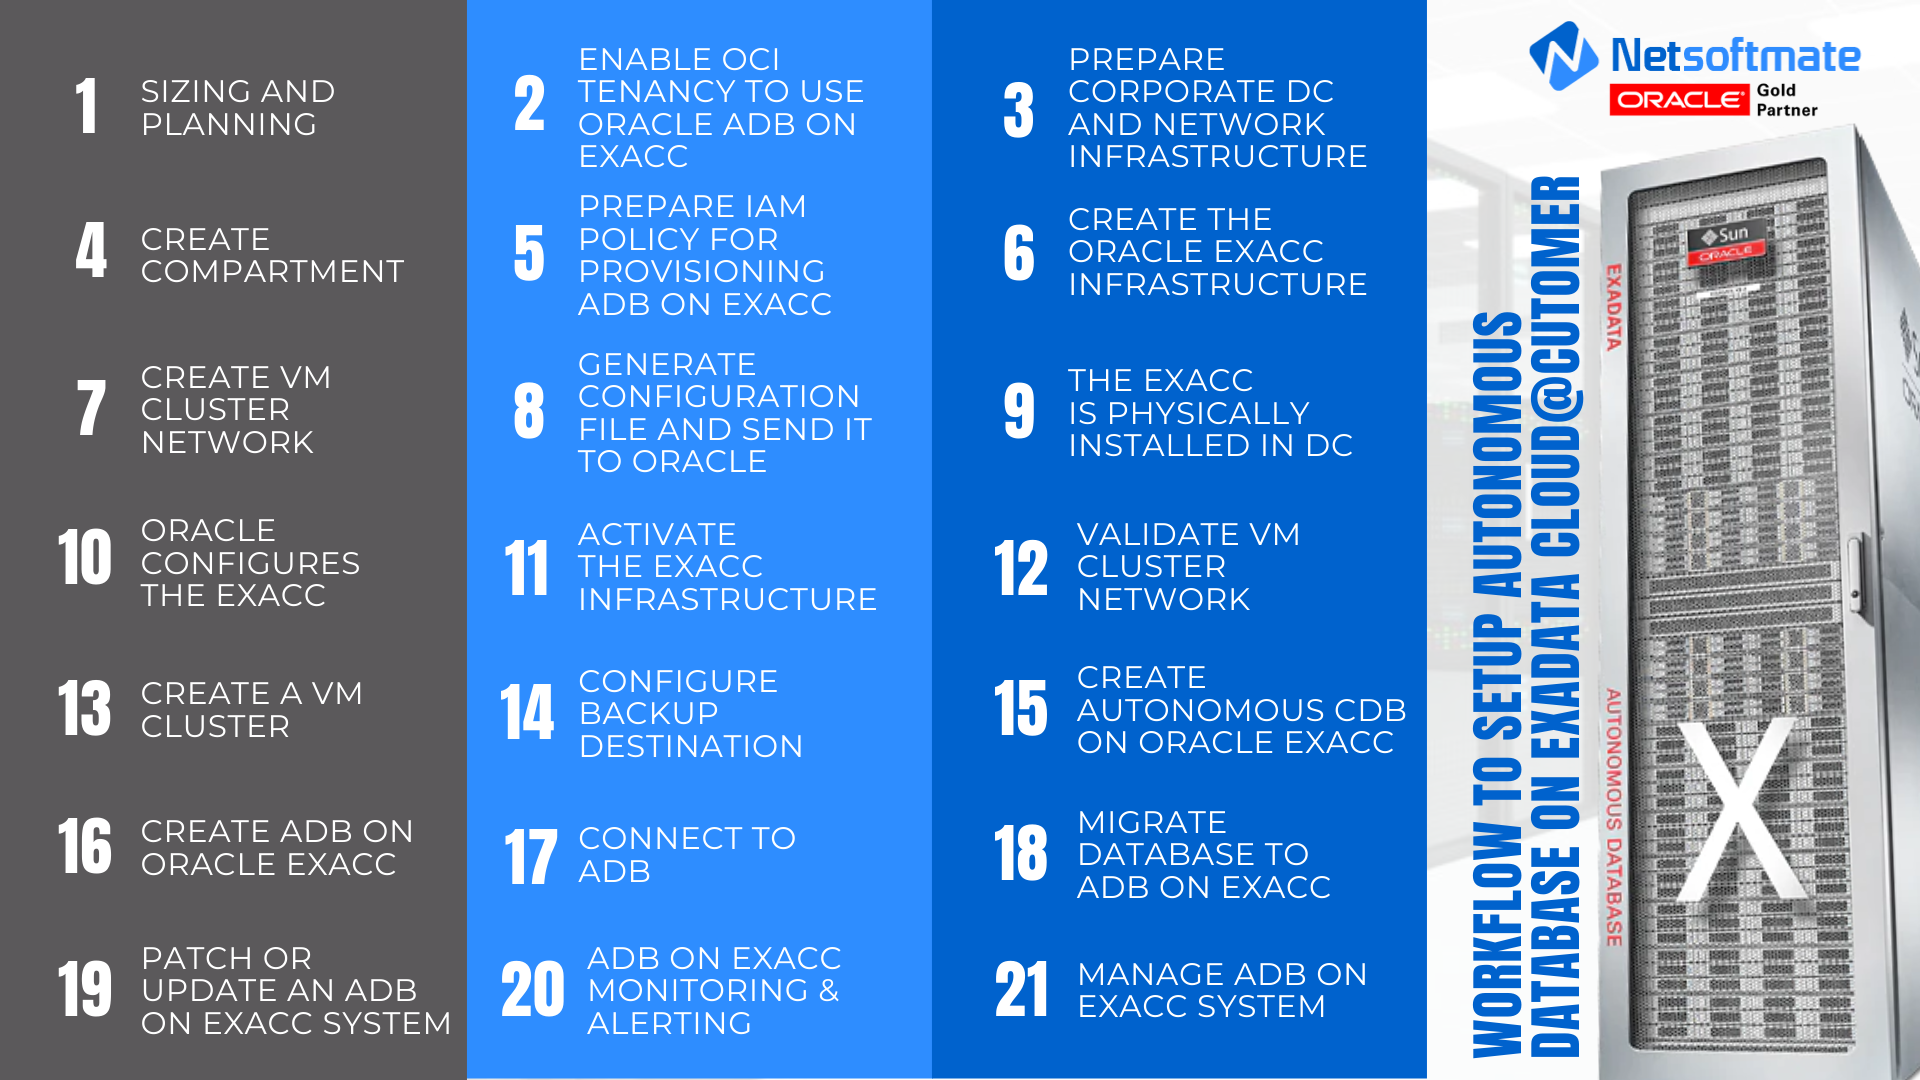
To setup Autonomous Database on Exadata Cloud@Customer, we have created a step-by-step workflow which will help you setup and running in no time –

How to Setup Autonomous Database On Exadata Cloud@Customer


Stay tuned for the next part on how to provision Autonomous Database on Oracle Exadata Cloud@Customer in our next blog!


Setup your Autonomous Database on Oracle Exadata Cloud@Customer with Netsoftmate’s team of Exadata Engineers:


Priority Suport for Oracle Engineered Systems | Netsoftmate

0

Database Management Services, Oracle Database Appliance - ODA, Oracle Database Management Solution, Oracle Databases, Remote Database Management, Uncategorized

ODA is basically a 2-node RAC cluster database system running Oracle Linux operating (OEL), Oracle Database Enterprise Edition or Standard Edition, Oracle Grid Infrastructure (Clusterware and ASM). All these together provides the Oracle Database high availability running on ODA.

 
In 2016, Oracle added 3 new models to expand Oracle Database Appliance portfolio. These 3 new models are:
  • Oracle Database Appliance X6-2S (single-instance database)
  • Oracle Database Appliance X6-2M (single-instance database)
  • Oracle Database Appliance X6-2L (single-instance database)
  •  
 
The High Available ODA X6-2 is now known as X6-2 HA which consists of 2 nodes and a storage shelf and optionally an additional storage shelf.

 
In October 2017, Oracle announced Oracle Database Appliance X7-2 (Small, Medium and HA). ODA X7-2 comes with more computing resources compared with X6-2 Models.


  • Oracle Database Appliance X7-2S (single-instance database)
  • Oracle Database Appliance X7-2M (single-instance database)
  • Oracle Database Appliance X7-2 HA
  •  
With ODA X7-2, the ODA Large configuration is discontinued.
 
 
With the different model families there is always a confusion that which command line tool to be used for managing, monitoring and administrating Oracle Database Appliance.


In this article we will explain different command line tools that can be used to manage and administer an Oracle Database Appliance Small, Medium, Large and HA models for both Bare Metal and Virtualized Platform environment.
 
 
Let’s look at the different command line tools available:
 
OAKCLI: oakcli stands for Oracle Appliance Kit Command Line Interface. oakcli utility is used to manage Oracle Database Appliance. It used to carry out management tasks such as, Deploying, Patching, validating, monitoring, troubleshooting, Create Database, create database homes, configuring core key, manage Virtual machines and so on.

 
ODACLI: It is used for Hardware and administrative tasks on the Oracle Database Appliance, Example: Hardware monitoring and Storage Configuration

 
ODAADMICLI: It is used for everyday task on the Oracle Database Appliance, Example: Database Creation, Patches and upgrades, Job creation and manage and so on.

The following table provides a quick reference on when to use oakcli Vs. odacli/odaadmcli
 
  • For Oracle Database Appliance software version 12.2.1.4 or older use the tools as shown in the following table
  •  
  •  
Oakcli
odacli/odaadmcli
ODA V1
ODA X6-2 S, M, L
ODA X3-2
ODA X7-2 S, M
ODA X4-2
ODA X7-2 HA (Bare Metal only) 
ODA X5-2
 
ODA X6-2 HA
 
ODA X7-2 HA (VM Only)


  • For Oracle Database Appliance software version 18.3.0.0 and later user the tools as shown in the following table


  •  
oakcli
odacli/odaadmcli
All hardware versions running Virtualized platform
All hardware versions running Bare Metal (physical)


Examples using oakcli, odacli and odaadmcli:
 
[root@odanode1 ~]# odacli describe-appliance
 
Appliance Information
—————————————————————-
                     ID: 9aef262c-xxxx-xxxx-xxxx-0d877c03d762
               Platform: ODA
        Data Disk Count: 2
         CPU Core Count: 10
                Created: May 23, 2017 3:08:03 AM CST
 
System Information
—————————————————————-
                   Name: odanode
            Domain Name: netsoftmate.com
              Time Zone: Asia/Pacific
             DB Edition: EE
            DNS Servers: 10.1.1.1
            NTP Servers: ntp1.netsoftmate.com
 
Disk Group Information
—————————————————————-
DG Name                   Redundancy                Percentage
————————- ————————- ————
Data                      Normal                    80
Reco                      Normal                    20
 
 
[root@odanode1 ~]# odaadmcli show disk
        NAME            PATH            TYPE            STATE           STATE_DETAILS
 
        pd_00           /dev/nvme0n1    NVD             ONLINE          Good
        pd_01           /dev/nvme1n1    NVD             ONLINE          Good
 
 
[root@odanode1 ~]# odaadmcli show diskgroup
DiskGroups
———-
DATA
RECO
 
 
[root@odanode1 ~]# odaadmcli show env_hw
BM ODA X6-2 Small
 
 
[root@odanode1 ~]# odaadmcli show storage
==== BEGIN STORAGE DUMP ========
Host Description: Oracle Corporation:ORACLE SERVER X6-2
Total number of controllers: 2
        Id          = 0
        Pci Slot    = 10
        Serial Num  = xxxxxxxxxx
        Vendor      = Samsung
        Model       = MS1PC2DD3ORA3.2T
        FwVers      = KPYABR3Q
        strId       = nvme:19:00.00
        Pci Address = 19:00.0
 
        Id          = 1
        Pci Slot    = 11
        Serial Num  = xxxxxxxxxxx
        Vendor      = Samsung
        Model       = MS1PC2DD3ORA3.2T
        FwVers      = KPYABR3Q
        strId       = nvme:1b:00.00
        Pci Address = 1b:00.0
 
Total number of expanders: 0
Total number of PDs: 2
        /dev/nvme0n1    Samsung           NVD 3200gb slot:  0  pci : 19
        /dev/nvme1n1    Samsung           NVD 3200gb slot:  1  pci : 1b
==== END STORAGE DUMP =========
 
 
[root@odanode1 ~]# oakcli show env_hw
BM ODA X5-2
Public interface : COPPER
 
 
[root@odanode1 ~]# oakcli show oda_base
ODA base domain
ODA base CPU cores :36
ODA base domain memory :362
ODA base template :/OVS/template.tar.gz
ODA base vlans :[‘priv1’, ‘net1’]
ODA base current status :Running
 
 
[root@odanode1 ~]# oakcli show env_hw
VM-oda_base ODA X7-2 HA


Conclusion

In this article we have learned about Oracle Database Appliance X6-2 and X7-2 model family. Also, we have learned when to use different ODA command lines tools such as oakcli, odacli and odaadmcli to manage and administer an Oracle Database Appliance.


eBook - Oracle Exadata X8M Patching Recipes | Netsoftmate


0

Uncategorized
Oracle announced the next-generation Oracle Exadata X8 with significant hardware and software enhancements in overall performance, storage capacity, network bandwidth, and automation. Exadata X7 delivers extreme performance and reliability to run the largest, most business-critical database workloads.


Oracle Exadata X8-2 quick glance:


  • – Latest Intel Xeon (8260) Processors (2.4GHz) 2*24 cores per database server (384 core in a Full Rack)
  •  
  • – Exadata X8 Capacity-on-Demand enables at least 14 cores per server
  •  
  • – Delivers up to 60 percent faster throughput than previous models
  •  
  • – NO changes in Database server Physical memory (upto 12TB in a full Rack)
  •  
  • – Latest Intel Xeon (5218) Processors (2.3GHz) 2*16 cores per Storage server (448 core in a Full Rack)
  •  
  • – NO increase in the capacity of Extreme Flash storage (716.8TB in a full Rack)
  •  
  • – 40% increase in disk capacity (2352TB in a full Rack)
  •  
  • – Exadata X8 introduces new Exadata storage option – Extended (XT) Storage Server
  •  
  • – Each Exadata XT Storage Server includes twelve 14 TB SAS disk drives
  •  
  • – A full rack Exadata X8-2 system has:
    •  
    • – Raw capacity of 2.3 petabytes of disk storage & 358.4TB Flash
    •  
    • – 720 terabytes of NVMe all-Flash storage
    •  
    • – Raw capacity of 2.3 petabytes of disk storage & No flash
  •  
  • – Additional network 2x 10/25 Gb optical Ethernet (client – optional)
  •  
  • – Available in Oracle Public Cloud – Oracle Database Exadata Cloud Service


For more information please visit –

https://www.oracle.com/a/ocom/docs/engineered-systems/exadata/exadata-x8-2-ds.pdf
 

https://www.oracle.com/a/ocom/docs/engineered-systems/exadata/exadata-x8-8-ds.pdf


0

Before we talk about Dbvisit Standby and it’s components, let’s talk little bit about about Disaster Recovery and Business Continuity.


What is Business Continuity?

In the event of a disaster, the process of failing over your server from the primary to the secondary site is known as Disaster Recovery. A disaster recovery solution provides your Company with Business Continuity.

The main purpose of Dbvisit Standby is to provide the Organizations with greater Business continuity.


What is Physical Replication?

The process of creating a Standby database from the source or primary database is known as Physical Replication. The Standby database is kept in sync using the archive logs generated on the source database to ensure that the Standby database is an exact copy of the source database.


How to Configure Disaster Recovery environment with Dbvisit Standby?

The following are the Disaster Recovery Configurations options available:
  1. On-Premise to On-Premise
  2. On-Premise to Cloud
  3. Cloud to On-Premise
  4. Cloud to Cloud

Dbvisit Standby Architecture

These are four main components that make up Dbvisit Standby’s Architecture.
  • Dbvserver
  • Dbvagent
  • Dbvnet
  • Standby core


Dbvserver:

It hosts secure web based user interface for Dbvisit standby. Multiple users can manage various different DR configurations. It provide graphical overview of setup, running and reporting of DR sites. It is recommended to that Dbvserver which has a small footprint be installed on different server.

Dbvserver details:
Using a small VM machine should be sufficient
HTTPS protocol port 4433
Host Managed by Dbvserver can be Windows or Linux
It has a small repository where information about executed tasks are store
It support Chrome, FireFox and Safari browsers

Dbvagent:

It is used to manages the communication between Dbvserver (web based user interface) and Dbvisit Standby core. Communication between Dbvagent and Dbvserver is encrypted. Dbvisit agent has a small footprint and listens for secure connection on port 7891 from the central console. The Dbvisit agent must run on the host managed by the Dbvisit Standby Central console. A user can bypass Dbvserver web based user interface and directly access CLI if preferred. In this case Dbvisit agent does not have to be installed or can be left shutdown.

Dbvnet:

It is responsible for secure communication between primary and standby systems. It essentially provides an encrypted transport layer to copy files and execute remote commands between primary and standby database server. It runs on both primary and standby servers and configured during installation process. Dbvnet removes any dependency SSH had for providing network communication  between primary and standby nodes. It is started as background process and it runs independently from the Dbvserver and Dbvagent.

Dbvisit Standby Core:

It is also known as command line interface. It is the heart of Dbvisit standby. This is where all commands are run to enable Dbvisit Standby to function. A user can bypass Dbvserver web based user interface and directly access CLI if preferred.

Dbvisit Standby Core allow you:

  •     Create standby database (CSD)
  •     Extract and Send archive logs to standby (SEND)
  •     Recover standby database using shipped archived logs (RECOVER)
  •     Perform Graceful Switchover also known as role reversal (GS)
  •     Synchronize a standby database (SYNC)
  •     In case of disaster activate the standby database (FAILVOER)
  •     It also provide API options, more than 80 command line API options (API)

dbvctl : The Dbvisit Standby Control CLI Utility


Other Dbvisit Standby Components

  • Database Configuration File (DDC)
Contains the Dbvisit Standby setting for a specific primary and standby pair.
Generated during the setup for each database.
can be edited with any text editor or by running ‘dbvisit -o setup’ or through web based GUI

  • Database Repository (DDR)
This is repository used by Dbvisit Standby to store internal information about Dbvisit Standby Configuration and functionality being performed.
It is a small *.db file located in the standby/conf sub directory.

  • Trace Files
Contains information about Dbvisit standby processing.
These files are required by Dbvisit Support in the event when an error is raised.
They are located in the standby/trace sub directory.


Dbvisit Standby functionality

Dbvisit Standby follows a simple 3 Steps functionality. The same is illustrated in the picture below:

Step 1: Log Extraction : Dbvisit Standby will extract the primary database archive logs from the database archive destination.
Step 2: Transport : The second step in the process will be to copy these extracted archive logs to the standby site.
Step 3: Log Apply : The third step in the process is Dbvisit Standby applying the transferred archive logs to the standby database.


Dbvisit Standby on Oracle RAC

  • Dbvisit Standby can be used together with Oracle RAC (Real Application Cluster)
  • Oracle RAC together with Dbvisit Standby standby database(s) allows scalability and provides high availability and disaster recovery
  • Dbvisit Standby supports archive logs in Oracle ASM (Automatic Storage Management) file system
  • The standby database can be a RAC or Non-RAC standby database


Conclusion

In this article we have learned Dbvisit Standby Architecture, different Dbvisit Standby components and Dbvisit Standby functionality.


0

Uncategorized
The patchmgr or dbnodeupdate.sh utility can be used for upgrading, rollback and backup Exadata Compute nodes. patchmgr utility can be used for upgrading Compute nodes in a rolling or non-rolling fashion. Compute nodes patches apply operating system, firmware, and driver updates.

Launch patchmgr from the compute node that is node 1 that has user equivalence setup to all the Compute nodes. Patch all the compute nodes except node 1 and later patch node 1 alone.

In this article I will demonstrate how to perform upgrade Exadata Compute nodes using patchmgr and dbnodeupdate.sh utilities.

MOS Notes
Read the following MOS notes carefully.

  • Exadata Database Machine and Exadata Storage Server Supported Versions (Doc ID 888828.1)
  • Exadata 18.1.12.0.0 release and patch (29194095) (Doc ID 2492012.1)   
  • Oracle Exadata Database Machine exachk or HealthCheck (Doc ID 1070954.1)dbnodeupdate.sh and dbserver.patch.zip: Updating Exadata Database Server Software using the DBNodeUpdate Utility and patchmgr (Doc ID 1553103.1)   

Software Download
Download the following patches required for Upgrading Compute nodes.

  • Patch 29181093 – Database server bare metal / domU ULN exadata_dbserver_18.1.12.0.0_x86_64_base OL6 channel ISO image (18.1.12.0.0.190111)
  • Download dbserver.patch.zip as p21634633_12*_Linux-x86-64.zip, which contains dbnodeupdate.zip and patchmgr for dbnodeupdate orchestration via patch 21634633

Current Environment
Exadata X4-2 Half Rack (4 Compute nodes, 7 Storage Cells and 2 IB Switches) running ESS version 12.2.1.1.6


Prerequisites
 
  • Install and configure VNC Server on Exadata compute node 1. It is recommended to use VNC or screen utility for patching to avoid disconnections due network issues.
 
  • Enable blackout (OEM, crontab and so on)
 
  • Verify disk space on Compute nodes
[root@dm01db01 ~]# dcli -g ~/dbs_group -l root ‘df -h /’
dm01db01: Filesystem            Size  Used Avail Use% Mounted on
dm01db01: /dev/mapper/VGExaDb-LVDbSys1
dm01db01: 59G   40G   17G  70% /
dm01db02: Filesystem            Size  Used Avail Use% Mounted on
dm01db02: /dev/mapper/VGExaDb-LVDbSys1
dm01db02: 59G   23G   34G  41% /
dm01db03: Filesystem            Size  Used Avail Use% Mounted on
dm01db03: /dev/mapper/VGExaDb-LVDbSys1
dm01db03: 59G   42G   14G  76% /
dm01db04: Filesystem            Size  Used Avail Use% Mounted on
dm01db04: /dev/mapper/VGExaDb-LVDbSys1
dm01db04: 59G   42G   15G  75% /

[root@dm01db01 ~]# dcli -g ~/dbs_group -l root ‘df -h /u01’
dm01db01: Filesystem            Size  Used Avail Use% Mounted on
dm01db01: /dev/mapper/VGExaDb-LVDbOra1
dm01db01: 197G  112G   76G  60% /u01
dm01db02: Filesystem            Size  Used Avail Use% Mounted on
dm01db02: /dev/mapper/VGExaDb-LVDbOra1
dm01db02: 197G   66G  122G  36% /u01
dm01db03: Filesystem            Size  Used Avail Use% Mounted on
dm01db03: /dev/mapper/VGExaDb-LVDbOra1
dm01db03: 197G   77G  111G  41% /u01
dm01db04: Filesystem            Size  Used Avail Use% Mounted on
dm01db04: /dev/mapper/VGExaDb-LVDbOra1
dm01db04: 197G   61G  127G  33% /u01

 
  • Run Exachk before starting the actual patching. Correct any Critical issues and Failure that conflict with patching.
 
  • Verify hardware failure. Make sure there are no hardware failures before patching
[root@dm01db01 ~]# dcli -g ~/dbs_group -l root ‘dbmcli -e list physicaldisk where status!=normal’

[root@dm01db01 ~]# dcli -g ~/dbs_group -l root ‘ipmitool sunoem cli “show -d properties -level all /SYS fault_state==Faulted”‘

 
  • Clear or acknowledge alerts on db and cell nodes
[root@dm01db01 ~]# dcli -l root -g ~/dbs_group “dbmcli -e  drop alerthistory all”
 
  • Download patches and copy them to the compute node 1 under staging directory
Stage Directory: /u01/app/oracle/software/exa_patches
p21634633_191200_Linux-x86-64.zip
p29181093_181000_Linux-x86-64.zip

 
  • Read the readme file and document the steps for storage cell patching.
eBook - Oracle Exadata X8M Patching Recipes | Netsoftmate

Steps to Upgrade Exadata Compute nodes


  • Copy the compute node patches to all the nodes
[root@dm01db01 exa_patches]# dcli -g ~/dbs_group -l root ‘mkdir -p /u01/app/oracle/software/exa_patches/dbnode’

[root@dm01db01 exa_patches]# cp p21634633_191200_Linux-x86-64.zip p29181093_181000_Linux-x86-64.zip dbnode/

[root@dm01db01 dbnode]# dcli -g ~/dbs_group -l root -d /u01/app/oracle/software/exa_patches/dbnode -f p21634633_191200_Linux-x86-64.zip

[root@dm01db01 dbnode]# dcli -g ~/dbs_group -l root -d /u01/app/oracle/software/exa_patches/dbnode -f p29181093_181000_Linux-x86-64.zip

[root@dm01db01 dbnode]# dcli -g ~/dbs_group -l root ls -ltr /u01/app/oracle/software/exa_patches/dbnode


  • Unzip tool patch
[root@dm01db01 dbnode]# unzip p21634633_191200_Linux-x86-64.zip

[root@dm01db01 dbnode]# ls -ltr

[root@dm01db01 dbnode]# cd dbserver_patch_19.190204/

[root@dm01db01 dbserver_patch_19.190204]# ls -ltr

[root@dm01db01 dbserver_patch_19.190204]# unzip dbnodeupdate.zip

[root@dm01db01 dbserver_patch_19.190204]# ls -ltr


NOTE: DO NOT unzip the ISO patch. IT will be extracted automatically by dbnodeupdate.sh utility

  • Umount all external file systems on all Compute nodes
[root@dm01db01 ~]# dcli -g ~/dbs_group -l root umount /zfssa/dm01/backup1

  • Get the current version
[root@dm01db01 dbnode]# imageinfo

Kernel version: 4.1.12-94.7.8.el6uek.x86_64 #2 SMP Thu Jan 11 20:41:01 PST 2018 x86_64
Image kernel version: 4.1.12-94.7.8.el6uek
Image version: 12.2.1.1.6.180125.1
Image activated: 2018-05-15 21:37:09 -0500
Image status: success
System partition on device: /dev/mapper/VGExaDb-LVDbSys1


  • Perform pre check on all nodes except node 1.
[root@dm01db01 dbserver_patch_19.190204]# ./patchmgr -dbnodes  dbs_group-1 -precheck -iso_repo /u01/app/oracle/software/exa_patches/dbnode/p29181093_181000_Linux-x86-64.zip -target_version 18.1.12.0.0.190111

************************************************************************************************************
NOTE    patchmgr release: 19.190204 (always check MOS 1553103.1 for the latest release of dbserver.patch.zip)
NOTE
WARNING Do not interrupt the patchmgr session.
WARNING Do not resize the screen. It may disturb the screen layout.
WARNING Do not reboot database nodes during update or rollback.
WARNING Do not open logfiles in write mode and do not try to alter them.
************************************************************************************************************
2019-02-11 04:26:37 -0600        :Working: DO: Initiate precheck on 3 node(s)
2019-02-11 04:27:29 -0600        :Working: DO: Check free space and verify SSH equivalence for the root user to node(s)
2019-02-11 04:29:44 -0600        :SUCCESS: DONE: Check free space and verify SSH equivalence for the root user to node(s)
2019-02-11 04:31:06 -0600        :Working: DO: dbnodeupdate.sh running a precheck on node(s).
2019-02-11 04:32:53 -0600        :SUCCESS: DONE: Initiate precheck on node(s).


  • Perform compute node backup
[root@dm01db01 dbserver_patch_19.190204]# ./patchmgr -dbnodes dbs_group-1 -backup -iso_repo /u01/app/oracle/software/exa_patches/dbnode/p29181093_181000_Linux-x86-64.zip -target_version 18.1.12.0.0.190111


************************************************************************************************************
NOTE    patchmgr release: 19.190204 (always check MOS 1553103.1 for the latest release of dbserver.patch.zip)
NOTE
WARNING Do not interrupt the patchmgr session.
WARNING Do not resize the screen. It may disturb the screen layout.
WARNING Do not reboot database nodes during update or rollback.
WARNING Do not open logfiles in write mode and do not try to alter them.
************************************************************************************************************
2019-02-11 04:43:16 -0600        :Working: DO: Initiate backup on 3 node(s).
2019-02-11 04:43:16 -0600        :Working: DO: Check free space and verify SSH equivalence for the root user to node(s)
2019-02-11 04:45:31 -0600        :SUCCESS: DONE: Check free space and verify SSH equivalence for the root user to node(s)
2019-02-11 04:46:16 -0600        :Working: DO: dbnodeupdate.sh running a backup on node(s).
2019-02-11 04:58:03 -0600        :SUCCESS: DONE: Initiate backup on node(s).
2019-02-11 04:58:03 -0600        :SUCCESS: DONE: Initiate backup on 3 node(s)


  • Execute compute node upgrade
[root@dm01db01 dbserver_patch_19.190204]# ./patchmgr -dbnodes dbs_group-1 -upgrade -iso_repo /u01/app/oracle/software/exa_patches/dbnode/p29181093_181000_Linux-x86-64.zip -target_version 18.1.12.0.0.190111

************************************************************************************************************
NOTE    patchmgr release: 19.190204 (always check MOS 1553103.1 for the latest release of dbserver.patch.zip)
NOTE
NOTE    Database nodes will reboot during the update process.
NOTE
WARNING Do not interrupt the patchmgr session.
WARNING Do not resize the screen. It may disturb the screen layout.
WARNING Do not reboot database nodes during update or rollback.
WARNING Do not open logfiles in write mode and do not try to alter them.
************************************************************************************************************
2019-02-11 05:05:24 -0600        :Working: DO: Initiate prepare steps on node(s).
2019-02-11 05:05:29 -0600        :Working: DO: Check free space and verify SSH equivalence for the root user to node(s)
2019-02-11 05:07:44 -0600        :SUCCESS: DONE: Check free space and verify SSH equivalence for the root user to node(s)
2019-02-11 05:09:35 -0600        :SUCCESS: DONE: Initiate prepare steps on node(s).
2019-02-11 05:09:35 -0600        :Working: DO: Initiate update on 3 node(s).
2019-02-11 05:09:35 -0600        :Working: DO: dbnodeupdate.sh running a backup on 3 node(s).
2019-02-11 05:21:06 -0600        :SUCCESS: DONE: dbnodeupdate.sh running a backup on 3 node(s).
2019-02-11 05:21:06 -0600        :Working: DO: Initiate update on node(s)
2019-02-11 05:21:11 -0600        :Working: DO: Get information about any required OS upgrades from node(s).
2019-02-11 05:21:22 -0600        :SUCCESS: DONE: Get information about any required OS upgrades from node(s).
2019-02-11 05:21:22 -0600        :Working: DO: dbnodeupdate.sh running an update step on all nodes.
2019-02-11 05:32:58 -0600        :INFO   : dm01db02 is ready to reboot.
2019-02-11 05:32:58 -0600        :INFO   : dm01db03 is ready to reboot.
2019-02-11 05:32:58 -0600        :INFO   : dm01db04 is ready to reboot.
2019-02-11 05:32:58 -0600        :SUCCESS: DONE: dbnodeupdate.sh running an update step on all nodes.
2019-02-11 05:33:26 -0600        :Working: DO: Initiate reboot on node(s)
2019-02-11 05:34:13 -0600        :SUCCESS: DONE: Initiate reboot on node(s)
2019-02-11 05:34:13 -0600        :Working: DO: Waiting to ensure node(s) is down before reboot.
2019-02-11 05:34:45 -0600        :SUCCESS: DONE: Waiting to ensure node(s) is down before reboot.
2019-02-11 05:34:45 -0600        :Working: DO: Waiting to ensure node(s) is up after reboot.
2019-02-11 05:39:51 -0600        :SUCCESS: DONE: Waiting to ensure node(s) is up after reboot.
2019-02-11 05:39:51 -0600        :Working: DO: Waiting to connect to node(s) with SSH. During Linux upgrades this can take some time.
2019-02-11 06:02:50 -0600        :SUCCESS: DONE: Waiting to connect to node(s) with SSH. During Linux upgrades this can take some time.
2019-02-11 06:02:50 -0600        :Working: DO: Wait for node(s) is ready for the completion step of update.
2019-02-11 06:04:14 -0600        :SUCCESS: DONE: Wait for node(s) is ready for the completion step of update.
2019-02-11 06:04:30 -0600        :Working: DO: Initiate completion step from dbnodeupdate.sh on node(s)
2019-02-11 06:24:40 -0600        :ERROR  : Completion step from dbnodeupdate.sh failed on one or more nodes
2019-02-11 06:24:45 -0600        :SUCCESS: DONE: Initiate completion step from dbnodeupdate.sh on dm01db02
2019-02-11 06:25:29 -0600        :SUCCESS: DONE: Get information about downgrade version from node.


    SUMMARY OF ERRORS FOR dm01db03:

2019-02-11 06:25:29 -0600        :ERROR  : There was an error during the completion step on dm01db03.
2019-02-11 06:25:29 -0600        :ERROR  : Please correct the error and run “/u01/dbnodeupdate.patchmgr/dbnodeupdate.sh -c” on dm01db03 to complete the update.
2019-02-11 06:25:29 -0600        :ERROR  : The dbnodeupdate.log and diag files can help to find the root cause.
2019-02-11 06:25:29 -0600        :ERROR  : DONE: Initiate completion step from dbnodeupdate.sh on dm01db03
2019-02-11 06:25:29 -0600        :SUCCESS: DONE: Initiate completion step from dbnodeupdate.sh on dm01db04
2019-02-11 06:26:38 -0600        :INFO   : SUMMARY FOR ALL NODES:
2019-02-11 06:25:28 -0600        :       : dm01db02 has state: SUCCESS
2019-02-11 06:25:29 -0600        :ERROR  : dm01db03 has state: COMPLETE STEP FAILED
2019-02-11 06:26:12 -0600        :       : dm01db04 has state: SUCCESS
2019-02-11 06:26:38 -0600        :FAILED : For details, check the following files in the /u01/app/oracle/software/exa_patches/dbnode/dbserver_patch_19.190204:
2019-02-11 06:26:38 -0600        :FAILED :  – <dbnode_name>_dbnodeupdate.log
2019-02-11 06:26:38 -0600        :FAILED :  – patchmgr.log
2019-02-11 06:26:38 -0600        :FAILED :  – patchmgr.trc
2019-02-11 06:26:38 -0600        :FAILED : DONE: Initiate update on node(s).

[INFO     ] Collected dbnodeupdate diag in file: Diag_patchmgr_dbnode_upgrade_110219050516.tbz
-rw-r–r– 1 root root 10358047 Feb 11 06:26 Diag_patchmgr_dbnode_upgrade_110219050516.tbz


Note: The compute node upgrade failed for the node 3.

Review the logs to identify the cause of upgrade failure on node 3.

[root@dm01db01 dbserver_patch_19.190204]# cd /u01/app/oracle/software/exa_patches/dbnode/dbserver_patch_19.190204

[root@dm01db01 dbserver_patch_19.190204]# view dm01db03_dbnodeupdate.log

[1549886671][2019-02-11 06:24:34 -0600][ERROR][/u01/dbnodeupdate.patchmgr/dbnodeupdate.sh][PrintGenError][]  Unable to start stack, see /var/log/cellos/dbnodeupdate.log for more info. Re-run dbnodeupdate.sh -c after resolving the issue. If you wish to skip relinking append an extra ‘-i’ flag. Exiting…


From the above log file and error message, we can see that the upgrade failed while trying to start the Clusterware.

Solution: Connect to node 3 and stop the clusterware and execute the command “/u01/dbnodeupdate.patchmgr/dbnodeupdate.sh -c -s” to complete the upgrade on node 3.

[root@dm01db01 dbserver_patch_19.190204]# ssh dm01db03
Last login: Mon Feb 11 04:13:00 2019 from dm01db01.netsoftmate.com

[root@dm01db03 ~]# uptime
 06:34:55 up 35 min,  1 user,  load average: 0.02, 0.11, 0.19

[root@dm01db03 ~]# /u01/app/11.2.0.4/grid/bin/crsctl check crs
CRS-4638: Oracle High Availability Services is online
CRS-4535: Cannot communicate with Cluster Ready Services
CRS-4530: Communications failure contacting Cluster Synchronization Services daemon
CRS-4534: Cannot communicate with Event Manager

[root@dm01db03 ~]# /u01/app/11.2.0.4/grid/bin/crsctl stop crs -f
CRS-2791: Starting shutdown of Oracle High Availability Services-managed resources on ‘dm01db03’
CRS-2673: Attempting to stop ‘ora.crf’ on ‘dm01db03’
CRS-2673: Attempting to stop ‘ora.mdnsd’ on ‘dm01db03’
CRS-2673: Attempting to stop ‘ora.diskmon’ on ‘dm01db03’
CRS-2677: Stop of ‘ora.crf’ on ‘dm01db03’ succeeded
CRS-2673: Attempting to stop ‘ora.gipcd’ on ‘dm01db03’
CRS-2677: Stop of ‘ora.mdnsd’ on ‘dm01db03’ succeeded
CRS-2677: Stop of ‘ora.diskmon’ on ‘dm01db03’ succeeded
CRS-2677: Stop of ‘ora.gipcd’ on ‘dm01db03’ succeeded
CRS-2673: Attempting to stop ‘ora.gpnpd’ on ‘dm01db03’
CRS-2677: Stop of ‘ora.gpnpd’ on ‘dm01db03’ succeeded
CRS-2793: Shutdown of Oracle High Availability Services-managed resources on ‘dm01db03’ has completed
CRS-4133: Oracle High Availability Services has been stopped.
[root@dm01db03 ~]# /u01/app/11.2.0.4/grid/bin/crsctl start crs
CRS-4123: Oracle High Availability Services has been started.


[root@dm01db03 ~]# /u01/dbnodeupdate.patchmgr/dbnodeupdate.sh -c -s
  (*) 2019-02-11 06:42:42: Initializing logfile /var/log/cellos/dbnodeupdate.log
##########################################################################################################################
#                                                                                                                        #
# Guidelines for using dbnodeupdate.sh (rel. 19.190204):                                                                 #
#                                                                                                                        #
# – Prerequisites for usage:                                                                                             #
#         1. Refer to dbnodeupdate.sh options. See MOS 1553103.1                                                         #
#         2. Always use the latest release of dbnodeupdate.sh. See patch 21634633                                        #
#         3. Run the prereq check using the ‘-v’ flag.                                                                   #
#         4. Run the prereq check with the ‘-M’ to allow rpms being removed and preupdated to make precheck work.        #
#                                                                                                                        #
#   I.e.:  ./dbnodeupdate.sh -u -l /u01/my-iso-repo.zip -v  (may see rpm conflicts)                                      #
#          ./dbnodeupdate.sh -u -l http://my-yum-repo -v -M (resolved known rpm comflicts)                               #
#                                                                                                                        #
# – Prerequisite rpm dependency check failures can happen due to customization:                                          #
#     – The prereq check detects dependency issues that need to be addressed prior to running a successful update.       #
#     – Customized rpm packages may fail the built-in dependency check and system updates cannot proceed until resolved. #
#     – Prereq check may fail because -M flag was not used and known conflicting rpms were not removed.                  #
#                                                                                                                        #
#   When upgrading to releases 11.2.3.3.0 or later:                                                                      #
#      – When ‘exact’ package dependency check fails ‘minimum’ package dependency check will be tried.                   #
#      – When ‘minimum’ package dependency check fails, conflicting packages should be removed before proceeding.        #
#                                                                                                                        #
# – As part of the prereq checks and as part of the update, a number of rpms will be removed.                            #
#   This removal is required to preserve Exadata functioning. This should not be confused with obsolete packages.        #
#   Running without -M at prereq time may result in a Yum dependency prereq checks fail                                  #
#                                                                                                                        #
# – In case of any problem when filing an SR, upload the following:                                                      #
#      – /var/log/cellos/dbnodeupdate.log                                                                                #
#      – /var/log/cellos/dbnodeupdate.<runid>.diag                                                                       #
#      – where <runid> is the unique number of the failing run.                                                          #
#                                                                                                                        #
#                                                                                                                        #
##########################################################################################################################
Continue ? [y/n] y

  (*) 2019-02-11 06:42:45: Unzipping helpers (/u01/dbnodeupdate.patchmgr/dbupdate-helpers.zip) to /opt/oracle.SupportTools/dbnodeupdate_helpers
  (*) 2019-02-11 06:42:48: Collecting system configuration settings. This may take a while…

Active Image version   : 18.1.12.0.0.190111
Active Kernel version  : 4.1.12-94.8.10.el6uek
Active LVM Name        : /dev/mapper/VGExaDb-LVDbSys1
Inactive Image version : 12.2.1.1.6.180125.1
Inactive LVM Name      : /dev/mapper/VGExaDb-LVDbSys2
Current user id        : root
Action                 : finish-post (validate image status, fix known issues, cleanup, relink and enable crs to auto-start)
Shutdown stack         : Yes (Currently stack is up)
Logfile                : /var/log/cellos/dbnodeupdate.log (runid: 110219064242)
Diagfile               : /var/log/cellos/dbnodeupdate.110219064242.diag
Server model           : SUN SERVER X4-2
dbnodeupdate.sh rel.   : 19.190204 (always check MOS 1553103.1 for the latest release of dbnodeupdate.sh)


The following known issues will be checked for but require manual follow-up:
  (*) – Yum rolling update requires fix for 11768055 when Grid Infrastructure is below 11.2.0.2 BP12


Continue ? [y/n] y


  (*) 2019-02-11 06:46:55: Verifying GI and DB’s are shutdown
  (*) 2019-02-11 06:46:56: Shutting down GI and db
  (*) 2019-02-11 06:47:39: No rpms to remove
  (*) 2019-02-11 06:47:43: EM agent in /u01/app/oracle/product/Agent12c/core/12.1.0.4.0 stopped
  (*) 2019-02-11 06:47:48: EM agent in /opt/OracleHomes/agent_home/core/12.1.0.4.0 stopped
  (*) 2019-02-11 06:47:48: Relinking all homes
  (*) 2019-02-11 06:47:48: Unlocking /u01/app/11.2.0.4/grid
  (*) 2019-02-11 06:47:57: Relinking /u01/app/11.2.0.4/grid as oracle (with rds option)
  (*) 2019-02-11 06:48:04: Relinking /u01/app/oracle/product/11.2.0.4/dbhome_1 as oracle (with rds option)
  (*) 2019-02-11 06:48:09: Locking and starting Grid Infrastructure (/u01/app/11.2.0.4/grid)
  (*) 2019-02-11 06:50:40: Sleeping another 60 seconds while stack is starting (1/15)
  (*) 2019-02-11 06:50:40: Stack started
  (*) 2019-02-11 06:51:08: TFA Started
  (*) 2019-02-11 06:51:08: Enabling stack to start at reboot. Disable this when the stack should not be starting on a next boot
  (*) 2019-02-11 06:51:21: EM agent in /u01/app/oracle/product/Agent12c/core/12.1.0.4.0 started
  (*) 2019-02-11 06:52:56: EM agent in /opt/OracleHomes/agent_home/core/12.1.0.4.0 started
  (*) 2019-02-11 06:52:56: Purging any extra jdk packages.
  (*) 2019-02-11 06:52:56: No jdk package cleanup needed. Retained jdk package installed: jdk1.8-1.8.0_191.x86_64
  (*) 2019-02-11 06:52:56: Retained the required kernel-transition package: kernel-transition-2.6.32-0.0.0.3.el6
  (*) 2019-02-11 06:53:09: Capturing service status and file attributes. This may take a while…
  (*) 2019-02-11 06:53:09: Service status and file attribute report in: /etc/exadata/reports
  (*) 2019-02-11 06:53:09: All post steps are finished.


  • Monitoring compute node upgrade.
[root@dm01db01 dbserver_patch_19.190204]# tail -f patchmgr.trc

  • Now patch node 1 using dbnodeupdate.sh or patchmgr. Here we will use the dbnodeupdate.sh utility to patch node 1.
[root@dm01db01 dbserver_patch_19.190204]# ./dbnodeupdate.sh -u -l /u01/app/oracle/software/exa_patches/dbnode/p29181093_181000_Linux-x86-64.zip -v
  (*) 2019-02-11 06:59:59: Initializing logfile /var/log/cellos/dbnodeupdate.log
##########################################################################################################################
#                                                                                                                        #
# Guidelines for using dbnodeupdate.sh (rel. 19.190204):                                                                 #
#                                                                                                                        #
# – Prerequisites for usage:                                                                                             #
#         1. Refer to dbnodeupdate.sh options. See MOS 1553103.1                                                         #
#         2. Always use the latest release of dbnodeupdate.sh. See patch 21634633                                        #
#         3. Run the prereq check using the ‘-v’ flag.                                                                   #
#         4. Run the prereq check with the ‘-M’ to allow rpms being removed and preupdated to make precheck work.        #
#                                                                                                                        #
#   I.e.:  ./dbnodeupdate.sh -u -l /u01/my-iso-repo.zip -v  (may see rpm conflicts)                                      #
#          ./dbnodeupdate.sh -u -l http://my-yum-repo -v -M (resolved known rpm comflicts)                               #
#                                                                                                                        #
# – Prerequisite rpm dependency check failures can happen due to customization:                                          #
#     – The prereq check detects dependency issues that need to be addressed prior to running a successful update.       #
#     – Customized rpm packages may fail the built-in dependency check and system updates cannot proceed until resolved. #
#     – Prereq check may fail because -M flag was not used and known conflicting rpms were not removed.                  #
#                                                                                                                        #
#   When upgrading to releases 11.2.3.3.0 or later:                                                                      #
#      – When ‘exact’ package dependency check fails ‘minimum’ package dependency check will be tried.                   #
#      – When ‘minimum’ package dependency check fails, conflicting packages should be removed before proceeding.        #
#                                                                                                                        #
# – As part of prereq check without specifying -M flag NO rpms will be removed. This may result in prereq check failing. #
#        The following file lists the commands that would have been executed for removing rpms when specifying -M flag.  #
#        File: /var/log/cellos/nomodify_results.110219065959.sh.                                                         #
#                                                                                                                        #
# – In case of any problem when filing an SR, upload the following:                                                      #
#      – /var/log/cellos/dbnodeupdate.log                                                                                #
#      – /var/log/cellos/dbnodeupdate.<runid>.diag                                                                       #
#      – where <runid> is the unique number of the failing run.                                                          #
#                                                                                                                        #
#      *** This is a verify only run without -M specified, no changes will be made to make prereq check work. ***        #
#                                                                                                                        #
##########################################################################################################################
Continue ? [y/n] y

  (*) 2019-02-11 07:00:11: Unzipping helpers (/u01/app/oracle/software/exa_patches/dbnode/dbserver_patch_19.190204/dbupdate-helpers.zip) to /opt/oracle.SupportTools/dbnodeupdate_helpers
  (*) 2019-02-11 07:00:14: Collecting system configuration settings. This may take a while…
  (*) 2019-02-11 07:01:01: Validating system settings for known issues and best practices. This may take a while…
  (*) 2019-02-11 07:01:01: Checking free space in /u01/app/oracle/software/exa_patches/dbnode/iso.stage
  (*) 2019-02-11 07:01:01: Unzipping /u01/app/oracle/software/exa_patches/dbnode/p29181093_181000_Linux-x86-64.zip to /u01/app/oracle/software/exa_patches/dbnode/iso.stage, this may take a while
  (*) 2019-02-11 07:01:11: Generating Exadata repository file /etc/yum.repos.d/Exadata-computenode.repo
  (*) 2019-02-11 07:01:50: Validating the specified source location.
  (*) 2019-02-11 07:01:51: Cleaning up the yum cache.
  (*) 2019-02-11 07:01:53: Performing yum package dependency check for ‘exact’ dependencies. This may take a while…
  (*) 2019-02-11 07:02:00: ‘Exact’ package dependency check succeeded.
  (*) 2019-02-11 07:02:00: ‘Minimum’ package dependency check succeeded.

—————————————————————————————————————————–
Running in prereq check mode. Flag -M was not specified this means NO rpms will be pre-updated or removed to make the prereq check work.
—————————————————————————————————————————–
Active Image version   : 12.2.1.1.6.180125.1
Active Kernel version  : 4.1.12-94.7.8.el6uek
Active LVM Name        : /dev/mapper/VGExaDb-LVDbSys1
Inactive Image version : 12.1.2.3.6.170713
Inactive LVM Name      : /dev/mapper/VGExaDb-LVDbSys2
Current user id        : root
Action                 : upgrade
Upgrading to           : 18.1.12.0.0.190111 (to exadata-sun-computenode-exact)
Baseurl                : file:///var/www/html/yum/unknown/EXADATA/dbserver/110219065959/x86_64/ (iso)
Iso file               : /u01/app/oracle/software/exa_patches/dbnode/iso.stage/exadata_ol6_base_repo_18.1.12.0.0.190111.iso
Create a backup        : Yes
Shutdown EM agents     : Yes
Shutdown stack         : No (Currently stack is up)
Missing package files  : Not tested.
RPM exclusion list     : Not in use (add rpms to /etc/exadata/yum/exclusion.lst and restart dbnodeupdate.sh)
RPM obsolete lists     : /etc/exadata/yum/obsolete_nodeps.lst, /etc/exadata/yum/obsolete.lst (lists rpms to be removed by the update)
                       : RPM obsolete list is extracted from exadata-sun-computenode-18.1.12.0.0.190111-1.noarch.rpm
Exact dependencies     : No conflicts
Minimum dependencies   : No conflicts
Logfile                : /var/log/cellos/dbnodeupdate.log (runid: 110219065959)
Diagfile               : /var/log/cellos/dbnodeupdate.110219065959.diag
Server model           : SUN SERVER X4-2
dbnodeupdate.sh rel.   : 19.190204 (always check MOS 1553103.1 for the latest release of dbnodeupdate.sh)
Note                   : After upgrading and rebooting run ‘./dbnodeupdate.sh -c’ to finish post steps.


The following known issues will be checked for but require manual follow-up:
  (*) – Yum rolling update requires fix for 11768055 when Grid Infrastructure is below 11.2.0.2 BP12
   Prereq check finished successfully, check the above report for next steps.
   When needed: run prereq check with -M to remove known rpm dependency failures or execute the commands in dm01db01:/var/log/cellos/nomodify_results.110219065959.sh.

  (*) 2019-02-11 07:02:07: Cleaning up iso and temp mount points

[root@dm01db01 dbserver_patch_19.190204]#


[root@dm01db01 dbserver_patch_19.190204]# ./dbnodeupdate.sh -u -l /u01/app/oracle/software/exa_patches/dbnode/p29181093_181000_Linux-x86-64.zip -s
  (*) 2019-02-11 07:12:44: Initializing logfile /var/log/cellos/dbnodeupdate.log
##########################################################################################################################
#                                                                                                                        #
# Guidelines for using dbnodeupdate.sh (rel. 19.190204):                                                                 #
#                                                                                                                        #
# – Prerequisites for usage:                                                                                             #
#         1. Refer to dbnodeupdate.sh options. See MOS 1553103.1                                                         #
#         2. Always use the latest release of dbnodeupdate.sh. See patch 21634633                                        #
#         3. Run the prereq check using the ‘-v’ flag.                                                                   #
#         4. Run the prereq check with the ‘-M’ to allow rpms being removed and preupdated to make precheck work.        #
#                                                                                                                        #
#   I.e.:  ./dbnodeupdate.sh -u -l /u01/my-iso-repo.zip -v  (may see rpm conflicts)                                      #
#          ./dbnodeupdate.sh -u -l http://my-yum-repo -v -M (resolved known rpm comflicts)                               #
#                                                                                                                        #
# – Prerequisite rpm dependency check failures can happen due to customization:                                          #
#     – The prereq check detects dependency issues that need to be addressed prior to running a successful update.       #
#     – Customized rpm packages may fail the built-in dependency check and system updates cannot proceed until resolved. #
#     – Prereq check may fail because -M flag was not used and known conflicting rpms were not removed.                  #
#                                                                                                                        #
#   When upgrading to releases 11.2.3.3.0 or later:                                                                      #
#      – When ‘exact’ package dependency check fails ‘minimum’ package dependency check will be tried.                   #
#      – When ‘minimum’ package dependency check fails, conflicting packages should be removed before proceeding.        #
#                                                                                                                        #
# – As part of the prereq checks and as part of the update, a number of rpms will be removed.                            #
#   This removal is required to preserve Exadata functioning. This should not be confused with obsolete packages.        #
#   Running without -M at prereq time may result in a Yum dependency prereq checks fail                                  #
#                                                                                                                        #
# – In case of any problem when filing an SR, upload the following:                                                      #
#      – /var/log/cellos/dbnodeupdate.log                                                                                #
#      – /var/log/cellos/dbnodeupdate.<runid>.diag                                                                       #
#      – where <runid> is the unique number of the failing run.                                                          #
#                                                                                                                        #
#      *** This is an update run, changes will be made. ***                                                              #
#                                                                                                                        #
##########################################################################################################################
Continue ? [y/n] y

  (*) 2019-02-11 07:12:47: Unzipping helpers (/u01/app/oracle/software/exa_patches/dbnode/dbserver_patch_19.190204/dbupdate-helpers.zip) to /opt/oracle.SupportTools/dbnodeupdate_helpers
  (*) 2019-02-11 07:12:49: Collecting system configuration settings. This may take a while…
  (*) 2019-02-11 07:13:38: Validating system settings for known issues and best practices. This may take a while…
  (*) 2019-02-11 07:13:38: Checking free space in /u01/app/oracle/software/exa_patches/dbnode/iso.stage
  (*) 2019-02-11 07:13:38: Unzipping /u01/app/oracle/software/exa_patches/dbnode/p29181093_181000_Linux-x86-64.zip to /u01/app/oracle/software/exa_patches/dbnode/iso.stage, this may take a while
  (*) 2019-02-11 07:13:48: Generating Exadata repository file /etc/yum.repos.d/Exadata-computenode.repo
  (*) 2019-02-11 07:14:27: Validating the specified source location.
  (*) 2019-02-11 07:14:28: Cleaning up the yum cache.
  (*) 2019-02-11 07:14:31: Performing yum package dependency check for ‘exact’ dependencies. This may take a while…
  (*) 2019-02-11 07:14:38: ‘Exact’ package dependency check succeeded.
  (*) 2019-02-11 07:14:38: ‘Minimum’ package dependency check succeeded.

Active Image version   : 12.2.1.1.6.180125.1
Active Kernel version  : 4.1.12-94.7.8.el6uek
Active LVM Name        : /dev/mapper/VGExaDb-LVDbSys1
Inactive Image version : 12.1.2.3.6.170713
Inactive LVM Name      : /dev/mapper/VGExaDb-LVDbSys2
Current user id        : root
Action                 : upgrade
Upgrading to           : 18.1.12.0.0.190111 (to exadata-sun-computenode-exact)
Baseurl                : file:///var/www/html/yum/unknown/EXADATA/dbserver/110219071244/x86_64/ (iso)
Iso file               : /u01/app/oracle/software/exa_patches/dbnode/iso.stage/exadata_ol6_base_repo_18.1.12.0.0.190111.iso
Create a backup        : Yes
Shutdown EM agents     : Yes
Shutdown stack         : Yes (Currently stack is up)
Missing package files  : Not tested.
RPM exclusion list     : Not in use (add rpms to /etc/exadata/yum/exclusion.lst and restart dbnodeupdate.sh)
RPM obsolete lists     : /etc/exadata/yum/obsolete_nodeps.lst, /etc/exadata/yum/obsolete.lst (lists rpms to be removed by the update)
                       : RPM obsolete list is extracted from exadata-sun-computenode-18.1.12.0.0.190111-1.noarch.rpm
Exact dependencies     : No conflicts
Minimum dependencies   : No conflicts
Logfile                : /var/log/cellos/dbnodeupdate.log (runid: 110219071244)
Diagfile               : /var/log/cellos/dbnodeupdate.110219071244.diag
Server model           : SUN SERVER X4-2
dbnodeupdate.sh rel.   : 19.190204 (always check MOS 1553103.1 for the latest release of dbnodeupdate.sh)
Note                   : After upgrading and rebooting run ‘./dbnodeupdate.sh -c’ to finish post steps.


The following known issues will be checked for but require manual follow-up:
  (*) – Yum rolling update requires fix for 11768055 when Grid Infrastructure is below 11.2.0.2 BP12


Continue ? [y/n] y

  (*) 2019-02-11 07:15:45: Verifying GI and DB’s are shutdown
  (*) 2019-02-11 07:15:45: Shutting down GI and db
  (*) 2019-02-11 07:17:00: Unmount of /boot successful
  (*) 2019-02-11 07:17:00: Check for /dev/sda1 successful
  (*) 2019-02-11 07:17:00: Mount of /boot successful
  (*) 2019-02-11 07:17:00: Disabling stack from starting
  (*) 2019-02-11 07:17:00: Performing filesystem backup to /dev/mapper/VGExaDb-LVDbSys2. Avg. 30 minutes (maximum 120) depends per environment………………………………………………………………………………………………………………………
  (*) 2019-02-11 07:28:38: Backup successful
  (*) 2019-02-11 07:28:39: ExaWatcher stopped successful
  (*) 2019-02-11 07:28:53: EM agent in /u01/app/oracle/product/Agent12c/core/12.1.0.4.0 stopped
  (*) 2019-02-11 07:29:06: EM agent in /opt/OracleHomes/agent_home/core/12.1.0.4.0 stopped
  (*) 2019-02-11 07:29:06: Auto-start of EM agents disabled
  (*) 2019-02-11 07:29:15: Capturing service status and file attributes. This may take a while…
  (*) 2019-02-11 07:29:16: Service status and file attribute report in: /etc/exadata/reports
  (*) 2019-02-11 07:29:27: MS stopped successful
  (*) 2019-02-11 07:29:31: Validating the specified source location.
  (*) 2019-02-11 07:29:33: Cleaning up the yum cache.
  (*) 2019-02-11 07:29:36: Performing yum update. Node is expected to reboot when finished.
  (*) 2019-02-11 07:33:41: Waiting for post rpm script to finish. Sleeping another 60 seconds (60 / 900)

Remote broadcast message (Mon Feb 11 07:33:50 2019):

Exadata post install steps started.
  It may take up to 15 minutes.
  (*) 2019-02-11 07:34:41: Waiting for post rpm script to finish. Sleeping another 60 seconds (120 / 900)
  (*) 2019-02-11 07:35:41: Waiting for post rpm script to finish. Sleeping another 60 seconds (180 / 900)
  (*) 2019-02-11 07:36:41: Waiting for post rpm script to finish. Sleeping another 60 seconds (240 / 900)

Remote broadcast message (Mon Feb 11 07:37:08 2019):

Exadata post install steps completed.
  (*) 2019-02-11 07:37:41: Waiting for post rpm script to finish. Sleeping another 60 seconds (300 / 900)
  (*) 2019-02-11 07:38:42: All post steps are finished.

  (*) 2019-02-11 07:38:42: System will reboot automatically for changes to take effect
  (*) 2019-02-11 07:38:42: After reboot run “./dbnodeupdate.sh -c” to complete the upgrade
  (*) 2019-02-11 07:39:04: Cleaning up iso and temp mount points
 
  (*) 2019-02-11 07:39:06: Rebooting now…


WAIT FOR FEW MINUTES SO THE SEVER IS REBOOTED

OPEN A NEW SESSION AND RUN THE FOLLOWING COMMAND TO COMPLETE THE NODE 1 UPGRADE.


[root@dm01db01 ~]# cd /u01/app/oracle/software/exa_patches/dbnode/dbserver_patch_19.190204/

[root@dm01db01 dbserver_patch_19.190204]# ./dbnodeupdate.sh -c -s
  (*) 2019-02-11 09:46:54: Initializing logfile /var/log/cellos/dbnodeupdate.log
##########################################################################################################################
#                                                                                                                        #
# Guidelines for using dbnodeupdate.sh (rel. 19.190204):                                                                 #
#                                                                                                                        #
# – Prerequisites for usage:                                                                                             #
#         1. Refer to dbnodeupdate.sh options. See MOS 1553103.1                                                         #
#         2. Always use the latest release of dbnodeupdate.sh. See patch 21634633                                        #
#         3. Run the prereq check using the ‘-v’ flag.                                                                   #
#         4. Run the prereq check with the ‘-M’ to allow rpms being removed and preupdated to make precheck work.        #
#                                                                                                                        #
#   I.e.:  ./dbnodeupdate.sh -u -l /u01/my-iso-repo.zip -v  (may see rpm conflicts)                                      #
#          ./dbnodeupdate.sh -u -l http://my-yum-repo -v -M (resolved known rpm comflicts)                               #
#                                                                                                                        #
# – Prerequisite rpm dependency check failures can happen due to customization:                                          #
#     – The prereq check detects dependency issues that need to be addressed prior to running a successful update.       #
#     – Customized rpm packages may fail the built-in dependency check and system updates cannot proceed until resolved. #
#     – Prereq check may fail because -M flag was not used and known conflicting rpms were not removed.                  #
#                                                                                                                        #
#   When upgrading to releases 11.2.3.3.0 or later:                                                                      #
#      – When ‘exact’ package dependency check fails ‘minimum’ package dependency check will be tried.                   #
#      – When ‘minimum’ package dependency check fails, conflicting packages should be removed before proceeding.        #
#                                                                                                                        #
# – As part of the prereq checks and as part of the update, a number of rpms will be removed.                            #
#   This removal is required to preserve Exadata functioning. This should not be confused with obsolete packages.        #
#   Running without -M at prereq time may result in a Yum dependency prereq checks fail                                  #
#                                                                                                                        #
# – In case of any problem when filing an SR, upload the following:                                                      #
#      – /var/log/cellos/dbnodeupdate.log                                                                                #
#      – /var/log/cellos/dbnodeupdate.<runid>.diag                                                                       #
#      – where <runid> is the unique number of the failing run.                                                          #
#                                                                                                                        #
#                                                                                                                        #
##########################################################################################################################
Continue ? [y/n] y

  (*) 2019-02-11 09:46:56: Unzipping helpers (/u01/app/oracle/software/exa_patches/dbnode/dbserver_patch_19.190204/dbupdate-helpers.zip) to /opt/oracle.SupportTools/dbnodeupdate_helpers
  (*) 2019-02-11 09:46:59: Collecting system configuration settings. This may take a while…

Active Image version   : 18.1.12.0.0.190111
Active Kernel version  : 4.1.12-94.8.10.el6uek
Active LVM Name        : /dev/mapper/VGExaDb-LVDbSys1
Inactive Image version : 12.2.1.1.6.180125.1
Inactive LVM Name      : /dev/mapper/VGExaDb-LVDbSys2
Current user id        : root
Action                 : finish-post (validate image status, fix known issues, cleanup, relink and enable crs to auto-start)
Shutdown stack         : Yes (Currently stack is up)
Logfile                : /var/log/cellos/dbnodeupdate.log (runid: 110219094654)
Diagfile               : /var/log/cellos/dbnodeupdate.110219094654.diag
Server model           : SUN SERVER X4-2
dbnodeupdate.sh rel.   : 19.190204 (always check MOS 1553103.1 for the latest release of dbnodeupdate.sh)


The following known issues will be checked for but require manual follow-up:
  (*) – Yum rolling update requires fix for 11768055 when Grid Infrastructure is below 11.2.0.2 BP12


Continue ? [y/n] y

  (*) 2019-02-11 09:54:33: Verifying GI and DB’s are shutdown
  (*) 2019-02-11 09:54:33: Shutting down GI and db
  (*) 2019-02-11 09:55:27: No rpms to remove
  (*) 2019-02-11 09:55:28: Relinking all homes
  (*) 2019-02-11 09:55:28: Unlocking /u01/app/11.2.0.4/grid
  (*) 2019-02-11 09:55:37: Relinking /u01/app/11.2.0.4/grid as oracle (with rds option)
  (*) 2019-02-11 09:55:52: Relinking /u01/app/oracle/product/11.2.0.4/dbhome_1 as oracle (with rds option)
  (*) 2019-02-11 09:56:06: Locking and starting Grid Infrastructure (/u01/app/11.2.0.4/grid)
  (*) 2019-02-11 09:58:36: Sleeping another 60 seconds while stack is starting (1/15)
  (*) 2019-02-11 09:58:36: Stack started
  (*) 2019-02-11 10:00:14: TFA Started
  (*) 2019-02-11 10:00:14: Enabling stack to start at reboot. Disable this when the stack should not be starting on a next boot
  (*) 2019-02-11 10:00:15: Auto-start of EM agents enabled
  (*) 2019-02-11 10:00:30: EM agent in /u01/app/oracle/product/Agent12c/core/12.1.0.4.0 started
  (*) 2019-02-11 10:00:53: EM agent in /opt/OracleHomes/agent_home/core/12.1.0.4.0 started
  (*) 2019-02-11 10:00:53: Purging any extra jdk packages.
  (*) 2019-02-11 10:00:53: No jdk package cleanup needed. Retained jdk package installed: jdk1.8-1.8.0_191.x86_64
  (*) 2019-02-11 10:00:54: Retained the required kernel-transition package: kernel-transition-2.6.32-0.0.0.3.el6
  (*) 2019-02-11 10:01:07: Capturing service status and file attributes. This may take a while…
  (*) 2019-02-11 10:01:07: Service status and file attribute report in: /etc/exadata/reports
  (*) 2019-02-11 10:01:08: All post steps are finished.


  • Verify the compute nodes new Image version
[root@dm01db01 ~]# dcli -g dbs_group -l root ‘imageinfo | grep “Image version”‘
dm01db01: Image version: 18.1.12.0.0.190111
dm01db02: Image version: 18.1.12.0.0.190111
dm01db03: Image version: 18.1.12.0.0.190111
dm01db04: Image version: 18.1.12.0.0.190111


[root@dm01db01 ~]# /u01/app/11.2.0.4/grid/bin/crsctl stat res -t | more
——————————————————————————–
NAME           TARGET  STATE        SERVER                   STATE_DETAILS
——————————————————————————–
Local Resources
——————————————————————————–
ora.DATA_dm01.dg
               ONLINE  ONLINE       dm01db01
               ONLINE  ONLINE       dm01db02
               ONLINE  ONLINE       dm01db03
               ONLINE  ONLINE       dm01db04
ora.DBFS_DG.dg
               ONLINE  ONLINE       dm01db01
               ONLINE  ONLINE       dm01db02
               ONLINE  ONLINE       dm01db03
               ONLINE  ONLINE       dm01db04
ora.LISTENER.lsnr
               ONLINE  ONLINE       dm01db01
               ONLINE  ONLINE       dm01db02
               ONLINE  ONLINE       dm01db03
               ONLINE  ONLINE       dm01db04
ora.RECO_dm01.dg
               ONLINE  ONLINE       dm01db01
               ONLINE  ONLINE       dm01db02
               ONLINE  ONLINE       dm01db03
               ONLINE  ONLINE       dm01db04
ora.asm
               ONLINE  ONLINE       dm01db01                 Started
               ONLINE  ONLINE       dm01db02                 Started
               ONLINE  ONLINE       dm01db03                 Started
               ONLINE  ONLINE       dm01db04                 Started
ora.gsd
               OFFLINE OFFLINE      dm01db01
               OFFLINE OFFLINE      dm01db02
               OFFLINE OFFLINE      dm01db03
               OFFLINE OFFLINE      dm01db04
ora.net1.network
               ONLINE  ONLINE       dm01db01
               ONLINE  ONLINE       dm01db02
               ONLINE  ONLINE       dm01db03
               ONLINE  ONLINE       dm01db04
ora.ons
               ONLINE  ONLINE       dm01db01
               ONLINE  ONLINE       dm01db02
               ONLINE  ONLINE       dm01db03
               ONLINE  ONLINE       dm01db04
ora.registry.acfs
               ONLINE  OFFLINE      dm01db01
               ONLINE  OFFLINE      dm01db02
               ONLINE  OFFLINE      dm01db03
               ONLINE  OFFLINE      dm01db04
——————————————————————————–
Cluster Resources
——————————————————————————–
ora.LISTENER_SCAN1.lsnr
      1        ONLINE  ONLINE       dm01db02
ora.LISTENER_SCAN2.lsnr
      1        ONLINE  ONLINE       dm01db04
ora.LISTENER_SCAN3.lsnr
      1        ONLINE  ONLINE       dm01db03
ora.cvu
      1        ONLINE  ONLINE       dm01db03
ora.dbm01.db
      1        OFFLINE OFFLINE
      2        OFFLINE OFFLINE
      3        OFFLINE OFFLINE
      4        OFFLINE OFFLINE
ora.dm01db01.vip
      1        ONLINE  ONLINE       dm01db01
ora.dm01db02.vip
      1        ONLINE  ONLINE       dm01db02
ora.dm01db03.vip
      1        ONLINE  ONLINE       dm01db03
ora.dm01db04.vip
      1        ONLINE  ONLINE       dm01db04
ora.oc4j
      1        ONLINE  ONLINE       dm01db03
ora.orcldb.db
      1        ONLINE  ONLINE       dm01db01                 Open
      2        ONLINE  ONLINE       dm01db02                 Open
      3        ONLINE  ONLINE       dm01db03                 Open
      4        ONLINE  ONLINE       dm01db04                 Open
ora.scan1.vip
      1        ONLINE  ONLINE       dm01db02
ora.scan2.vip
      1        ONLINE  ONLINE       dm01db04
ora.scan3.vip
      1        ONLINE  ONLINE       dm01db03


Conclusion

In this article we have learned how to perform upgrade Exadata Compute nodes using patchmgr & dbnodeupdate.sh utilities. The patchmgr utility can be used for upgrading, rollback and backup Exadata Compute nodes. patchmgr utility can be used for upgrading Exadata Compute nodes in a rolling or non-rolling fashion. Launch patchmgr from the compute node that is node 1 that has user equivalence setup to all the Compute nodes. Patch all the compute nodes except node 1 and later patch node 1 alone.


1

Overview
  • The Exadata network grid consists of multiple Sun QDR InfiniBand switches.
  • IB Switches are used for the storage network as well as the Oracle RAC interconnect.
  • Exadata compute nodes and storage cells are configured with dual-port InfiniBand ports and connect to each of the two leaf switches.
  • You can access IB Switches using command line and Web ILOM
  • IB Switches run Linux operating system.

In this article I will demonstrate how to patch or upgrade Oracle Exadata IB Switches.


About Infiniband Switch Patching
  • Starting with release 11.2.3.3.0, the patchmgr utility is used to upgrade and downgrade the InfiniBand switches.
  • IB Switch patch is delievered with Exadata storage patch.
  • IB Switch patches are released semi annually to annually.
  • IB Switch can be patched in Rolling fashion only.

Environment
  • Exadata Half Rack X4-2
  • 4 Compute nodes, 7 Storage cells and 2 IB Switches
  • Current IB Switch Version 2.2.7-1

Step by Step Infiniband Switch Patching
 

  • Identify the number of switches in clusters.

[root@dm01dbadm01 ~]# ibswitches
Switch  : 0x002128469b8aa0a0 ports 36 “SUN DCS 36P QDR dm01sw-iba01 10.209.41.246” enhanced port 0 lid 5 lmc 0
Switch  : 0x002128469b97a0a0 ports 36 “SUN DCS 36P QDR dm01sw-ibb01 10.209.41.247” enhanced port 0 lid 4 lmc 0


  • Identify the current IB switch software version on all the Switches

[root@dm01db01 patch_18.1.12.0.0.190111]# ssh dm01sw-iba01 version
SUN DCS 36p version: 2.2.7-1
Build time: Aug  4 2017 12:20:53
SP board info:
Manufacturing Date: 2014.05.20
Serial Number: “NCDFxxxxx”
Hardware Revision: 0x0107
Firmware Revision: 0x0000
BIOS version: SUN0R100
BIOS date: 06/22/2010


  • Log in to Exadata Compute node 1 as root user and navigate the Exadata Storage Software staging area

[root@dm01dbadm01 ESS_121220]# cd /u01/app/oracle/software/exa_patches/patch_18.1.12.0.0.190111
 
[root@dm01dbadm01 patch_18.1.12.0.0.190111]# pwd
/u01/app/oracle/software/exa_patches/patch_18.1.12.0.0.190111


  • Create a file named ibswitches.lst and enter IB switch names one per line as follows:

[root@dm01dbadm01 patch_18.1.12.0.0.190111]# vi ~/ibswitch_group
dm01sw-ibb01
dm01sw-iba01

[root@dm01dbadm01 patch_18.1.12.0.0.190111]# cat ~/ibswitch_group
dm01sw-ibb01
dm01sw-iba01


  • Execute the following to perform the IB Switch precheck

[root@dm01db01 patch_18.1.12.0.0.190111]# ./patchmgr -ibswitches ~/ibswitch_group -upgrade -ibswitch_precheck

2019-02-10 03:02:46 -0600 1 of 1 :Working: DO: Initiate pre-upgrade validation check on InfiniBand switch(es).
 —– InfiniBand switch update process started 2019-02-10 03:02:47 -0600 —–
[NOTE     ] Log file at /u01/app/oracle/software/exa_patches/patch_18.1.12.0.0.190111/upgradeIBSwitch.log

[INFO     ] List of InfiniBand switches for upgrade: ( dm01sw-ibb01 dm01sw-iba01 )
[SUCCESS  ] Verifying Network connectivity to dm01sw-ibb01
[SUCCESS  ] Verifying Network connectivity to dm01sw-iba01
[SUCCESS  ] Validating verify-topology output
[INFO     ] Master Subnet Manager is set to “dm01sw-ibb01” in all Switches
[INFO     ] Upgrade to 2.2.11_2 requires that the InfiniBand switch be at 2.2.7-2. Upgrading dm01sw-ibb01 first to 2.2.7-2

[INFO     ] ———- Starting with InfiniBand Switch dm01sw-ibb01
[WARNING  ] Infiniband switch meets minimal version requirements, but downgrade is only available to 2.2.9-3 with the current package.
     To downgrade to other versions:
     – Manually download the InfiniBand switch firmware package to the patch directory
     – Set export variable “EXADATA_IMAGE_IBSWITCH_DOWNGRADE_VERSION” to the appropriate version
     – Run patchmgr command to initiate downgrade.
[SUCCESS  ] Verify SSH access to the patchmgr host dm01db01.netsoftmate.com from the InfiniBand Switch dm01sw-ibb01.
[INFO     ] Starting pre-update validation on dm01sw-ibb01
[SUCCESS  ] Verifying that /tmp has 120M in dm01sw-ibb01, found 246M
[SUCCESS  ] Verifying that / has 20M in dm01sw-ibb01, found 26M
[SUCCESS  ] NTP daemon is running on dm01sw-ibb01.
[SUCCESS  ] opensm.conf passed all validations
[INFO     ] Manually validate the following entries Date:(YYYY-MM-DD) 2019-02-10 Time:(HH:MM:SS) 03:03:03
[INFO     ] Validating the current firmware on the InfiniBand Switch
[SUCCESS  ] Firmware verification on InfiniBand switch dm01sw-ibb01
[SUCCESS  ] Verifying that the patchmgr host dm01db01.netsoftmate.com is recognized on the InfiniBand Switch dm01sw-ibb01 through getHostByName
[SUCCESS  ] Execute plugin check for Patch Check Prereq on dm01sw-ibb01
[INFO     ] Finished pre-update validation on dm01sw-ibb01
[SUCCESS  ] Pre-update validation on dm01sw-ibb01

[INFO     ] ———- Starting with InfiniBand Switch dm01sw-ibb01
[WARNING  ] Infiniband switch meets minimal version requirements, but downgrade is only available to 2.2.9-3 with the current package.
     To downgrade to other versions:
     – Manually download the InfiniBand switch firmware package to the patch directory
     – Set export variable “EXADATA_IMAGE_IBSWITCH_DOWNGRADE_VERSION” to the appropriate version
     – Run patchmgr command to initiate downgrade.
[SUCCESS  ] Verify SSH access to the patchmgr host dm01db01.netsoftmate.com from the InfiniBand Switch dm01sw-ibb01.
[INFO     ] Starting pre-update validation on dm01sw-ibb01
[SUCCESS  ] Verifying that /tmp has 120M in dm01sw-ibb01, found 246M
[SUCCESS  ] Verifying that / has 20M in dm01sw-ibb01, found 26M
[SUCCESS  ] NTP daemon is running on dm01sw-ibb01.
[SUCCESS  ] opensm.conf passed all validations
[INFO     ] Manually validate the following entries Date:(YYYY-MM-DD) 2019-02-10 Time:(HH:MM:SS) 03:03:34
[INFO     ] Validating the current firmware on the InfiniBand Switch
[SUCCESS  ] Firmware verification on InfiniBand switch dm01sw-ibb01
[SUCCESS  ] Verifying that the patchmgr host dm01db01.netsoftmate.com is recognized on the InfiniBand Switch dm01sw-ibb01 through getHostByName
[SUCCESS  ] Execute plugin check for Patch Check Prereq on dm01sw-ibb01
[INFO     ] Finished pre-update validation on dm01sw-ibb01
[SUCCESS  ] Pre-update validation on dm01sw-ibb01
[SUCCESS  ] Prereq check on dm01sw-ibb01
[INFO     ] Upgrade to 2.2.11_2 requires that the InfiniBand switch be at 2.2.7-2. Upgrading dm01sw-iba01 first to 2.2.7-2

[INFO     ] ———- Starting with InfiniBand Switch dm01sw-iba01
[WARNING  ] Infiniband switch meets minimal version requirements, but downgrade is only available to 2.2.9-3 with the current package.
     To downgrade to other versions:
     – Manually download the InfiniBand switch firmware package to the patch directory
     – Set export variable “EXADATA_IMAGE_IBSWITCH_DOWNGRADE_VERSION” to the appropriate version
     – Run patchmgr command to initiate downgrade.
[SUCCESS  ] Verify SSH access to the patchmgr host dm01db01.netsoftmate.com from the InfiniBand Switch dm01sw-iba01.
[INFO     ] Starting pre-update validation on dm01sw-iba01
[SUCCESS  ] Verifying that /tmp has 120M in dm01sw-iba01, found 246M
[SUCCESS  ] Verifying that / has 20M in dm01sw-iba01, found 26M
[SUCCESS  ] NTP daemon is running on dm01sw-iba01.
[SUCCESS  ] opensm.conf passed all validations
[INFO     ] Manually validate the following entries Date:(YYYY-MM-DD) 2019-02-10 Time:(HH:MM:SS) 03:04:06
[INFO     ] Validating the current firmware on the InfiniBand Switch
[SUCCESS  ] Firmware verification on InfiniBand switch dm01sw-iba01
[SUCCESS  ] Verifying that the patchmgr host dm01db01.netsoftmate.com is recognized on the InfiniBand Switch dm01sw-iba01 through getHostByName
[SUCCESS  ] Execute plugin check for Patch Check Prereq on dm01sw-iba01
[INFO     ] Finished pre-update validation on dm01sw-iba01
[SUCCESS  ] Pre-update validation on dm01sw-iba01

[INFO     ] ———- Starting with InfiniBand Switch dm01sw-iba01
[WARNING  ] Infiniband switch meets minimal version requirements, but downgrade is only available to 2.2.9-3 with the current package.
     To downgrade to other versions:
     – Manually download the InfiniBand switch firmware package to the patch directory
     – Set export variable “EXADATA_IMAGE_IBSWITCH_DOWNGRADE_VERSION” to the appropriate version
     – Run patchmgr command to initiate downgrade.
[SUCCESS  ] Verify SSH access to the patchmgr host dm01db01.netsoftmate.com from the InfiniBand Switch dm01sw-iba01.
[INFO     ] Starting pre-update validation on dm01sw-iba01
[SUCCESS  ] Verifying that /tmp has 120M in dm01sw-iba01, found 246M
[SUCCESS  ] Verifying that / has 20M in dm01sw-iba01, found 26M
[SUCCESS  ] NTP daemon is running on dm01sw-iba01.
[SUCCESS  ] opensm.conf passed all validations
[INFO     ] Manually validate the following entries Date:(YYYY-MM-DD) 2019-02-10 Time:(HH:MM:SS) 03:04:36
[INFO     ] Validating the current firmware on the InfiniBand Switch
[SUCCESS  ] Firmware verification on InfiniBand switch dm01sw-iba01
[SUCCESS  ] Verifying that the patchmgr host dm01db01.netsoftmate.com is recognized on the InfiniBand Switch dm01sw-iba01 through getHostByName
[SUCCESS  ] Execute plugin check for Patch Check Prereq on dm01sw-iba01
[INFO     ] Finished pre-update validation on dm01sw-iba01
[SUCCESS  ] Pre-update validation on dm01sw-iba01
[SUCCESS  ] Prereq check on dm01sw-iba01
[SUCCESS  ] Overall status

 —– InfiniBand switch update process ended 2019-02-10 03:05:00 -0600 —–
2019-02-10 03:05:00 -0600 1 of 1 :SUCCESS: DONE: Initiate pre-upgrade validation check on InfiniBand switch(es).


  • Upgrade the IB Switches using the following command:

[root@dm01db01 patch_18.1.12.0.0.190111]# ./patchmgr -ibswitches ~/ibswitch_group -upgrade

2019-02-10 03:07:26 -0600 1 of 1 :Working: DO: Initiate upgrade of InfiniBand switches to 2.2.11-2. Expect up to 40 minutes for each switch
                                                  
 —– InfiniBand switch update process started 2019-02-10 03:07:27 -0600 —–
[NOTE     ] Log file at /u01/app/oracle/software/exa_patches/patch_18.1.12.0.0.190111/upgradeIBSwitch.log

[INFO     ] List of InfiniBand switches for upgrade: ( dm01sw-ibb01 dm01sw-iba01 )
[SUCCESS  ] Verifying Network connectivity to dm01sw-ibb01
[SUCCESS  ] Verifying Network connectivity to dm01sw-iba01
[SUCCESS  ] Validating verify-topology output
[INFO     ] Proceeding with upgrade of InfiniBand switches to version 2.2.11_2
[INFO     ] Master Subnet Manager is set to “dm01sw-ibb01” in all Switches
[INFO     ] Upgrade to 2.2.11_2 requires that the InfiniBand switch be at 2.2.7-2. Upgrading dm01sw-ibb01 first to 2.2.7-2

[INFO     ] ———- Starting with InfiniBand Switch dm01sw-ibb01
[WARNING  ] Infiniband switch meets minimal version requirements, but downgrade is only available to 2.2.9-3 with the current package.
     To downgrade to other versions:
     – Manually download the InfiniBand switch firmware package to the patch directory
     – Set export variable “EXADATA_IMAGE_IBSWITCH_DOWNGRADE_VERSION” to the appropriate version
     – Run patchmgr command to initiate downgrade.
[SUCCESS  ] Verify SSH access to the patchmgr host dm01db01.netsoftmate.com from the InfiniBand Switch dm01sw-ibb01.
[INFO     ] Starting pre-update validation on dm01sw-ibb01
[SUCCESS  ] Verifying that /tmp has 120M in dm01sw-ibb01, found 246M
[SUCCESS  ] Verifying that / has 20M in dm01sw-ibb01, found 26M
[SUCCESS  ] Service opensmd is running on InfiniBand Switch dm01sw-ibb01
[SUCCESS  ] NTP daemon is running on dm01sw-ibb01.
[SUCCESS  ] opensm.conf passed all validations
[INFO     ] Manually validate the following entries Date:(YYYY-MM-DD) 2019-02-10 Time:(HH:MM:SS) 03:07:43
[INFO     ] Validating the current firmware on the InfiniBand Switch
[SUCCESS  ] Firmware verification on InfiniBand switch dm01sw-ibb01
[SUCCESS  ] Verifying that the patchmgr host dm01db01.netsoftmate.com is recognized on the InfiniBand Switch dm01sw-ibb01 through getHostByName
[SUCCESS  ] Execute plugin check for Patch Check Prereq on dm01sw-ibb01
[INFO     ] Finished pre-update validation on dm01sw-ibb01
[SUCCESS  ] Pre-update validation on dm01sw-ibb01
[INFO     ] Package will be downloaded at firmware update time via scp
[SUCCESS  ] Disable Subnet Manager on dm01sw-ibb01
[SUCCESS  ] Execute plugin check for Patching on dm01sw-ibb01
[INFO     ] Starting upgrade on dm01sw-ibb01 to 2.2.7_2. Please give upto 15 mins for the process to complete. DO NOT INTERRUPT or HIT CTRL+C during the upgrade
[INFO     ] Rebooting dm01sw-ibb01 to complete the firmware update. Wait for 15 minutes before continuing. DO NOT MANUALLY REBOOT THE INFINIBAND SWITCH
[SUCCESS  ] Load firmware 2.2.7_2 onto dm01sw-ibb01
[SUCCESS  ] Disable Subnet Manager on dm01sw-ibb01
[SUCCESS  ] Verify that /conf/configvalid is set to 1 on dm01sw-ibb01
[INFO     ] Set SMPriority to 5 on dm01sw-ibb01
[INFO     ] Rebooting dm01sw-ibb01. Wait for 4 minutes before continuing
[SUCCESS  ] Reboot dm01sw-ibb01
[SUCCESS  ] SUCCESS
[INFO     ] Starting post-update validation on dm01sw-ibb01
[SUCCESS  ] Service opensmd is running on InfiniBand Switch dm01sw-ibb01
[SUCCESS  ] NTP daemon is running on dm01sw-ibb01.
[INFO     ] Manually validate the following entries Date:(YYYY-MM-DD) 2019-02-10 Time:(HH:MM:SS) 03:29:11
[INFO     ] /conf/configvalid is 1
[INFO     ] Validating the current firmware on the InfiniBand Switch
[SUCCESS  ] Firmware verification on InfiniBand switch dm01sw-ibb01
[SUCCESS  ] Execute plugin check for Post Patch on dm01sw-ibb01
[INFO     ] Finished post-update validation on dm01sw-ibb01
[SUCCESS  ] Post-update validation on dm01sw-ibb01

[INFO     ] ———- Starting with InfiniBand Switch dm01sw-ibb01
[WARNING  ] Infiniband switch meets minimal version requirements, but downgrade is only available to 2.2.9-3 with the current package.
     To downgrade to other versions:
     – Manually download the InfiniBand switch firmware package to the patch directory
     – Set export variable “EXADATA_IMAGE_IBSWITCH_DOWNGRADE_VERSION” to the appropriate version
     – Run patchmgr command to initiate downgrade.
[SUCCESS  ] Verify SSH access to the patchmgr host dm01db01.netsoftmate.com from the InfiniBand Switch dm01sw-ibb01.
[INFO     ] Starting pre-update validation on dm01sw-ibb01
[SUCCESS  ] Verifying that /tmp has 120M in dm01sw-ibb01, found 246M
[SUCCESS  ] Verifying that / has 20M in dm01sw-ibb01, found 28M
[SUCCESS  ] Service opensmd is running on InfiniBand Switch dm01sw-ibb01
[SUCCESS  ] NTP daemon is running on dm01sw-ibb01.
[INFO     ] Manually validate the following entries Date:(YYYY-MM-DD) 2019-02-10 Time:(HH:MM:SS) 03:29:39
[INFO     ] Validating the current firmware on the InfiniBand Switch
[SUCCESS  ] Firmware verification on InfiniBand switch dm01sw-ibb01
[SUCCESS  ] Verifying that the patchmgr host dm01db01.netsoftmate.com is recognized on the InfiniBand Switch dm01sw-ibb01 through getHostByName
[SUCCESS  ] Execute plugin check for Patch Check Prereq on dm01sw-ibb01
[INFO     ] Finished pre-update validation on dm01sw-ibb01
[SUCCESS  ] Pre-update validation on dm01sw-ibb01
[INFO     ] Package will be downloaded at firmware update time via scp
[SUCCESS  ] Disable Subnet Manager on dm01sw-ibb01
[SUCCESS  ] Execute plugin check for Patching on dm01sw-ibb01
[INFO     ] Starting upgrade on dm01sw-ibb01 to 2.2.11_2. Please give upto 15 mins for the process to complete. DO NOT INTERRUPT or HIT CTRL+C during the upgrade
[INFO     ] Rebooting dm01sw-ibb01 to complete the firmware update. Wait for 15 minutes before continuing. DO NOT MANUALLY REBOOT THE INFINIBAND SWITCH
[SUCCESS  ] Load firmware 2.2.11_2 onto dm01sw-ibb01
[SUCCESS  ] Disable Subnet Manager on dm01sw-ibb01
[SUCCESS  ] Verify that /conf/configvalid is set to 1 on dm01sw-ibb01
[INFO     ] Set SMPriority to 5 on dm01sw-ibb01
[INFO     ] Rebooting dm01sw-ibb01. Wait for 4 minutes before continuing
[SUCCESS  ] Reboot dm01sw-ibb01
[SUCCESS  ] SUCCESS
[INFO     ] Starting post-update validation on dm01sw-ibb01
[SUCCESS  ] Service opensmd is running on InfiniBand Switch dm01sw-ibb01
[SUCCESS  ] NTP daemon is running on dm01sw-ibb01.
[INFO     ] Manually validate the following entries Date:(YYYY-MM-DD) 2019-02-10 Time:(HH:MM:SS) 03:51:03
[INFO     ] /conf/configvalid is 1
[INFO     ] Validating the current firmware on the InfiniBand Switch
[SUCCESS  ] Firmware verification on InfiniBand switch dm01sw-ibb01
[SUCCESS  ] Execute plugin check for Post Patch on dm01sw-ibb01
[INFO     ] Finished post-update validation on dm01sw-ibb01
[SUCCESS  ] Post-update validation on dm01sw-ibb01
[SUCCESS  ] Update InfiniBand switch dm01sw-ibb01 to 2.2.11_2
[INFO     ] Upgrade to 2.2.11_2 requires that the InfiniBand switch be at 2.2.7-2. Upgrading dm01sw-iba01 first to 2.2.7-2
[INFO     ] ———- Starting with InfiniBand Switch dm01sw-iba01
[WARNING  ] Infiniband switch meets minimal version requirements, but downgrade is only available to 2.2.9-3 with the current package.
     To downgrade to other versions:
     – Manually download the InfiniBand switch firmware package to the patch directory
     – Set export variable “EXADATA_IMAGE_IBSWITCH_DOWNGRADE_VERSION” to the appropriate version
     – Run patchmgr command to initiate downgrade.
[SUCCESS  ] Verify SSH access to the patchmgr host dm01db01.netsoftmate.com from the InfiniBand Switch dm01sw-iba01.
[INFO     ] Starting pre-update validation on dm01sw-iba01
[SUCCESS  ] Verifying that /tmp has 120M in dm01sw-iba01, found 246M
[SUCCESS  ] Verifying that / has 20M in dm01sw-iba01, found 26M
[SUCCESS  ] Service opensmd is running on InfiniBand Switch dm01sw-iba01
[SUCCESS  ] NTP daemon is running on dm01sw-iba01.
[SUCCESS  ] opensm.conf passed all validations
[INFO     ] Manually validate the following entries Date:(YYYY-MM-DD) 2019-02-10 Time:(HH:MM:SS) 03:51:38
[INFO     ] Validating the current firmware on the InfiniBand Switch
[SUCCESS  ] Firmware verification on InfiniBand switch dm01sw-iba01
[SUCCESS  ] Verifying that the patchmgr host dm01db01.netsoftmate.com is recognized on the InfiniBand Switch dm01sw-iba01 through getHostByName
[SUCCESS  ] Execute plugin check for Patch Check Prereq on dm01sw-iba01
[INFO     ] Finished pre-update validation on dm01sw-iba01
[SUCCESS  ] Pre-update validation on dm01sw-iba01
[INFO     ] Package will be downloaded at firmware update time via scp
[SUCCESS  ] Disable Subnet Manager on dm01sw-iba01
[SUCCESS  ] Execute plugin check for Patching on dm01sw-iba01
[INFO     ] Starting upgrade on dm01sw-iba01 to 2.2.7_2. Please give upto 15 mins for the process to complete. DO NOT INTERRUPT or HIT CTRL+C during the upgrade
[INFO     ] Rebooting dm01sw-iba01 to complete the firmware update. Wait for 15 minutes before continuing. DO NOT MANUALLY REBOOT THE INFINIBAND SWITCH
[SUCCESS  ] Load firmware 2.2.7_2 onto dm01sw-iba01
[SUCCESS  ] Disable Subnet Manager on dm01sw-iba01
[SUCCESS  ] Verify that /conf/configvalid is set to 1 on dm01sw-iba01
[INFO     ] Set SMPriority to 5 on dm01sw-iba01
[INFO     ] Rebooting dm01sw-iba01. Wait for 4 minutes before continuing
[SUCCESS  ] Reboot dm01sw-iba01
[SUCCESS  ] SUCCESS
[INFO     ] Starting post-update validation on dm01sw-iba01
[SUCCESS  ] Service opensmd is running on InfiniBand Switch dm01sw-iba01
[SUCCESS  ] NTP daemon is running on dm01sw-iba01.
[INFO     ] Manually validate the following entries Date:(YYYY-MM-DD) 2019-02-10 Time:(HH:MM:SS) 04:13:06
[INFO     ] /conf/configvalid is 1
[INFO     ] Validating the current firmware on the InfiniBand Switch
[SUCCESS  ] Firmware verification on InfiniBand switch dm01sw-iba01
[SUCCESS  ] Execute plugin check for Post Patch on dm01sw-iba01
[INFO     ] Finished post-update validation on dm01sw-iba01
[SUCCESS  ] Post-update validation on dm01sw-iba01

[INFO     ] ———- Starting with InfiniBand Switch dm01sw-iba01
[WARNING  ] Infiniband switch meets minimal version requirements, but downgrade is only available to 2.2.9-3 with the current package.
     To downgrade to other versions:
     – Manually download the InfiniBand switch firmware package to the patch directory
     – Set export variable “EXADATA_IMAGE_IBSWITCH_DOWNGRADE_VERSION” to the appropriate version
     – Run patchmgr command to initiate downgrade.
[SUCCESS  ] Verify SSH access to the patchmgr host dm01db01.netsoftmate.com from the InfiniBand Switch dm01sw-iba01.
[INFO     ] Starting pre-update validation on dm01sw-iba01
[SUCCESS  ] Verifying that /tmp has 120M in dm01sw-iba01, found 246M
[SUCCESS  ] Verifying that / has 20M in dm01sw-iba01, found 28M
[SUCCESS  ] Service opensmd is running on InfiniBand Switch dm01sw-iba01
[SUCCESS  ] NTP daemon is running on dm01sw-iba01.
[INFO     ] Manually validate the following entries Date:(YYYY-MM-DD) 2019-02-10 Time:(HH:MM:SS) 04:13:35
[INFO     ] Validating the current firmware on the InfiniBand Switch
[SUCCESS  ] Firmware verification on InfiniBand switch dm01sw-iba01
[SUCCESS  ] Verifying that the patchmgr host dm01db01.netsoftmate.com is recognized on the InfiniBand Switch dm01sw-iba01 through getHostByName
[SUCCESS  ] Execute plugin check for Patch Check Prereq on dm01sw-iba01
[INFO     ] Finished pre-update validation on dm01sw-iba01
[SUCCESS  ] Pre-update validation on dm01sw-iba01
[INFO     ] Package will be downloaded at firmware update time via scp
[SUCCESS  ] Disable Subnet Manager on dm01sw-iba01
[SUCCESS  ] Execute plugin check for Patching on dm01sw-iba01
[INFO     ] Starting upgrade on dm01sw-iba01 to 2.2.11_2. Please give upto 15 mins for the process to complete. DO NOT INTERRUPT or HIT CTRL+C during the upgrade
[INFO     ] Rebooting dm01sw-iba01 to complete the firmware update. Wait for 15 minutes before continuing. DO NOT MANUALLY REBOOT THE INFINIBAND SWITCH
[SUCCESS  ] Load firmware 2.2.11_2 onto dm01sw-iba01
[SUCCESS  ] Disable Subnet Manager on dm01sw-iba01
[SUCCESS  ] Verify that /conf/configvalid is set to 1 on dm01sw-iba01
[INFO     ] Set SMPriority to 5 on dm01sw-iba01
[INFO     ] Rebooting dm01sw-iba01. Wait for 4 minutes before continuing
[SUCCESS  ] Reboot dm01sw-iba01
[SUCCESS  ] SUCCESS
[INFO     ] Starting post-update validation on dm01sw-iba01
[SUCCESS  ] Service opensmd is running on InfiniBand Switch dm01sw-iba01
[SUCCESS  ] NTP daemon is running on dm01sw-iba01.
[INFO     ] Manually validate the following entries Date:(YYYY-MM-DD) 2019-02-10 Time:(HH:MM:SS) 04:35:00
[INFO     ] /conf/configvalid is 1
[INFO     ] Validating the current firmware on the InfiniBand Switch
[SUCCESS  ] Firmware verification on InfiniBand switch dm01sw-iba01
[SUCCESS  ] Execute plugin check for Post Patch on dm01sw-iba01
[INFO     ] Finished post-update validation on dm01sw-iba01
[SUCCESS  ] Post-update validation on dm01sw-iba01
[SUCCESS  ] Update InfiniBand switch dm01sw-iba01 to 2.2.11_2
[INFO     ] InfiniBand Switches ( dm01sw-ibb01 dm01sw-iba01 ) updated to 2.2.11_2
[SUCCESS  ] Overall status

 —– InfiniBand switch update process ended 2019-02-10 04:35:25 -0600 —–
2019-02-10 04:35:25 -0600 1 of 1 :SUCCESS: DONE: Upgrade InfiniBand switch(es) to 2.2.11-2.


  • Verify that all the IB Switches are upgraded to latest version.

[root@dm01db01 ~]# ssh dm01sw-ibb01 version
SUN DCS 36p version: 2.2.11-2
Build time: Aug 27 2018 11:18:39
SP board info:
Manufacturing Date: 2014.05.19
Serial Number: “NCDFxxxxx”
Hardware Revision: 0x0107
Firmware Revision: 0x0000
BIOS version: SUN0R100
BIOS date: 06/22/2010
[root@dm01db01 ~]#

[root@dm01db01 ~]# ssh dm01sw-iba01 version
SUN DCS 36p version: 2.2.11-2
Build time: Aug 27 2018 11:18:39
SP board info:
Manufacturing Date: 2014.05.20
Serial Number: “NCDFxxxxx”
Hardware Revision: 0x0107
Firmware Revision: 0x0000
BIOS version: SUN0R100
BIOS date: 06/22/2010


Conclusion
In this article we have demonstrated how to patch Exadata IB Switches using patchmgr utility. Patching an Exadata IB switch is very straight forward and can be done in rolling fashion without any downtime.
1

The patchmgr utility can be used for upgrading, rollback and backup Exadata Storage cells. patchmgr utility can be used for upgrading Storage cells in a rolling or non-rolling fashion. Non-Rolling is default. Storage server patches apply operating system, firmware, and driver updates.

Launch patchmgr from the compute node that is node 1 that has user equivalence setup to all the storage cells.

In this article I will demonstrate how to perform upgrade Exadata Storage cells using patchmgr utility.

MOS Notes
Read the following MOS notes carefully.

  • Exadata Database Machine and Exadata Storage Server Supported Versions (Doc ID 888828.1)
  • Exadata 18.1.12.0.0 release and patch (29194095) (Doc ID 2492012.1)   
  • Oracle Exadata Database Machine exachk or HealthCheck (Doc ID 1070954.1)   

Software Download

  • Download the following patches required for Upgrading Storage cells.
  • Patch 29194095 – Storage server (18.1.12.0.0.190111) and InfiniBand switch software (2.2.11-2)

Current Environment

  • Exadata X4-2 Half Rack (4 Compute nodes, 7 Storage Cells and 2 IB Switches) running ESS version 12.2.1.1.6

Current Image version

  • Execute the “imageinfo” command on one of the Compute nodes to identify the current Exadata Image version
[root@dm01cel01 ~]# imageinfo

Kernel version: 4.1.12-94.7.8.el6uek.x86_64 #2 SMP Thu Jan 11 20:41:01 PST 2018 x86_64
Cell version: OSS_12.2.1.1.6_LINUX.X64_180125.1
Cell rpm version: cell-12.2.1.1.6_LINUX.X64_180125.1-1.x86_64

Active image version: 12.2.1.1.6.180125.1
Active image kernel version: 4.1.12-94.7.8.el6uek
Active image activated: 2018-05-08 00:42:57 -0500
Active image status: success
Active system partition on device: /dev/md6
Active software partition on device: /dev/md8

Cell boot usb partition: /dev/sdac1
Cell boot usb version: 12.2.1.1.6.180125.1

Inactive image version: 12.1.2.3.6.170713
Inactive image activated: 2017-10-03 00:57:25 -0500
Inactive image status: success
Inactive system partition on device: /dev/md5
Inactive software partition on device: /dev/md7

Inactive marker for the rollback: /boot/I_am_hd_boot.inactive
Inactive grub config for the rollback: /boot/grub/grub.conf.inactive
Inactive kernel version for the rollback: 2.6.39-400.297.1.el6uek.x86_64
Rollback to the inactive partitions: Possible


Prerequisites

  • Install and configure VNC Server on Exadata compute node 1. It is recommended to use VNC or screen utility for patching to avoid disconnections due to network issues.

  • Enable blackout (OEM, crontab and so on)

  • Verify disk space on storage cells
[root@dm01db01 ~]# dcli -g ~/cell_group -l root ‘df -h /’
dm01cel01: Filesystem      Size  Used Avail Use% Mounted on
dm01cel01: /dev/md6        9.8G  4.4G  4.9G  48% /
dm01cel02: Filesystem      Size  Used Avail Use% Mounted on
dm01cel02: /dev/md6        9.8G  4.5G  4.8G  49% /
dm01cel03: Filesystem      Size  Used Avail Use% Mounted on
dm01cel03: /dev/md6        9.8G  4.5G  4.8G  49% /
dm01cel04: Filesystem      Size  Used Avail Use% Mounted on
dm01cel04: /dev/md6        9.8G  4.5G  4.8G  49% /
dm01cel05: Filesystem      Size  Used Avail Use% Mounted on
dm01cel05: /dev/md6        9.8G  4.5G  4.8G  49% /
dm01cel06: Filesystem      Size  Used Avail Use% Mounted on
dm01cel06: /dev/md6        9.8G  4.6G  4.7G  50% /
dm01cel07: Filesystem      Size  Used Avail Use% Mounted on
dm01cel07: /dev/md6        9.8G  4.5G  4.8G  48% /


  • Run Exachk before starting the actual patching. Correct any Critical issues and Failure that can conflict with patching.

  • Verify hardware failure. Make sure there are no hardware failures before patching
[root@dm01db01 ~]# dcli -g ~/cell_group -l root ‘cellcli -e list physicaldisk where status!=normal’
[root@dm01db01 ~]# dcli -l root -g ~/cell_group “cellcli -e list physicaldisk where diskType=FlashDisk and status not = normal”
[root@dm01db01 ~]# dcli -g ~/dbs_group -l root ‘dbmcli -e list physicaldisk where status!=normal’

[root@dm01db01 ~]# dcli -g ~/dbs_group -l root ‘ipmitool sunoem cli “show -d properties -level all /SYS fault_state==Faulted”‘
[root@dm01db01 ~]# dcli -g ~/cell_group -l root ‘ipmitool sunoem cli “show -d properties -level all /SYS fault_state==Faulted”‘


  • Clear or acknowledge alerts on db and cell nodes
[root@dm01db01 ~]# dcli -l root -g ~/cell_group “cellcli -e drop alerthistory all”
[root@dm01db01 ~]# dcli -l root -g ~/dbs_group “dbmcli -e  drop alerthistory all”


  • Download patches and copy them to the compute node 1 under staging directory
Patch 29194095 – Storage server software (18.1.12.0.0.190111) and InfiniBand switch software (2.2.11-2)

  • Copy the patches to compute node 1 under staging aread and unzip the patches
[root@dm01db01 ~]# cd /u01/app/oracle/software/exa_patches
[root@dm01db01 ~]# unzip p29194095_181000_Linux-x86-64.zip


  • Read the readme file and document the steps for storage cell patching.

Steps to perform Storage Cell Patching

  • Open VNC Session and login as root user

  • Login as root user
[root@dm01db01 ~]# id
uid=0(root) gid=0(root) groups=0(root),1(bin),2(daemon),3(sys),4(adm),6(disk),10(wheel)


  • Check SSH user equivalence
[root@dm01db01 ~]# dcli -g cell_group -l root uptime
dm01cel01: 01:46:18 up 194 days, 40 min,  0 users,  load average: 0.17, 0.50, 0.61
dm01cel02: 01:46:18 up 194 days, 40 min,  0 users,  load average: 0.05, 0.29, 0.45
dm01cel03: 01:46:18 up 194 days, 40 min,  0 users,  load average: 0.25, 0.64, 0.63
dm01cel04: 01:46:18 up 194 days, 40 min,  0 users,  load average: 0.12, 0.44, 0.53
dm01cel05: 01:46:18 up 194 days, 40 min,  0 users,  load average: 0.15, 0.55, 0.65
dm01cel06: 01:46:18 up 194 days, 40 min,  0 users,  load average: 0.33, 0.48, 0.55
dm01cel07: 01:46:18 up 194 days, 40 min,  0 users,  load average: 0.09, 0.37, 0.52

  • Adjust the disk_repair_time for Oracle ASM.
SQL> col value for a40
SQL> select dg.name,a.value from v$asm_diskgroup dg, v$asm_attribute a where dg.group_number=a.group_number and a.name=’disk_repair_time’;

NAME                           VALUE
—————————— ————————–
DATA_DM01                      3.6H
RECO_DM01                      3.6h


  • Shut down and stop the Oracle components on each database server using the following commands:
[root@dm01db01 ~]# dcli -g dbs_group -l root ‘/u01/app/11.2.0.4/grid/bin/crsctl stop cluster -all’
[root@dm01db01 ~]# dcli -g dbs_group -l root ‘/u01/app/11.2.0.4/grid/bin/crsctl stop crs’


  • Get the current Cell Exadata Storage software version
[root@dm01cel01 ~]# imageinfo

Kernel version: 4.1.12-94.7.8.el6uek.x86_64 #2 SMP Thu Jan 11 20:41:01 PST 2018 x86_64
Cell version: OSS_12.2.1.1.6_LINUX.X64_180125.1
Cell rpm version: cell-12.2.1.1.6_LINUX.X64_180125.1-1.x86_64

Active image version: 12.2.1.1.6.180125.1
Active image kernel version: 4.1.12-94.7.8.el6uek
Active image activated: 2018-05-08 00:42:57 -0500
Active image status: success
Active system partition on device: /dev/md6
Active software partition on device: /dev/md8

Cell boot usb partition: /dev/sdac1
Cell boot usb version: 12.2.1.1.6.180125.1

Inactive image version: 12.1.2.3.6.170713
Inactive image activated: 2017-10-03 00:57:25 -0500
Inactive image status: success
Inactive system partition on device: /dev/md5
Inactive software partition on device: /dev/md7

Inactive marker for the rollback: /boot/I_am_hd_boot.inactive
Inactive grub config for the rollback: /boot/grub/grub.conf.inactive
Inactive kernel version for the rollback: 2.6.39-400.297.1.el6uek.x86_64
Rollback to the inactive partitions: Possible


  • Shut down all cell services on all cells to be updated. Use dcli command to do all cells at the same time:
[root@dm01db01 ~]# dcli -g cell_group -l root “cellcli -e alter cell shutdown services all”
dm01cel01:
dm01cel01: Stopping the RS, CELLSRV, and MS services…
dm01cel01: The SHUTDOWN of services was successful.
dm01cel02:
dm01cel02: Stopping the RS, CELLSRV, and MS services…
dm01cel02: The SHUTDOWN of services was successful.
dm01cel03:
dm01cel03: Stopping the RS, CELLSRV, and MS services…
dm01cel03: The SHUTDOWN of services was successful.
dm01cel04:
dm01cel04: Stopping the RS, CELLSRV, and MS services…
dm01cel04: The SHUTDOWN of services was successful.
dm01cel05:
dm01cel05: Stopping the RS, CELLSRV, and MS services…
dm01cel05: The SHUTDOWN of services was successful.
dm01cel06:
dm01cel06: Stopping the RS, CELLSRV, and MS services…
dm01cel06: The SHUTDOWN of services was successful.
dm01cel07:
dm01cel07: Stopping the RS, CELLSRV, and MS services…
dm01cel07: The SHUTDOWN of services was successful.


  • Reset the patchmgr state to a known state using the following command:
[root@dm01db01 patch_18.1.12.0.0.190111]# ./patchmgr -cells ~/cell_group -reset_force

2019-02-10 01:56:19 -0600        :Working: DO: Force Cleanup
2019-02-10 01:56:21 -0600        :SUCCESS: DONE: Force Cleanup


  • Clean up any previous patchmgr utility runs using the following command:
[root@dm01db01 patch_18.1.12.0.0.190111]# ./patchmgr -cells ~/cell_group -cleanup

2019-02-10 01:57:39 -0600        :Working: DO: Cleanup
2019-02-10 01:57:40 -0600        :SUCCESS: DONE: Cleanup


  • Verify that the cells meet prerequisite checks using the following command.
[root@dm01db01 patch_18.1.12.0.0.190111]# ./patchmgr -cells ~/cell_group -patch_check_prereq

2019-02-10 02:01:53 -0600        :Working: DO: Check cells have ssh equivalence for root user. Up to 10 seconds per cell …
2019-02-10 02:01:55 -0600        :SUCCESS: DONE: Check cells have ssh equivalence for root user.
2019-02-10 02:02:00 -0600        :Working: DO: Initialize files. Up to 1 minute …
2019-02-10 02:02:01 -0600        :Working: DO: Setup work directory
2019-02-10 02:02:02 -0600        :SUCCESS: DONE: Setup work directory
2019-02-10 02:02:04 -0600        :SUCCESS: DONE: Initialize files.
2019-02-10 02:02:04 -0600        :Working: DO: Copy, extract prerequisite check archive to cells. If required start md11 mismatched partner size correction. Up to 40 minutes …
2019-02-10 02:02:17 -0600        :INFO   : Wait correction of degraded md11 due to md partner size mismatch. Up to 30 minutes.
2019-02-10 02:02:18 -0600        :SUCCESS: DONE: Copy, extract prerequisite check archive to cells. If required start md11 mismatched partner size correction.
2019-02-10 02:02:18 -0600        :Working: DO: Check space and state of cell services. Up to 20 minutes …
2019-02-10 02:03:40 -0600        :SUCCESS: DONE: Check space and state of cell services.
2019-02-10 02:03:40 -0600        :Working: DO: Check prerequisites on all cells. Up to 2 minutes …
2019-02-10 02:03:49 -0600        :SUCCESS: DONE: Check prerequisites on all cells.
2019-02-10 02:03:49 -0600        :Working: DO: Execute plugin check for Patch Check Prereq …
2019-02-10 02:03:49 -0600        :INFO   : Patchmgr plugin start: Prereq check for exposure to bug 22909764 v1.0.
2019-02-10 02:03:49 -0600        :INFO   : Details in logfile /u01/app/oracle/software/exa_patches/patch_18.1.12.0.0.190111/patchmgr.stdout.
2019-02-10 02:03:49 -0600        :INFO   : Patchmgr plugin start: Prereq check for exposure to bug 17854520 v1.3.
2019-02-10 02:03:49 -0600        :INFO   : Details in logfile /u01/app/oracle/software/exa_patches/patch_18.1.12.0.0.190111/patchmgr.stdout.
2019-02-10 02:03:49 -0600        :SUCCESS: No exposure to bug 17854520 with non-rolling patching
2019-02-10 02:03:49 -0600        :INFO   : Patchmgr plugin start: Prereq check for exposure to bug 22468216 v1.0.
2019-02-10 02:03:49 -0600        :INFO   : Details in logfile /u01/app/oracle/software/exa_patches/patch_18.1.12.0.0.190111/patchmgr.stdout.
2019-02-10 02:03:49 -0600        :SUCCESS: Patchmgr plugin complete: Prereq check passed for the bug 22468216
2019-02-10 02:03:49 -0600        :INFO   : Patchmgr plugin start: Prereq check for exposure to bug 24625612 v1.0.
2019-02-10 02:03:49 -0600        :INFO   : Details in logfile /u01/app/oracle/software/exa_patches/patch_18.1.12.0.0.190111/patchmgr.stdout.
2019-02-10 02:03:49 -0600        :SUCCESS: Patchmgr plugin complete: Prereq check passed for the bug 24625612
2019-02-10 02:03:49 -0600        :SUCCESS: No exposure to bug  with non-rolling patching
2019-02-10 02:03:49 -0600        :INFO   : Patchmgr plugin start: Prereq check for exposure to bug 22651315 v1.0.
2019-02-10 02:03:49 -0600        :INFO   : Details in logfile /u01/app/oracle/software/exa_patches/patch_18.1.12.0.0.190111/patchmgr.stdout.
2019-02-10 02:03:51 -0600        :SUCCESS: Patchmgr plugin complete: Prereq check passed for the bug 22651315
2019-02-10 02:03:51 -0600        :SUCCESS: DONE: Execute plugin check for Patch Check Prereq.
2019-02-10 02:03:51 -0600        :Working: DO: Check ASM deactivation outcome. Up to 1 minute …
2019-02-10 02:04:02 -0600        :SUCCESS: DONE: Check ASM deactivation outcome
.

  • If the prerequisite checks pass, then start the update process.
[root@dm01db01 patch_18.1.12.0.0.190111]# ./patchmgr -cells ~/cell_group -patch
********************************************************************************
NOTE Cells will reboot during the patch or rollback process.
NOTE For non-rolling patch or rollback, ensure all ASM instances using
NOTE the cells are shut down for the duration of the patch or rollback.
NOTE For rolling patch or rollback, ensure all ASM instances using
NOTE the cells are up for the duration of the patch or rollback.

WARNING Do not interrupt the patchmgr session.
WARNING Do not alter state of ASM instances during patch or rollback.
WARNING Do not resize the screen. It may disturb the screen layout.
WARNING Do not reboot cells or alter cell services during patch or rollback.
WARNING Do not open log files in editor in write mode or try to alter them.

NOTE All time estimates are approximate.
********************************************************************************

2019-02-10 02:08:27 -0600        :Working: DO: Check cells have ssh equivalence for root user. Up to 10 seconds per cell …
2019-02-10 02:08:28 -0600        :SUCCESS: DONE: Check cells have ssh equivalence for root user.
2019-02-10 02:08:33 -0600        :Working: DO: Initialize files. Up to 1 minute …
2019-02-10 02:08:34 -0600        :Working: DO: Setup work directory
2019-02-10 02:09:13 -0600        :SUCCESS: DONE: Setup work directory
2019-02-10 02:09:15 -0600        :SUCCESS: DONE: Initialize files.
2019-02-10 02:09:15 -0600        :Working: DO: Copy, extract prerequisite check archive to cells. If required start md11 mismatched partner size correction. Up to 40 minutes …
2019-02-10 02:09:28 -0600        :INFO   : Wait correction of degraded md11 due to md partner size mismatch. Up to 30 minutes.
2019-02-10 02:09:30 -0600        :SUCCESS: DONE: Copy, extract prerequisite check archive to cells. If required start md11 mismatched partner size correction.
2019-02-10 02:09:30 -0600        :Working: DO: Check space and state of cell services. Up to 20 minutes …
2019-02-10 02:10:05 -0600        :SUCCESS: DONE: Check space and state of cell services.
2019-02-10 02:10:05 -0600        :Working: DO: Check prerequisites on all cells. Up to 2 minutes …
2019-02-10 02:10:13 -0600        :SUCCESS: DONE: Check prerequisites on all cells.
2019-02-10 02:10:13 -0600        :Working: DO: Copy the patch to all cells. Up to 3 minutes …
2019-02-10 02:12:01 -0600        :SUCCESS: DONE: Copy the patch to all cells.
2019-02-10 02:12:03 -0600        :Working: DO: Execute plugin check for Patch Check Prereq …
2019-02-10 02:12:03 -0600        :INFO   : Patchmgr plugin start: Prereq check for exposure to bug 22909764 v1.0.
2019-02-10 02:12:03 -0600        :INFO   : Details in logfile /u01/app/oracle/software/exa_patches/patch_18.1.12.0.0.190111/patchmgr.stdout.
2019-02-10 02:12:03 -0600        :INFO   : Patchmgr plugin start: Prereq check for exposure to bug 17854520 v1.3.
2019-02-10 02:12:03 -0600        :INFO   : Details in logfile /u01/app/oracle/software/exa_patches/patch_18.1.12.0.0.190111/patchmgr.stdout.
2019-02-10 02:12:03 -0600        :SUCCESS: No exposure to bug 17854520 with non-rolling patching
2019-02-10 02:12:03 -0600        :INFO   : Patchmgr plugin start: Prereq check for exposure to bug 22468216 v1.0.
2019-02-10 02:12:03 -0600        :INFO   : Details in logfile /u01/app/oracle/software/exa_patches/patch_18.1.12.0.0.190111/patchmgr.stdout.
2019-02-10 02:12:03 -0600        :SUCCESS: Patchmgr plugin complete: Prereq check passed for the bug 22468216
2019-02-10 02:12:03 -0600        :INFO   : Patchmgr plugin start: Prereq check for exposure to bug 24625612 v1.0.
2019-02-10 02:12:03 -0600        :INFO   : Details in logfile /u01/app/oracle/software/exa_patches/patch_18.1.12.0.0.190111/patchmgr.stdout.
2019-02-10 02:12:03 -0600        :SUCCESS: Patchmgr plugin complete: Prereq check passed for the bug 24625612
2019-02-10 02:12:03 -0600        :SUCCESS: No exposure to bug  with non-rolling patching
2019-02-10 02:12:03 -0600        :INFO   : Patchmgr plugin start: Prereq check for exposure to bug 22651315 v1.0.
2019-02-10 02:12:03 -0600        :INFO   : Details in logfile /u01/app/oracle/software/exa_patches/patch_18.1.12.0.0.190111/patchmgr.stdout.
2019-02-10 02:12:05 -0600        :SUCCESS: Patchmgr plugin complete: Prereq check passed for the bug 22651315
2019-02-10 02:12:06 -0600        :SUCCESS: DONE: Execute plugin check for Patch Check Prereq.
2019-02-10 02:12:12 -0600 1 of 5 :Working: DO: Initiate patch on cells. Cells will remain up. Up to 5 minutes …
2019-02-10 02:12:16 -0600 1 of 5 :SUCCESS: DONE: Initiate patch on cells.
2019-02-10 02:12:16 -0600 2 of 5 :Working: DO: Waiting to finish pre-reboot patch actions. Cells will remain up. Up to 45 minutes …
2019-02-10 02:13:16 -0600        :INFO   : Wait for patch pre-reboot procedures
2019-02-10 02:14:34 -0600 2 of 5 :SUCCESS: DONE: Waiting to finish pre-reboot patch actions.
2019-02-10 02:14:34 -0600        :Working: DO: Execute plugin check for Patching …
2019-02-10 02:14:34 -0600        :SUCCESS: DONE: Execute plugin check for Patching.
2019-02-10 02:14:35 -0600 3 of 5 :Working: DO: Finalize patch on cells. Cells will reboot. Up to 5 minutes …
2019-02-10 02:14:39 -0600 3 of 5 :SUCCESS: DONE: Finalize patch on cells.
2019-02-10 02:15:41 -0600 4 of 5 :Working: DO: Wait for cells to reboot and come online. Up to 120 minutes …
2019-02-10 02:16:41 -0600        :INFO   : Wait for patch finalization and reboot
2019-02-10 02:44:33 -0600 4 of 5 :SUCCESS: DONE: Wait for cells to reboot and come online.
2019-02-10 02:44:33 -0600 5 of 5 :Working: DO: Check the state of patch on cells. Up to 5 minutes …
2019-02-10 02:44:52 -0600 5 of 5 :SUCCESS: DONE: Check the state of patch on cells.
2019-02-10 02:44:52 -0600        :Working: DO: Execute plugin check for Pre Disk Activation …
2019-02-10 02:44:53 -0600        :SUCCESS: DONE: Execute plugin check for Pre Disk Activation.
2019-02-10 02:44:53 -0600        :Working: DO: Activate grid disks…
2019-02-10 02:44:54 -0600        :INFO   : Wait for checking and activating grid disks
2019-02-10 02:45:00 -0600        :SUCCESS: DONE: Activate grid disks.
2019-02-10 02:45:03 -0600        :Working: DO: Execute plugin check for Post Patch …
2019-02-10 02:45:03 -0600        :SUCCESS: DONE: Execute plugin check for Post Patch.
2019-02-10 02:45:04 -0600        :Working: DO: Cleanup
2019-02-10 02:45:56 -0600        :SUCCESS: DONE: Cleanup


  • Monitor the log files and cells being updated when e-mail alerts are not setup. open a new session and do a tail on the log file as shown below
[root@dm01db01 patch_18.1.12.0.0.190111]# tail -f patchmgr.stdout

  • Verify the update status after the patchmgr utility completes as follows:
[root@dm01cel01 ~]# imageinfo

Kernel version: 4.1.12-94.8.10.el6uek.x86_64 #2 SMP Sat Dec 22 21:26:11 PST 2018 x86_64
Cell version: OSS_18.1.12.0.0_LINUX.X64_190111
Cell rpm version: cell-18.1.12.0.0_LINUX.X64_190111-1.x86_64

Active image version: 18.1.12.0.0.190111
Active image kernel version: 4.1.12-94.8.10.el6uek
Active image activated: 2019-02-10 02:43:36 -0600
Active image status: success
Active system partition on device: /dev/md5
Active software partition on device: /dev/md7

Cell boot usb partition: /dev/sdac1
Cell boot usb version: 18.1.12.0.0.190111

Inactive image version: 12.2.1.1.6.180125.1
Inactive image activated: 2018-05-16 00:58:24 -0500
Inactive image status: success
Inactive system partition on device: /dev/md6
Inactive software partition on device: /dev/md8

Inactive marker for the rollback: /boot/I_am_hd_boot.inactive
Inactive grub config for the rollback: /boot/grub/grub.conf.inactive
Inactive usb grub config for the rollback: /boot/grub/grub.conf.usb.inactive
Inactive kernel version for the rollback: 4.1.12-94.7.8.el6uek.x86_64
Rollback to the inactive partitions: Possible


  • Check the imagehistory
[root@dm01cel01 ~]# imagehistory
Version                              : 12.1.1.1.1.140712
Image activation date                : 2014-11-23 00:34:06 -0800
Imaging mode                         : fresh
Imaging status                       : success

Version                              : 12.1.1.1.2.150411
Image activation date                : 2015-05-28 21:40:16 -0500
Imaging mode                         : out of partition upgrade
Imaging status                       : success

Version                              : 12.1.2.3.2.160721
Image activation date                : 2016-10-14 02:45:04 -0500
Imaging mode                         : out of partition upgrade
Imaging status                       : success

Version                              : 12.1.2.3.4.170111
Image activation date                : 2017-04-04 00:25:08 -0500
Imaging mode                         : out of partition upgrade
Imaging status                       : success

Version                              : 12.1.2.3.6.170713
Image activation date                : 2017-10-19 03:40:28 -0500
Imaging mode                         : out of partition upgrade
Imaging status                       : success

Version                              : 12.2.1.1.6.180125.1
Image activation date                : 2018-05-16 00:58:24 -0500
Imaging mode                         : out of partition upgrade
Imaging status                       : success

Version                              : 18.1.12.0.0.190111
Image activation date                : 2019-02-10 02:43:36 -0600
Imaging mode                         : out of partition upgrade
Imaging status                       : success


  • Verify the image on all cells
[root@dm01db01 ~]# dcli -g cell_group -l root ‘imageinfo | grep “Active image version”‘
dm01cel01: Active image version: 18.1.12.0.0.190111
dm01cel02: Active image version: 18.1.12.0.0.190111
dm01cel03: Active image version: 18.1.12.0.0.190111
dm01cel04: Active image version: 18.1.12.0.0.190111
dm01cel05: Active image version: 18.1.12.0.0.190111
dm01cel06: Active image version: 18.1.12.0.0.190111
dm01cel07: Active image version: 18.1.12.0.0.190111


  • Clean up the cells using the -cleanup option to clean up all the temporary update or rollback files on the cells.
[root@dm01db01 patch_18.1.12.0.0.190111]# ./patchmgr -cells ~/cell_group -cleanup

2019-02-10 02:58:37 -0600        :Working: DO: Cleanup
2019-02-10 02:58:39 -0600        :SUCCESS: DONE: Cleanup


  • Start Clusterware and databases
[root@dm01db01 ~]# /u01/app/11.2.0.4/grid/bin/crsctl check crs
CRS-4639: Could not contact Oracle High Availability Services

[root@dm01db01 ~]# dcli -g dbs_group -l root ‘/u01/app/11.2.0.4/grid/bin/crsctl start crs’
dm01db01: CRS-4123: Oracle High Availability Services has been started.
dm01db02: CRS-4123: Oracle High Availability Services has been started.
dm01db03: CRS-4123: Oracle High Availability Services has been started.
dm01db04: CRS-4123: Oracle High Availability Services has been started.

[root@dm01db01 ~]# dcli -g dbs_group -l root ‘/u01/app/11.2.0.4/grid/bin/crsctl check crs’
dm01db01: CRS-4638: Oracle High Availability Services is online
dm01db01: CRS-4537: Cluster Ready Services is online
dm01db01: CRS-4529: Cluster Synchronization Services is online
dm01db01: CRS-4533: Event Manager is online
dm01db02: CRS-4638: Oracle High Availability Services is online
dm01db02: CRS-4537: Cluster Ready Services is online
dm01db02: CRS-4529: Cluster Synchronization Services is online
dm01db02: CRS-4533: Event Manager is online
dm01db03: CRS-4638: Oracle High Availability Services is online
dm01db03: CRS-4537: Cluster Ready Services is online
dm01db03: CRS-4529: Cluster Synchronization Services is online
dm01db03: CRS-4533: Event Manager is online
dm01db04: CRS-4638: Oracle High Availability Services is online
dm01db04: CRS-4537: Cluster Ready Services is online
dm01db04: CRS-4529: Cluster Synchronization Services is online
dm01db04: CRS-4533: Event Manager is online


[root@dm01db01 ~]# /u01/app/11.2.0.4/grid/bin/crsctl stat res -t | more
——————————————————————————–
NAME           TARGET  STATE        SERVER                   STATE_DETAILS
——————————————————————————–
Local Resources
——————————————————————————–
ora.DATA_dm01.dg
               ONLINE  ONLINE       dm01db01
               ONLINE  ONLINE       dm01db02
               ONLINE  ONLINE       dm01db03
               ONLINE  ONLINE       dm01db04
ora.DBFS_DG.dg
               ONLINE  ONLINE       dm01db01
               ONLINE  ONLINE       dm01db02
               ONLINE  ONLINE       dm01db03
               ONLINE  ONLINE       dm01db04
ora.LISTENER.lsnr
               ONLINE  ONLINE       dm01db01
               ONLINE  ONLINE       dm01db02
               ONLINE  ONLINE       dm01db03
               ONLINE  ONLINE       dm01db04
ora.RECO_dm01.dg
               ONLINE  ONLINE       dm01db01
               ONLINE  ONLINE       dm01db02
               ONLINE  ONLINE       dm01db03
               ONLINE  ONLINE       dm01db04
ora.asm
               ONLINE  ONLINE       dm01db01                 Started
               ONLINE  ONLINE       dm01db02                 Started
               ONLINE  ONLINE       dm01db03                 Started
               ONLINE  ONLINE       dm01db04                 Started
ora.gsd
               OFFLINE OFFLINE      dm01db01
               OFFLINE OFFLINE      dm01db02
               OFFLINE OFFLINE      dm01db03
               OFFLINE OFFLINE      dm01db04
ora.net1.network
               ONLINE  ONLINE       dm01db01
               ONLINE  ONLINE       dm01db02
               ONLINE  ONLINE       dm01db03
               ONLINE  ONLINE       dm01db04
ora.ons
               ONLINE  ONLINE       dm01db01
               ONLINE  ONLINE       dm01db02
               ONLINE  ONLINE       dm01db03
               ONLINE  ONLINE       dm01db04
ora.registry.acfs
               ONLINE  OFFLINE      dm01db01
               ONLINE  OFFLINE      dm01db02
               ONLINE  OFFLINE      dm01db03
               ONLINE  OFFLINE      dm01db04
——————————————————————————–
Cluster Resources
——————————————————————————–
ora.LISTENER_SCAN1.lsnr
      1        ONLINE  ONLINE       dm01db04
ora.LISTENER_SCAN2.lsnr
      1        ONLINE  ONLINE       dm01db03
ora.LISTENER_SCAN3.lsnr
      1        ONLINE  ONLINE       dm01db01
ora.cvu
      1        ONLINE  ONLINE       dm01db02
ora.dbm01.db
      1        OFFLINE OFFLINE
      2        OFFLINE OFFLINE
      3        OFFLINE OFFLINE
      4        OFFLINE OFFLINE
ora.dm01db01.vip
      1        ONLINE  ONLINE       dm01db01
ora.dm01db02.vip
      1        ONLINE  ONLINE       dm01db02
ora.dm01db03.vip
      1        ONLINE  ONLINE       dm01db03
ora.dm01db04.vip
      1        ONLINE  ONLINE       dm01db04
ora.oc4j
      1        ONLINE  ONLINE       dm01db02
ora.orcldb.db
      1        ONLINE  ONLINE       dm01db01                 Open
      2        ONLINE  ONLINE       dm01db02                 Open
      3        ONLINE  ONLINE       dm01db03                 Open
      4        ONLINE  ONLINE       dm01db04                 Open
ora.nsmdb.db
      1        ONLINE  ONLINE       dm01db01                 Open
      2        ONLINE  ONLINE       dm01db02                 Open
      3        ONLINE  ONLINE       dm01db03                 Open
      4        ONLINE  ONLINE       dm01db04                 Open
ora.scan1.vip
      1        ONLINE  ONLINE       dm01db04
ora.scan2.vip
      1        ONLINE  ONLINE       dm01db03
ora.scan3.vip
      1        ONLINE  ONLINE       dm01db01


  • Verify the databases and start them if needed
$ srvctl status database -d orcldb
$ srvctl status database -d nsmdb


Conclusion

In this article we have learned how to perform upgrade Exadata Storage cells using patchmgr utility. The patchmgr utility can be used for upgrading, rollback and backup Exadata Storage cells. patchmgr utility can be used for upgrading Storage cells in a rolling or non-rolling fashion. Non-Rolling is default. Storage server patches apply operating system, firmware, and driver updates. Launch patchmgr from the compute node that is node 1 that has user equivalence setup to all the storage cells.
0

Uncategorized
I was working on changing password for the administrative user accounts on all Exadata Components. I encountered a strange issue while changing the root password on Infiniband Switch. We were unable to change the root password on IB Siwtch using command line method. We used couple different command line methods to change the root password on IB switches but all of them failed. This could be a BUG, firmware issue or something else.

In this article we demonstrate how to change the root password on an Exadata infiniband switch using Browser User Interface.

Issue 1: Using passwd command

Tried to change the root user password using passwd command using dcli. This method assumes you are have ssh equivalence setup from compute node 1. As you can see the command failed saying to use the ILOM shell. In the past I have used the same command successfully to change the root password on IB Switches.

[root@dm01db01 ~]#  dcli -g ibswitch_group -l root “echo welcome1 | passwd –stdin root”
dm01sw-ibb01: This command should not be used for ILOM users.
dm01sw-ibb01: Please use ILOM shell to handle password for this user.
dm01sw-ibb01: Example:
dm01sw-ibb01: -> set /SP/users/root password
dm01sw-ibb01:
dm01sw-iba01: This command should not be used for ILOM users.
dm01sw-iba01: Please use ILOM shell to handle password for this user.
dm01sw-iba01: Example:
dm01sw-iba01: -> set /SP/users/root password
dm01sw-iba01:


So I decided to login to the IB switch directly and use the passwd command instead of running from dcli. The passwd command fail again with the same error.

[root@dm01sw-iba01 ~]# ssh dm01sw-ibb01
You are now logged in to the root shell.
It is recommended to use ILOM shell instead of root shell.
All usage should be restricted to documented commands and documented
config files.
To view the list of documented commands, use “help” at linux prompt.

[root@dm01sw-ibb01 ~]# hostname
dm01sw-ibb01

[root@dm01sw-iba01 ~]# passwd root
This command should not be used for ILOM users.
Please use ILOM shell to handle password for this user.
Example:
   -> set /SP/users/root password


eBook - Oracle Exadata X8M Patching Recipes | Netsoftmate

Issue 2: Using ILOM Shell

As the passwd command failed asking to use the ILOM shell, I login to the IB switch as ilom-admin and executed the change password command. What I see is, the password change command failed at ILOM prompt as well.

[root@dm01sw-iba01 ~]# su – ilom-admin

Oracle(R) Integrated Lights Out Manager
Version 2.2.7-1 ILOM 3.2.6 r118629
Copyright (c) 2017, Oracle and/or its affiliates. All rights reserved.
Warning: HTTPS certificate is set to factory default.
 

Hostname: dm01sw-iba01

-> set /SP/users/root welcome1
set: Invalid command syntax
Usage: set [-script] [target] <property>=<value> [<property>=<value>…]


Solution: Using Browser User Interface

I have decided to use the BUI to change the password.

Steps:

  • Open a Browser and enter the IB Switch hostname or IP address
https://dm01sw-ibb01.netsoftmate.com
  • Accept the security warning and proceed to connect to the IB Switch
  • Enter the username and password to connect to the IB Switch

  • This show the summary page

  • On the left Pan, expand ILOM administration and select User Management

  • Click on  User Accounts, Select root user and click on edit button

  • Enter the new password and confirm and Finally click on the Save button to change the password.

  • To Verify the new password, open a Putty session and ssh to IB Switch using new password.
[root@dm01db01 ~]# ssh dm01sw-ibb01
Password:
You are now logged in to the root shell.
It is recommended to use ILOM shell instead of root shell.
All usage should be restricted to documented commands and documented
config files.
To view the list of documented commands, use “help” at linux prompt.

[root@dm01sw-ibb01 ~]# hostname
dm01sw-ibb01


Conclusion

In this article we have learned how to change the root password on Infiniband Switch using Browser User Interface when the command line option doesn’t work.
1

PREVIOUS POSTSPage 1 of 18NO NEW POSTS