Good Contents Are Everywhere, But Here, We Deliver The Best of The Best.Please Hold on!
During the Oracle Database Appliance Deployment you can optionally configure CloudFS file system. The default mount point is /cloudfs and set to default size of 50GB. Oracle Database Appliance uses the Oracle Automatic Storage Management Cluster File System (Oracle ACFS) for database and virtual machine files storage. ACFS can only be used to configure shared storage file system on ODA. Oracle ACFS provides both servers with concurrent access to /cloudfs shared file system. The default size of 50GB may not sufficient and must be increased to store big files for business requirement.


In this article we will demonstrate how to resize the /cloudfs file system using ASMCA GUI interface


Steps to resize the /cloudfs file system using asmca GUI Interface

Step 1: Get the current /cloudfs file system size

Step 2: Start VNC on node 1. Here I am starting VNC as root user. You can choose to start it as Grid or Oracle user.

[root@odanode1 ~]# rpm -qa *vnc*
tigervnc-1.1.0-18.el6.x86_64
tigervnc-server-1.1.0-18.el6.x86_64
[root@odanode1 ~]# ps -ef|grep vnc
root     23281 20754  0 13:32 pts/1    00:00:00 grep vnc

[root@odanode1 ~]# vncserver :1

You will require a password to access your desktops.

Password:
Verify:

New ‘odanode1:1 (root)’ desktop is odanode1:1

Creating default startup script /root/.vnc/xstartup
Starting applications specified in /root/.vnc/xstartup
Log file is /root/.vnc/odanode1:1.log

[root@odanode1 ~]# ps -ef|grep vnc
root     23399     1  1 13:32 pts/1    00:00:00 /usr/bin/Xvnc :1 -desktop odanode1:1 (root) -auth /root/.Xauthority -geometry 1024×768 -rfbwait 30000 -rfbauth /root/.vnc/passwd -rfbport 5901 -fp catalogue:/etc/X11/fontpath.d -pn
root     23481 23480  0 13:33 pts/1    00:00:00 vncconfig -iconic
root     23636 20754  0 13:33 pts/1    00:00:00 grep vnc

Step 3: Start VNC viewer on desktop and enter the hostname/IP address on node 1. Enter the root password as we have started the VNC server using root user.


Step 4: Switch to grid user and verify the Grid Home

Step 5: Set Oracle Home to Grid home and start asmca

Step 6: Click on ASM Cluster File System Tab

Step 7: Right Click on /cloudfs and select Resize option

Step 8: Enter the desired new size. Here I am resizing the /cloudfs to 200GB

Step 9: Resize in progress

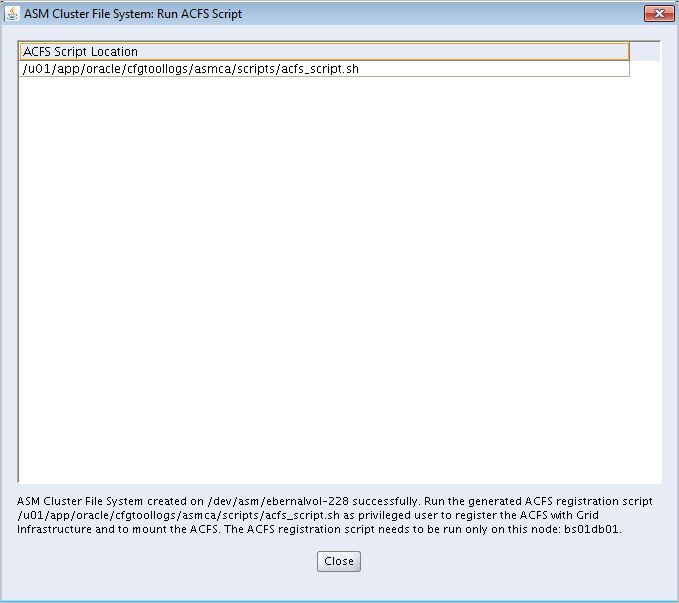
Step 10: Resize completed

Step 11: Verify the /cloudfs size


Conclusion

In this article we have learned how to resize/increase the size of /cloudfs ACFS file system on ODA using ASMCA GUI utility. The cloudfs file system is configured during the ODA deployment and it is set to 50GB which is not sufficient for storing the big files. The cloudfs is build using ACFS and it can be resized easily using ASMCA graphical interface.

0

During Oracle Database Appliance Deployment you can optionally configure CloudFS file system. The default mount point is /cloudfs and set to default size of 50GB. Oracle Database Appliance uses the Oracle Automatic Storage Management Cluster File System (Oracle ACFS) for database and virtual machine files storage. ACFS can only be used to configure shared storage file system on ODA. Oracle ACFS provides both servers with concurrent access to /cloudfs shared file system. The default size of 50GB may not sufficient and must be increased to store big files for business requirement.


In this article we will demonstrate how to resize the /cloudfs file system manually using ACFS commands.


Steps to resize the /cloudfs file system


Step 1: Login to node 1 as grid user the owner of Grid Infrastructure software

[grid@odanoden1 ~]$ id
uid=1000(grid) gid=1001(oinstall) groups=1001(oinstall),1003(racoper),1004(asmdba),1005(asmoper),1006(asmadmin)

Step 2: Verify the existing size of /cloudfs. Here is my case the /cloufs is 200GB and it was resized in the past from 50GB to 200GB

[grid@odanoden1 ~]$ df -h /cloudfs
Filesystem           Size  Used Avail Use% Mounted on
/dev/asm/acfsvol-23  200G  483M  200G   1% /cloudfs

Step 3: Set the ORACLE SID to +ASM1

[grid@odanoden1 ~]$ echo $ORACLE_SID

[grid@odanoden1 ~]$ . oraenv

ORACLE_SID = [grid] ? +ASM1
The Oracle base has been set to /u01/app/grid

[grid@odanoden1 ~]$ echo $ORACLE_SID

+ASM1

Step 4: List the ACFS Mounts. Here we can see that /cloudfs volume is /dev/asm/acfsvol-23

[grid@odanoden1 ~]$ mount |grep asm
/dev/asm/acfsvol-23 on /cloudfs type acfs (rw)
/dev/asm/datastore-272 on /u01/app/oracle/oradata/datastore type acfs (rw)
/dev/asm/datastore-97 on /u02/app/oracle/oradata/datastore type acfs (rw)
/dev/asm/datastore-23 on /u01/app/oracle/fast_recovery_area/datastore type acfs (rw)

Step 5: Get the size of the volume /dev/asm/acfsvol-23

[grid@odanoden1 ~]$ /sbin/advmutil volinfo /dev/asm/acfsvol-23
Device: /dev/asm/acfsvol-23
Interface Version: 1
Size (MB): 204800
Resize Increment (MB): 64
Redundancy: high
Stripe Columns: 8
Stripe Width (KB): 1024
Disk Group: RECO
Volume: ACFSVOL
Compatible.advm: 12.1.0.2.0

Step 6: Resize the /cloudfs as follows. Here we are increasing /cloudfs by 50GB

[grid@odanoden1 ~]$ /sbin/acfsutil size +50g /cloudfs
acfsutil size: new file system size: 268435456000 (256000MB)

Step 7: Verify the new size of the volume /dev/asm/acfsvol-23

[grid@odanoden1 ~]$ /sbin/advmutil volinfo /dev/asm/acfsvol-23
Device: /dev/asm/acfsvol-23
Interface Version: 1
Size (MB): 256000
Resize Increment (MB): 64
Redundancy: high
Stripe Columns: 8
Stripe Width (KB): 1024
Disk Group: RECO
Volume: ACFSVOL
Compatible.advm: 12.1.0.2.0

Step 8: Verify the new size of /cloudfs file system

[grid@odanoden1 ~]$ df -h /cloudfs
Filesystem           Size  Used Avail Use% Mounted on
/dev/asm/acfsvol-23  250G  585M  250G   1% /cloudfs


Conclusion

In this article we have learned how to resize/increase the size of /cloudfs shared file system on ODA. The cloudfs file system is configured during the ODA deployment and it is set to 50GB which is not sufficient for storing the big files. The cloudfs is build using ACFS and it can be resized easily using ACFS commands.

0

Introduction

Oracle Database Appliance uses the Oracle Automatic Storage Management Cluster File System (Oracle ACFS) for database and virtual machine files storage. Oracle ACFS provides both servers with concurrent access to some or all of the shared storage on Oracle Database Appliance. It supports space-efficient storage snapshots, which provides fast provisioning databases and virtual machines within Oracle Database Appliance.


To check Storage used for database running on ODA, execute the following:

[root@dzuro614001nor ~]# oakcli show databases
Name     Type       Storage   HomeName             HomeLocation                                       Version
—–    ——     ——–  ————–       —————-                                   ———-
odatest  RAC    ACFS      OraDb12102_home1     /u01/app/oracle/product/12.1.0.2/dbhome_1          2.1.0.2.170117(24732082,24828633)


In this article I will demonstrate how to check ACFS mounts on ODA and how to resize an Oracle ACFS file system.


[root@odanode1 ~]# su – grid

[grid@odanode1 ~]$ . oraenv
ORACLE_SID = [+ASM1] ? +ASM2
The Oracle base has been set to /u01/app/grid

[grid@odanode1 ~]$ mount | grep asm
/dev/asm/flashdata-5 on /u02/app/oracle/oradata/flashdata type acfs (rw)
/dev/asm/datdc00000-282 on /u02/app/oracle/oradata/DC00000 type acfs (rw)
/dev/asm/datastore-305 on /u01/app/oracle/fast_recovery_area/datastore type acfs (rw)
/dev/asm/rdodc00001-55 on /u01/app/oracle/oradata/DC00001 type acfs (rw)
/dev/asm/datdc00002-282 on /u02/app/oracle/oradata/DC00002 type acfs (rw)
/dev/asm/rcodc00002-305 on /u01/app/oracle/fast_recovery_area/DC00002 type acfs (rw)
/dev/asm/rdodc00000-55 on /u01/app/oracle/oradata/DC00000 type acfs (rw)
/dev/asm/datastore-282 on /u02/app/oracle/oradata/datastore type acfs (rw)
/dev/asm/rcodc00000-305 on /u01/app/oracle/fast_recovery_area/DC00000 type acfs (rw)
/dev/asm/datastore-55 on /u01/app/oracle/oradata/datastore type acfs (rw)
/dev/asm/datdc00001-282 on /u02/app/oracle/oradata/DC00001 type acfs (rw)
/dev/asm/rdodc00002-55 on /u01/app/oracle/oradata/DC00002 type acfs (rw)
/dev/asm/rcodc00001-305 on /u01/app/oracle/fast_recovery_area/DC00001 type acfs (rw)
/dev/asm/acfsvol-305 on /cloudfs type acfs (rw)

Here I would like to resize the ACFS /u02/app/oracle/oradata/DC00002 from 1.5TB to 2.5TB

Follow the steps below to resize the ACFS file system:

[grid@odanode1 ~]$ df -h /u02/app/oracle/oradata/DC00002
Filesystem            Size  Used Avail Use% Mounted on
/dev/asm/datdc00002-282
                      1.5T  233G  1.3T  15% /u02/app/oracle/oradata/DC00002

[grid@odanode1 ~]$ /sbin/advmutil volinfo /dev/asm/datdc00002-282
/dev/asm/datdc00002-282
Interface Version: 1
Size (MB): 1572864
Resize Increment (MB): 64
Redundancy: mirror
Stripe Columns: 8
Stripe Width (KB): 1024
Disk Group: DATA
Volume: DATDC00002
Compatible.advm: 12.1.0.2.0

[grid@odanode1 ~]$ asmcmd lsdg
State    Type    Rebal  Sector  Block       AU   Total_MB   Free_MB  Req_mir_free_MB  Usable_file_MB  Offline_disks  Voting_files  Name
MOUNTED  NORMAL  N         512   4096  4194304  103088128  93545932          6443008        43551462              0             Y  DATA/
MOUNTED  NORMAL  N         512   4096  4194304    1526208    835840           381552          227144              0             N  FLASH/
MOUNTED  NORMAL  N         512   4096  4194304   16930368  13944968          1058148         6443410              0             N  RECO/
MOUNTED  HIGH    N         512   4096  4194304     763120    634480           381560           84306              0             N  REDO/

[grid@odanode1 ~]$ /sbin/acfsutil size -h
Usage: acfsutil [-h] size [[-|+]nnn[K|M|G|T|P]] [-a nnn[K|M|G|T|P]] [-x nnn[K|M|G|T|P]] [-d <device>]  <path>
                                         – Resize file system and configure auto-resize
                [-a]                     – Auto-resize increment
                [-x]                     – Auto-resize maximum
                [-d]                     – Resize only this device


[grid@odanode1 ~]$ /sbin/acfsutil size 2.5T /u02/app/oracle/oradata/DC00002
acfsutil size: new file system size: 2748779069440 (2621440MB)


[grid@odanode1 ~]$ df -h /u02/app/oracle/oradata/DC00002
Filesystem            Size  Used Avail Use% Mounted on
/dev/asm/datdc00024-282
                      2.5T  233G  2.2T   9% /u02/app/oracle/oradata/DC00002


[grid@odanode1 ~]$ /sbin/advmutil volinfo /dev/asm/datdc00002-282
Device: /dev/asm/datdc00002-282
Interface Version: 1
Size (MB): 2621440
Resize Increment (MB): 64
Redundancy: mirror
Stripe Columns: 8
Stripe Width (KB): 1024
Disk Group: DATA
Volume: DATDC00002
Compatible.advm: 12.1.0.2.0

Conclusion
In this article we have learned how to resize an Oracle ACFS file system. ODA uses Oracle Automatic Storage Management Cluster File System (Oracle ACFS) for database and virtual machine files storage, provides both servers with concurrent access and supports space-efficient storage snapshots.

0

Overview
You can install Oracle GoldenGate for Oracle RAC using:

  • Shared Storage
    •  NFS, OCFS2, DBFS, OCFS
  • Local file system
You can Install Oracle GoldenGate 12c in 2 ways:
  • Graphical User Interface (GUI)
  • Using response file (Silent)

In this article I will demonstrate how to Install Oracle GoldenGate 12c using GUI on a full Rack Exadata Database Machine using ACFS file system.

What is ACFS?
Automatic Storage Management Cluster File System (ACFS) was introduced in Oracle database 11gR2. ACFS is a general purpose single-node or cluster file system on top of ASM. ACFS can be accessed using industry-standard Network Attached Storage (NAS) file access protocols: Network File System (NFS) and Common Internet File System (CIFS)

Installing GoldenGate on ACFS
ACFS file systems are mounted on all nodes in a cluster. Oracle GoldenGate is supported in an Oracle ACFS environment. GoldenGate should be installed in the cluster to capture the data from the database.

How to configure ACFS?
Take a look at the below 2 articles on how to configure ACFS on Exadata Database Machine.
 
Flex ASM: http://netsoftmate.blogspot.in/2017/03/configure-acfs-on-exadata-running.html
Standard ASM: http://netsoftmate.blogspot.in/2017/02/configure-acfs-on-exadata-database.html

Environment:
  • Exadata Database Machine X5-2 Full Rack
  • Oracle GoldenGate 12.2.0.1
  • Oracle Database 12.2.0.1
  • ASM Cluster File System (ACFS)
Verify ACFS is running and mounted

dm01db01-+ASM1 {/home/oracle}:/u01/app/12.2.0.1/grid/bin/crsctl stat res ora.acfs_dg.acfsvol.acfs -t
——————————————————————————–
Name           Target  State        Server                   State details
——————————————————————————–
Local Resources
——————————————————————————–
ora.acfs_dg.acfsvol.acfs
               ONLINE  ONLINE       dm01db01                 mounted on /acfs_ogg
                                                             ,STABLE
               ONLINE  ONLINE       dm01db02                 mounted on /acfs_ogg
                                                             ,STABLE
               ONLINE  ONLINE       dm01db03                 mounted on /acfs_ogg
                                                             ,STABLE
               ONLINE  ONLINE       dm01db04                 mounted on /acfs_ogg
                                                             ,STABLE
               ONLINE  ONLINE       dm01db05                 mounted on /acfs_ogg
                                                             ,STABLE
               ONLINE  ONLINE       dm01db06                 mounted on /acfs_ogg
                                                             ,STABLE
               ONLINE  ONLINE       dm01db07                 mounted on /acfs_ogg
                                                             ,STABLE
               ONLINE  ONLINE       dm01db08                 mounted on /acfs_ogg
                                                             ,STABLE
——————————————————————————–

dm01db01-+ASM1 {/home/oracle}:dcli -g ~/dbs_group -l oracle ‘df -h /acfs_ogg’
dm01db01: Filesystem            Size  Used Avail Use% Mounted on
dm01db01: /dev/asm/acfsvol-223  4.9T   12G  4.9T   1% /acfs_ogg
dm01db02: Filesystem            Size  Used Avail Use% Mounted on
dm01db02: /dev/asm/acfsvol-223  4.9T   12G  4.9T   1% /acfs_ogg
dm01db03: Filesystem            Size  Used Avail Use% Mounted on
dm01db03: /dev/asm/acfsvol-223  4.9T   12G  4.9T   1% /acfs_ogg
dm01db04: Filesystem            Size  Used Avail Use% Mounted on
dm01db04: /dev/asm/acfsvol-223  4.9T   12G  4.9T   1% /acfs_ogg
dm01db05: Filesystem            Size  Used Avail Use% Mounted on
dm01db05: /dev/asm/acfsvol-223  4.9T   12G  4.9T   1% /acfs_ogg
dm01db06: Filesystem            Size  Used Avail Use% Mounted on
dm01db06: /dev/asm/acfsvol-223  4.9T   12G  4.9T   1% /acfs_ogg
dm01db07: Filesystem            Size  Used Avail Use% Mounted on
dm01db07: /dev/asm/acfsvol-223  4.9T   12G  4.9T   1% /acfs_ogg
dm01db08: Filesystem            Size  Used Avail Use% Mounted on
dm01db08: /dev/asm/acfsvol-223  4.9T   12G  4.9T   1% /acfs_ogg


Steps to Download Oracle GoldenGate 12c Software
  • Open a web browser and enter www.oracle.com in the address bar
  • This will bring you to the Oracle website home page
  • On this page hover on the download tab and click on “middleware”
  • Click GoldenGate
  • Accept the agreement and select the desired Oracle GoldenGate version for your platform.
    • Here I am downloading “Oracle GoldenGate 12.2.0.1.1 for Oracle on Linux x86-64”
  • Copy the zip file from your desktop to Exadata Compute node 1 using WinScp
  • Drag and Drop the file from left to right in to a directory
    • Here I am copying the file to /u01/app/oracle/software location
  • File copy is in progress

Steps to Install Oracle GoldenGate 12c software using OUI (Graphical Interface)
  • Login to Exadata Compute node 1 as Oracle software owner and navigate to the Oracle GoldenGate staging location
dm01db01-orcldb1 {/home/oracle}:cd /u01/app/oracle/software

dm01db01-orcldb1 {/u01/app/oracle/software}:ls -ltr
total 464928
-rw-r–r– 1 oracle oinstall 475611228 Jan  2 04:51 fbo_ggs_Linux_x64_shiphome.zip
  • Copy software zip file to ACFS location /acfs_ogg
dm01db01-orcl1 {/u01/app/oracle/software}: cp fbo_ggs_Linux_x64_shiphome.zip /acfs_ogg/
  • Unzip the Oracle GoldenGate 12c software
dm01db01-orcldb1 {/u01/app/oracle/software}: cd /acfs_ogg

dm01db01-orcldb1 {/acfs_ogg}:ls -l
total 467040
-rw-r–r– 1 oracle oinstall 475611228 Mar 25 01:51 fbo_ggs_Linux_x64_shiphome.zip

dm01db01-orcldb1 {/acfs_ogg}:unzip fbo_ggs_Linux_x64_shiphome.zip
Archive:  fbo_ggs_Linux_x64_shiphome.zip
   creating: fbo_ggs_Linux_x64_shiphome/
   creating: fbo_ggs_Linux_x64_shiphome/Disk1/
  inflating: fbo_ggs_Linux_x64_shiphome/Disk1/runInstaller
   creating: fbo_ggs_Linux_x64_shiphome/Disk1/stage/
  inflating: fbo_ggs_Linux_x64_shiphome/Disk1/stage/OuiConfigVariables.xml
  inflating: fbo_ggs_Linux_x64_shiphome/Disk1/stage/productlanguages.properties
   creating: fbo_ggs_Linux_x64_shiphome/Disk1/stage/fastcopy/
  inflating: fbo_ggs_Linux_x64_shiphome/Disk1/stage/fastcopy/setperms1.sh
  inflating: fbo_ggs_Linux_x64_shiphome/Disk1/stage/fastcopy/oracle.oggcore.top_ora11g_filemap.jar
  inflating: fbo_ggs_Linux_x64_shiphome/Disk1/stage/fastcopy/oracle.oggcore.top_ora12c_dirs.lst
  inflating: fbo_ggs_Linux_x64_shiphome/Disk1/stage/fastcopy/oracle.oggcore.top_ora12c_1.xml
  inflating: fbo_ggs_Linux_x64_shiphome/Disk1/stage/fastcopy/racfiles.jar
  inflating: fbo_ggs_Linux_x64_shiphome/Disk1/stage/fastcopy/oracle.oggcore.top_ora11g_dirs.lst
  inflating: fbo_ggs_Linux_x64_shiphome/Disk1/stage/fastcopy/oracle.oggcore.top_ora12c_filemap.jar
  inflating: fbo_ggs_Linux_x64_shiphome/Disk1/stage/fastcopy/oracle.oggcore.top_ora11g_1.xml
  inflating: fbo_ggs_Linux_x64_shiphome/Disk1/stage/fastcopy/oracle.oggcore.top_ora11g_exp_1.xml
  inflating: fbo_ggs_Linux_x64_shiphome/Disk1/stage/fastcopy/oracle.oggcore.top_ora12c_exp_1.xml
   creating: fbo_ggs_Linux_x64_shiphome/Disk1/stage/globalvariables/
   creating: fbo_ggs_Linux_x64_shiphome/Disk1/stage/Dialogs/
   creating: fbo_ggs_Linux_x64_shiphome/Disk1/stage/Dialogs/standardDialogs/

……

   creating: fbo_ggs_Linux_x64_shiphome/Disk1/response/
  inflating: fbo_ggs_Linux_x64_shiphome/Disk1/response/oggcore.rsp
  inflating: OGG-12.2.0.1-README.txt
  inflating: OGG-12.2.0.1.1-ReleaseNotes.pdf


dm01db01-orcldb1 {/acfs_ogg}:ls -ltr
total 467412
drwxr-xr-x 3 oracle oinstall     20480 Dec 12  2015 fbo_ggs_Linux_x64_shiphome
-rw-r–r– 1 oracle oinstall      1559 Jan 18  2016 OGG-12.2.0.1-README.txt
-rw-r–r– 1 oracle oinstall    282294 Jan 18  2016 OGG-12.2.0.1.1-ReleaseNotes.pdf
drwx—— 2 root   root         65536 Mar 23 08:53 lost+found
-rw-r–r– 1 oracle oinstall 475611228 Mar 25 01:51 fbo_ggs_Linux_x64_shiphome.zip
  • Change directory to Disk1 and run the Installer
dm01db01-orcldb1 {/acfs_ogg}:cd fbo_ggs_Linux_x64_shiphome

dm01db01-orcldb1 {/acfs_ogg/fbo_ggs_Linux_x64_shiphome}:cd Disk1/

dm01db01-orcldb1 {/acfs_ogg/fbo_ggs_Linux_x64_shiphome/Disk1}:ls -ltr
total 160
drwxr-xr-x  4 oracle oinstall 20480 Dec 12  2015 install
drwxr-xr-x 11 oracle oinstall 20480 Dec 12  2015 stage
-rwxr-xr-x  1 oracle oinstall   918 Dec 12  2015 runInstaller
drwxrwxr-x  2 oracle oinstall 20480 Dec 12  2015 response


dm01db01-orcldb1 {/acfs_ogg/fbo_ggs_Linux_x64_shiphome/Disk1}: ./runInstaller

Select the Database version for which you are installing Oracle GoldenGate Software.
Here I am Installing Oracle GoldenGate for Oracle Database 12c
Click Next

Specify the GoldenGate Software location. Here I am using /acfs_ogg (ACFS file system)
Specify the Database Home Location and Manager port (Default Manager port is 7809) 
Click Next

Review the Installation Summary and click Install

Oracle GoldenGate Software Installation in progress

Installation completed. Click Close
  • Open the .bash_profile and add the following two variables
dm01db01-orcldb1 {/home/oracle}: vi .bash_profile

export GG_HOME=/acfs_ogg/app/oracle/product/12.2.0.1/gghome
export LD_LIBRARY_PATH=$ORACLE_HOME/lib:$ORACLE_HOME/lib32:$GG_HOME

*** Repeat the above step on all the nodes to update the .bash_profile***
  • Execute the .bash_profile and verify the variables.
dm01db01-orcldb1 {/home/oracle}: . .bash_profile
dm01db01-orcldb1 {/home/oracle}: echo $GG_HOME
/acfs_ogg/app/oracle/product/12.2.0.1/gghome

dm01db01-orcldb1 {/home/oracle}: echo $LD_LIBRARY_PATH
/u01/app/oracle/product/12.2.0.1/dbhome/lib:/u01/app/oracle/product/12.2.0.1/dbhome/lib32:/acfs_ogg/app/oracle/product/12.2.0.1/gghome
  • Let’s connect to ggsci prompt and verify the manager process
dm01db01-orcldb1 {/home/oracle}:cd $GG_HOME
dm01db01-orcldb1 {/acfs_ogg/app/oracle/product/12.2.0.1/gghome}:./ggsci


Oracle GoldenGate Command Interpreter for Oracle
Version 12.2.0.1.1 OGGCORE_12.2.0.1.0_PLATFORMS_151211.1401_FBO
Linux, x64, 64bit (optimized), Oracle 12c on Dec 12 2015 02:56:48
Operating system character set identified as UTF-8.

Copyright (C) 1995, 2015, Oracle and/or its affiliates. All rights reserved.

GGSCI (dm01db01.netsoftmate.com) 1> info all

Program     Status      Group       Lag at Chkpt  Time Since Chkpt

MANAGER     RUNNING


GGSCI (dm01db01.netsoftmate.com) 2> info mgr

Manager is running (IP port dm01db01.netsoftmate.com.15000, Process ID 10249).
  • Let’s verify it from node 2 this time. See the “info mgr” output. It clearly says that the mgr is up on node 1 that is dm01db01 using process ID 10249.
dm01db02-orcldb2 {/home/oracle}:cd $GG_HOME
dm01db02-orcldb2 {/acfs_ogg/app/oracle/product/12.2.0.1/gghome}:./ggsci

Oracle GoldenGate Command Interpreter for Oracle
Version 12.2.0.1.1 OGGCORE_12.2.0.1.0_PLATFORMS_151211.1401_FBO
Linux, x64, 64bit (optimized), Oracle 12c on Dec 12 2015 02:56:48
Operating system character set identified as UTF-8.

Copyright (C) 1995, 2015, Oracle and/or its affiliates. All rights reserved.

GGSCI (dm01db02.netsoftmate.com) 1> info all

Program     Status      Group       Lag at Chkpt  Time Since Chkpt

MANAGER     RUNNING

GGSCI (dm01db02.netsoftmate.com) 3> info mgr

Manager is running (IP port dm01db01.netsoftmate.com.15000, Process ID 10249).

dm01db02-orcldb2 {/acfs_ogg/app/oracle/product/12.2.0.1/gghome}:ps -ef|grep mgr
oracle   19219   823  0 04:06 pts/0    00:00:00 grep mgr

dm01db01-orcldb1 {/home/oracle}:dcli -g dbs_group -l oracle ‘ls -l /acfs_ogg/app/oracle/product/12.2.0.1/’
dm01db01: total 52
dm01db01: drwxr-xr-x 26 oracle oinstall 20480 Mar 25 03:57 gghome
dm01db02: total 52
dm01db02: drwxr-xr-x 26 oracle oinstall 20480 Mar 25 03:57 gghome
dm01db03: total 52
dm01db03: drwxr-xr-x 26 oracle oinstall 20480 Mar 25 03:57 gghome
dm01db04: total 52
dm01db04: drwxr-xr-x 26 oracle oinstall 20480 Mar 25 03:57 gghome
dm01db05: total 52
dm01db05: drwxr-xr-x 26 oracle oinstall 20480 Mar 25 03:57 gghome
dm01db06: total 52
dm01db06: drwxr-xr-x 26 oracle oinstall 20480 Mar 25 03:57 gghome
dm01db07: total 52
dm01db07: drwxr-xr-x 26 oracle oinstall 20480 Mar 25 03:57 gghome
dm01db08: total 52
dm01db08: drwxr-xr-x 26 oracle oinstall 20480 Mar 25 03:57 gghome


Conclusion
This completes our Oracle GoldenGate 12c installation on Exadata database machine using ACFS. We have seen how much easy it is to install Oracle GoldenGate software using GUI interface. The key for installing Oracle GoldenGate on 12c a RAC environment is to choose a shared location for software. You can also choose to install Oracle GoldenGate on local file system if you don’t have a shared location.
0

About ACFS:

  • ACFS stands for Oracle Automatic Storage Management Cluster File System
  • ACFS extends ASM functionality to support all kind of files like database files, application files and general purpose files.
  • Oracle ACFS is a High Availability Cluster File system and it is tightly coupled with Oracle Clusterware technology.
  • It can manage large number of file systems and files.
  • One can manage ACFS/ADVM using: ASMCA, ASMCMD, SQL*PLUS, OEM and ACFS Plug-ins

In this article I will demostrate how to configure Oracle ACFS on Exadata Database machine. Before start with the actual configuration, let’s discuss the few important points about ACFS and configure it on Exadata.

Oracle Automatic Storage Management Cluster File System (ACFS) on Exadata Database Machine:

Starting with Oracle Grid Infrastructure version 12.1.0.2, Oracle ACFS supports all database files and general purpose files on Oracle Exadata Database Machine running Oracle Linux on database servers.

The following database versions are supported by Oracle ACFS on Exadata Database Machine:

  • Oracle Database 10g Rel. 2 (10.2.0.4 and 10.2.0.5)
  • Oracle Database 11g (11.2.0.4 and higher)
  • Oracle Database 12c (12.1.0.1 and higher)


Some important information about using Oracle ACFS with Exadata


  • Oracle ACFS supports all database file types and general purpose files
  • All Oracle ACFS advanced functionality is supported on Exadata including:
    • Snapshots, replication, tagging, security, encryption, audit and HANFS.


Patches required

  • Please refer to the MOS note for important fixed required for Oracle ACFS on Exadata Database Machine.
    • 2022172.1


Oracle ACFS restriction

  • Smart Scan, Storage Indexes, IO Resource Manager (IORM) are currently not supported.
  • Smart FC read operation are cached.
  • Smart FC write operations is not supported
  • Smart Flash Logging is not supported.
  • HCC is supported with fix for bug 19136936
  • Hardware Assisted Resilient Data (HARD) checks are not performed.
  • Oracle ACFS replication or security/encryption/audit is only supported with general purpose files.
  • Database files in ACFS doesn’t support replication or security/encryption/audit


Performance Optimization

  • When storing database data files on Oracle ACFS, Initialization parameter FILESYSTEMIO_OPTIONS must be set to ‘setall’. Other settings are not supported.
  • For each disk group that contains an Oracle ADVM volume that is intended to hold data files, set ASM and ADVM compatibility attributes to 12.1 or higher as this will ensure optimized performance.


Uses of ACFS on Exadata Database Machine

  • Since Oracle ACFS support database version 10.2.0.4 and 10.2.0.5, Customers can migrate their 10g database to Exadata. Later they upgrade their 10g database to 11g or higher database version.
  • Oracle ACFS can be used as a shared Oracle Home for RDBMS, Middleware, GoldenGate binaries.
  • Oracle ACFS can be used to store Oracle GoldenGate related files such as trail file, checkpoint files, parameter files and so on.


Steps to configure ACFS

It consists of 4 steps:

  1. Load ACFS/ADVM module on all the nodes
  2. Create ASM diskgroup for ACFS
  3. Create ASM Volume
  4. Create ASM Cluster File system


Current Environment Details:

  • Exadata Database Machine X5-2 Full Rack
  • Exadata Storage Software version 12.1.2.1.1
  • Oracle Grid/Database Version 12.1.0.2


I – Load ACFS/ADVM module on all the nodes

  • Login as Oracle Grid Infrastructure software owner and start asmca.

uid=1000(oracle) gid=1001(oinstall) groups=1001(oinstall),1002(dba),1003(oper),1004(asmdba)

  • Set the ORACLE HOME and SID to ASM

dm01db01-orcldb1 {/home/oracle}:. oraenv
ORACLE_SID = [orcldb1] ? +ASM1
The Oracle base remains unchanged with value /u01/app/oracle

dm01db01-+ASM1 {/home/oracle}:env | grep ORA
ORACLE_SID=+ASM1
ORACLE_BASE=/u01/app/oracle
ORACLE_HOME=/u01/app/12.1.0.2/grid

  • Set DISPLAY

dm01db01-+ASM1 {/home/oracle}:export DISPLAY=10.30.201.137:0.0

  • Start asmca utility

dm01db01-+ASM1 {/home/oracle}:which asmca
/u01/app/12.1.0.2/grid/bin/asmca
dm01db01-+ASM1 {/home/oracle}:asmca


  • Make sure ACFS/ADVM modules loaded on every node in a standard cluster.


Here ACFS/ADVM module is not load on node 1.
Execute the following command to load acfs module.

[root@dm01db01 ~]# /u01/app/12.1.0.2/grid/bin/acfsload -h
ACFS-9228: usage: acfsload [-h] {start|stop} [-s]

[root@dm01db01 ~]# /u01/app/12.1.0.2/grid/bin/acfsload start
ACFS-9391: Checking for existing ADVM/ACFS installation.
ACFS-9392: Validating ADVM/ACFS installation files for operating system.
ACFS-9393: Verifying ASM Administrator setup.
ACFS-9308: Loading installed ADVM/ACFS drivers.
ACFS-9327: Verifying ADVM/ACFS devices.
ACFS-9156: Detecting control device ‘/dev/asm/.asm_ctl_spec’.
ACFS-9156: Detecting control device ‘/dev/ofsctl’.
ACFS-9322: completed

  • Verify ACFS/ADVM module is loaded.

[root@dm01db01 ~]# lsmod | grep oracle
oracleacfs           3310765  0
oracleadvm            506070  0
oracleoks             508392  2 oracleacfs,oracleadvm

On all nodes:

[root@dm01db01 ~]# dcli -g dbs_group -l root ‘lsmod | grep oracle’
dm01db01: oracleacfs           3310765  0
dm01db01: oracleadvm            506070  0
dm01db01: oracleoks             508392  2 oracleacfs,oracleadvm
dm01db02: oracleacfs           3310765  0
dm01db02: oracleadvm            506070  0
dm01db02: oracleoks             508392  2 oracleacfs,oracleadvm
dm01db03: oracleacfs           3310765  0
dm01db03: oracleadvm            506070  0
dm01db03: oracleoks             508392  2 oracleacfs,oracleadvm
dm01db04: oracleacfs           3310765  0
dm01db04: oracleadvm            506070  0
dm01db04: oracleoks             508392  2 oracleacfs,oracleadvm
dm01db05: oracleacfs           3310765  0
dm01db05: oracleadvm            506070  0
dm01db05: oracleoks             508392  2 oracleacfs,oracleadvm
dm01db06: oracleacfs           3310765  0
dm01db06: oracleadvm            506070  0
dm01db06: oracleoks             508392  2 oracleacfs,oracleadvm
dm01db07: oracleacfs           3310765  0
dm01db07: oracleadvm            506070  0
dm01db07: oracleoks             508392  2 oracleacfs,oracleadvm
dm01db08: oracleacfs           3310765  0
dm01db08: oracleadvm            506070  0
dm01db08: oracleoks             508392  2 oracleacfs,oracleadvm

[root@dm01db01 ~]# vi acfs_validate_module.sh

[root@dm01db01 ~]# cat acfs_validate_module.sh
#################################################
###
### ACFS/ADVM modules validation
###
#################################################
###
### Author: Esteban D Bernal
###
#################################################

/u01/app/12.1.0.2/grid/bin/acfsdriverstate loaded
/u01/app/12.1.0.2/grid/bin/acfsdriverstate installed
/u01/app/12.1.0.2/grid/bin/acfsdriverstate supported
/u01/app/12.1.0.2/grid/bin/acfsdriverstate version
/u01/app/12.1.0.2/grid/bin/acfsroot version_check

lsmod | grep oracle

## Where: “/u01/app/12.1.0.2/grid” is the Grid Infrastructure Home directory,
## thus you need to replace this value with your Grid Infrastructure Home directory path.

[root@dm01db01 ~]# chmod +x acfs_validate_module.sh

[root@dm01db01 ~]# ls -l acfs_validate_module.sh
-rwxr-xr-x 1 root root 673 Jan 25 05:02 acfs_validate_module.sh

[root@dm01db01 ~]# sh -x acfs_validate_module.sh
+ /u01/app/12.1.0.2/grid/bin/acfsdriverstate loaded
ACFS-9203: true
+ /u01/app/12.1.0.2/grid/bin/acfsdriverstate installed
ACFS-9203: true
+ /u01/app/12.1.0.2/grid/bin/acfsdriverstate supported
ACFS-9200: Supported
+ /u01/app/12.1.0.2/grid/bin/acfsdriverstate version
ACFS-9325:     Driver OS kernel version = 2.6.39-400.3.0.el6uek.x86_64(x86_64).
ACFS-9326:     Driver Oracle version = 140611.5.
+ /u01/app/12.1.0.2/grid/bin/acfsroot version_check
ACFS-9316: Valid ADVM/ACFS distribution media detected at: ‘/u01/app/12.1.0.2/grid/usm/install/Oracle/EL6UEK/x86_64/2.6.39-400/2.6.39-400-x86_64/bin’
+ lsmod
+ grep oracle
oracleacfs           3310765  0
oracleadvm            506070  0
oracleoks             508392  2 oracleacfs,oracleadvm


  • Refresh or Exit and start ASMCA again.


I still see that ACFS/ADVM is “Not Installed” on node 1 though we have enabled/loaded it manually on node 1 and verified. Let’s move on and see if it is just a BUG. If there is no issue we should be able to configure ASM Volume and ACFS without any issues.

II – Create ASM diskgroup for ACFS

  • On Disk Groups page click on “Create”


  • On Create Disk Group page, specify:
    • Disk Group Name: ACFS_DG
    • Redundancy: Normal
    • Select Member Disk: Show Eligible
    • Select all candidate disks to be part of ACFS_DG disk group
    • In Exadata each Storage cell is a failure Group
    • Click on Show Advanced Options, specify:
    • Allocation Unit Size: 4 (MB)
    • Minimun software version for ASM/Database/ADVM: 12.1.0.0.0
    • Click Ok


  • Click Ok


  • We can see our ACFS_DG Disk Group created


  • Verify newly created ACFS_DG Disk Group as follows:

SQL> select inst_id, name, total_mb, group_number from gv$asm_diskgroup where name like ‘ACFS_DG’;

   INST_ID NAME                             TOTAL_MB GROUP_NUMBER
———- —————————— ———- ————
         1 ACFS_DG                           4145536            3
         3 ACFS_DG                           4145536            3
         6 ACFS_DG                           4145536            3
         5 ACFS_DG                           4145536            3
         7 ACFS_DG                           4145536            3
         4 ACFS_DG                           4145536            3
         2 ACFS_DG                           4145536            3
         8 ACFS_DG                           4145536            3

8 rows selected.

SQL> col value for a30
SQL> col name for a30
SQL> select name, value from v$asm_attribute where GROUP_NUMBER=3 and name like ‘compatible%’;

NAME                           VALUE
—————————— ——————————
compatible.asm                 12.1.0.0.0
compatible.rdbms               12.1.0.0.0
compatible.advm                12.1.0.0.0

dm01db01-+ASM1 {/home/oracle}:/u01/app/12.1.0.2/grid/bin/crsctl stat res ora.ACFS_DG.dg -t
——————————————————————————–
Name           Target  State        Server                   State details
——————————————————————————–
Local Resources
——————————————————————————–
ora.ACFS_DG.dg
               ONLINE  ONLINE       dm01db01                 STABLE
               ONLINE  ONLINE       dm01db02                 STABLE
               ONLINE  ONLINE       dm01db03                 STABLE
               ONLINE  ONLINE       dm01db04                 STABLE
               ONLINE  ONLINE       dm01db05                 STABLE
               ONLINE  ONLINE       dm01db06                 STABLE
               ONLINE  ONLINE       dm01db07                 STABLE
               ONLINE  ONLINE       dm01db08                 STABLE
——————————————————————————–

III – Create ASM Volume

  • Click on “Volumes” tab


  • On Volumes page click on “Create”
    • On Create Volume page, specify:
    • Volumn name: acfsvol
    • Disk Group name: ACFS_DG
    • Size: 2008.25 (it can be anything based on your requirement from usable space avaialble.)
    • Click Ok


  • Click Ok


  • We can see our Volume created


  • Verify newly created Volume as follows:

ASMCMD> volinfo –all
Diskgroup Name: ACFS_DG

         Volume Name: ACFSVOL
         Volume Device: /dev/asm/acfsvol-228
         State: ENABLED
         Size (MB): 2056448
         Resize Unit (MB): 64
         Redundancy: MIRROR
         Stripe Columns: 8
         Stripe Width (K): 1024
         Usage:
         Mountpath:

dm01db01-+ASM1 {/home/oracle}:/u01/app/12.1.0.2/grid/bin/crsctl stat res ora.ACFS_DG.ACFSVOL.advm -t
——————————————————————————–
Name           Target  State        Server                   State details
——————————————————————————–
Local Resources
——————————————————————————–
ora.ACFS_DG.ACFSVOL.advm
               ONLINE  ONLINE       dm01db01                 STABLE
               ONLINE  ONLINE       dm01db02                 STABLE
               ONLINE  ONLINE       dm01db03                 STABLE
               ONLINE  ONLINE       dm01db04                 STABLE
               ONLINE  ONLINE       dm01db05                 STABLE
               ONLINE  ONLINE       dm01db06                 STABLE
               ONLINE  ONLINE       dm01db07                 STABLE
               ONLINE  ONLINE       dm01db08                 STABLE
——————————————————————————–

dm01db01-+ASM1 {/home/oracle}:dcli -g ~/dbs_group -l oracle ‘ls -l /dev/asm/*’
dm01db01: brwxrwx— 1 root dba 251, 116737 Jan 25 06:14 /dev/asm/acfsvol-228
dm01db02: brwxrwx— 1 root dba 251, 116737 Jan 25 06:14 /dev/asm/acfsvol-228
dm01db03: brwxrwx— 1 root dba 251, 116737 Jan 25 06:14 /dev/asm/acfsvol-228
dm01db04: brwxrwx— 1 root dba 251, 116737 Jan 25 06:14 /dev/asm/acfsvol-228
dm01db05: brwxrwx— 1 root dba 251, 116737 Jan 25 06:14 /dev/asm/acfsvol-228
dm01db06: brwxrwx— 1 root dba 251, 116737 Jan 25 06:14 /dev/asm/acfsvol-228
dm01db07: brwxrwx— 1 root dba 251, 116737 Jan 25 06:14 /dev/asm/acfsvol-228
dm01db08: brwxrwx— 1 root dba 251, 116737 Jan 25 06:14 /dev/asm/acfsvol-228

IV – Create ASM Cluster File system

  • Create ACFS mount point directory on all nodes

[root@dm01db01 ~]# dcli -g ~/dbs_group -l root ‘mkdir /acfs’

[root@dm01db01 ~]# dcli -g ~/dbs_group -l root ‘chown oracle:oinstall /acfs’

[root@dm01db01 ~]# dcli -g ~/dbs_group -l root ‘chmod 775 /acfs’

[root@dm01db01 ~]# dcli -g ~/dbs_group -l root ‘ls -ld /acfs’
dm01db01: drwxrwxr-x 2 oracle oinstall 4096 Jan 25 06:28 /acfs
dm01db02: drwxrwxr-x 2 oracle oinstall 4096 Jan 25 06:28 /acfs
dm01db03: drwxrwxr-x 2 oracle oinstall 4096 Jan 25 06:28 /acfs
dm01db04: drwxrwxr-x 2 oracle oinstall 4096 Jan 25 06:28 /acfs
dm01db05: drwxrwxr-x 2 oracle oinstall 4096 Jan 25 06:28 /acfs
dm01db06: drwxrwxr-x 2 oracle oinstall 4096 Jan 25 06:28 /acfs
dm01db07: drwxrwxr-x 2 oracle oinstall 4096 Jan 25 06:28 /acfs
dm01db08: drwxrwxr-x 2 oracle oinstall 4096 Jan 25 06:28 /acfs


  • Click on “ASM Cluster File Systems” tab


  • On ASM Cluster File Systems page click on “Create”


  • On Create ASM Cluster File System page, specify:
    • Type of ACFS: Cluster File System
    • Mount point: /acfs
    • Auto Mount: check
    • User Name: oracle
    • Group Name: oinstall
    • Description: ACFS File System
    • Select Volume: ACFSVOL – /dev/asm/acfsvol-228 – 2008.25
    • Click Ok


  • Run the ACFS script on Node 1 only to register ACFS with Grid Infrastructure and to mount the ACFS file system.

  • Contents of ACFS script looks like this:

[root@dm01db01 ~]# cat /u01/app/oracle/cfgtoollogs/asmca/scripts/acfs_script.sh
#!/bin/sh

/u01/app/12.1.0.2/grid/bin/srvctl add filesystem -d /dev/asm/acfsvol-228 -m /acfs -u oracle -fstype ACFS -description ‘ACFS File System’ -autostart ALWAYS
if [ $? = “0” -o $? = “2” ]; then
   /u01/app/12.1.0.2/grid/bin/srvctl start filesystem -d /dev/asm/acfsvol-228
   if [ $? = “0” ]; then
      chown oracle:oinstall /acfs
      chmod 775 /acfs
      /u01/app/12.1.0.2/grid/bin/srvctl status filesystem -d /dev/asm/acfsvol-228
      exit 0
   fi
   /u01/app/12.1.0.2/grid/bin/srvctl status filesystem -d /dev/asm/acfsvol-228
fi


  • Execute the script

[root@dm01db01 ~]# /u01/app/oracle/cfgtoollogs/asmca/scripts/acfs_script.sh
ACFS file system /acfs is mounted on nodes dm01db01,dm01db02,dm01db03,dm01db04,dm01db05,dm01db06,dm01db07,dm01db08


  • Click Close


  • We can see our Volume created


  • Verify newly created Volume as follows:

dm01db01-+ASM1 {/home/oracle}:/u01/app/12.1.0.2/grid/bin/crsctl stat res ora.acfs_dg.acfsvol.acfs -t
——————————————————————————–
Name           Target  State        Server                   State details
——————————————————————————–
Local Resources
——————————————————————————–
ora.acfs_dg.acfsvol.acfs
               ONLINE  ONLINE       dm01db01                 mounted on /acfs,STA
                                                             BLE
               ONLINE  ONLINE       dm01db02                 mounted on /acfs,STA
                                                             BLE
               ONLINE  ONLINE       dm01db03                 mounted on /acfs,STA
                                                             BLE
               ONLINE  ONLINE       dm01db04                 mounted on /acfs,STA
                                                             BLE
               ONLINE  ONLINE       dm01db05                 mounted on /acfs,STA
                                                             BLE
               ONLINE  ONLINE       dm01db06                 mounted on /acfs,STA
                                                             BLE
               ONLINE  ONLINE       dm01db07                 mounted on /acfs,STA
                                                             BLE
               ONLINE  ONLINE       dm01db08                 mounted on /acfs,STA
                                                             BLE
——————————————————————————–

V – Test ACFS Cluster file system

dm01db01-+ASM1 {/home/oracle}:cd /acfs

dm01db01-+ASM1 {/acfs}:ls -ltr
total 64
drwx—— 2 root root 65536 Jan 25 07:11 lost+found

dm01db01-+ASM1 {/acfs}:mkdir test

dm01db01-+ASM1 {/acfs}:cd test/

dm01db01-+ASM1 {/acfs/test}:vi myfile.txt

dm01db01-+ASM1 {/acfs/test}:cat myfile.txt
this is a test

dm01db01-+ASM1 {/home/oracle}:dcli -g ~/dbs_group -l oracle ‘cat /acfs/test/myfile.txt’
dm01db01: this is a test
dm01db02: this is a test
dm01db03: this is a test
dm01db04: this is a test
dm01db05: this is a test
dm01db06: this is a test
dm01db07: this is a test
dm01db08: this is a test

dm01db01-+ASM1 {/home/oracle}:dcli -g ~/dbs_group -l oracle ‘df -h /acfs’
dm01db01: Filesystem            Size  Used Avail Use% Mounted on
dm01db01: /dev/asm/acfsvol-228
dm01db01: 2.0T  4.3G  2.0T   1% /acfs
dm01db02: Filesystem            Size  Used Avail Use% Mounted on
dm01db02: /dev/asm/acfsvol-228
dm01db02: 2.0T  4.3G  2.0T   1% /acfs
dm01db03: Filesystem            Size  Used Avail Use% Mounted on
dm01db03: /dev/asm/acfsvol-228
dm01db03: 2.0T  4.3G  2.0T   1% /acfs
dm01db04: Filesystem            Size  Used Avail Use% Mounted on
dm01db04: /dev/asm/acfsvol-228
dm01db04: 2.0T  4.3G  2.0T   1% /acfs
dm01db05: Filesystem            Size  Used Avail Use% Mounted on
dm01db05: /dev/asm/acfsvol-228
dm01db05: 2.0T  4.3G  2.0T   1% /acfs
dm01db06: Filesystem            Size  Used Avail Use% Mounted on
dm01db06: /dev/asm/acfsvol-228
dm01db06: 2.0T  4.3G  2.0T   1% /acfs
dm01db07: Filesystem            Size  Used Avail Use% Mounted on
dm01db07: /dev/asm/acfsvol-228
dm01db07: 2.0T  4.3G  2.0T   1% /acfs
dm01db08: Filesystem            Size  Used Avail Use% Mounted on
dm01db08: /dev/asm/acfsvol-228
dm01db08: 2.0T  4.3G  2.0T   1% /acfs

dm01db01-+ASM1 {/home/oracle}:dcli -g ~/dbs_group -l oracle ‘ls -ld /acfs’
dm01db01: drwxrwxr-x 4 oracle oinstall 4096 Jan 25 07:11 /acfs
dm01db02: drwxrwxr-x 4 oracle oinstall 4096 Jan 25 07:11 /acfs
dm01db03: drwxrwxr-x 4 oracle oinstall 4096 Jan 25 07:11 /acfs
dm01db04: drwxrwxr-x 4 oracle oinstall 4096 Jan 25 07:11 /acfs
dm01db05: drwxrwxr-x 4 oracle oinstall 4096 Jan 25 07:11 /acfs
dm01db06: drwxrwxr-x 4 oracle oinstall 4096 Jan 25 07:11 /acfs
dm01db07: drwxrwxr-x 4 oracle oinstall 4096 Jan 25 07:11 /acfs
dm01db08: drwxrwxr-x 4 oracle oinstall 4096 Jan 25 07:11 /acfs


Conclusion
In this article we have learned basic concepts about ACFS and it works on Exadata. We also seen a practicle demonstration on how to Load ACFS/ADVM module on all the nodes, Create ASM diskgroup for ACFS, Create ASM Volume and Create ASM Cluster File system.


2