Good Contents Are Everywhere, But Here, We Deliver The Best of The Best.Please Hold on!
Database Management Services, Oracle Database Management Solution, Oracle Exadata, Remote Database Management
What are the different Exadata Deployment Option available?


– Exadata On-Premises

– Exadata Cloud Service

– Exadata Cloud at Customer


What is Oracle Exadata Database Machine?


Exadata Database Machine is an Engineered System which consists of Compute nodes, Storage cells and Infiniband Switches or RoCE Switches (starting X8M).


Exadata Database Machine or simply known as Exadata is:

  • – An Engineered System

    – A preconfigured combination of balanced Hardware and unique software

    – A unique platform for running Oracle Databases

    – Consists of Compute Grid, Storage Grid and Network Grid

    – A fully integrated platform for Oracle Database

    – Ideal for Database Consolidation platform

    – It provides High Availability and High Performance for all types of Workloads


The Oracle Exadata Database Machine is an Engineered System designed to deliver extreme performance and high availability for all type of Oracle database workloads (OLTP, OLAP & Mixed Workload).


Exadata Database Machine Components

  • 1. Compute nodes (Database Server Grid)
  •  
  • 2. Exadata Storage Server (Storage Server Grid)
  •  
  • 3. Network (Network Grid)
  •  
    •             – Exadata Infiniband switches
    •  
    •             – Exadata RoCE switches – From Exadata X8M
    •  
  • 4. Other Components
  •  
    •             – Cisco Switch, PDUs


Oracle Exadata Cloud Service

Oracle Database Exadata Cloud Service delivers the world’s most advanced database cloud by combining the world’s #1 database technology and Exadata, the most powerful database platform, with the simplicity, agility and elasticity of a cloud-based deployment.


Oracle Exadata Cloud @ Customer

Exadata C@C is ideal for customers desiring cloud benefits but cannot move their databases to the public cloud due to sovereignty laws, industry regulations, corporate policies, security requirements, network latency, or organizations that find it impractical to move databases away from other tightly coupled on-premises IT infrastructure. Oracle Exadata C@C delivers the world’s most advanced database cloud to customers who require their databases to be located on-premises. It is identical to Oracle’s Exadata Cloud Service but located in customers’ own data centers and managed by Oracle.


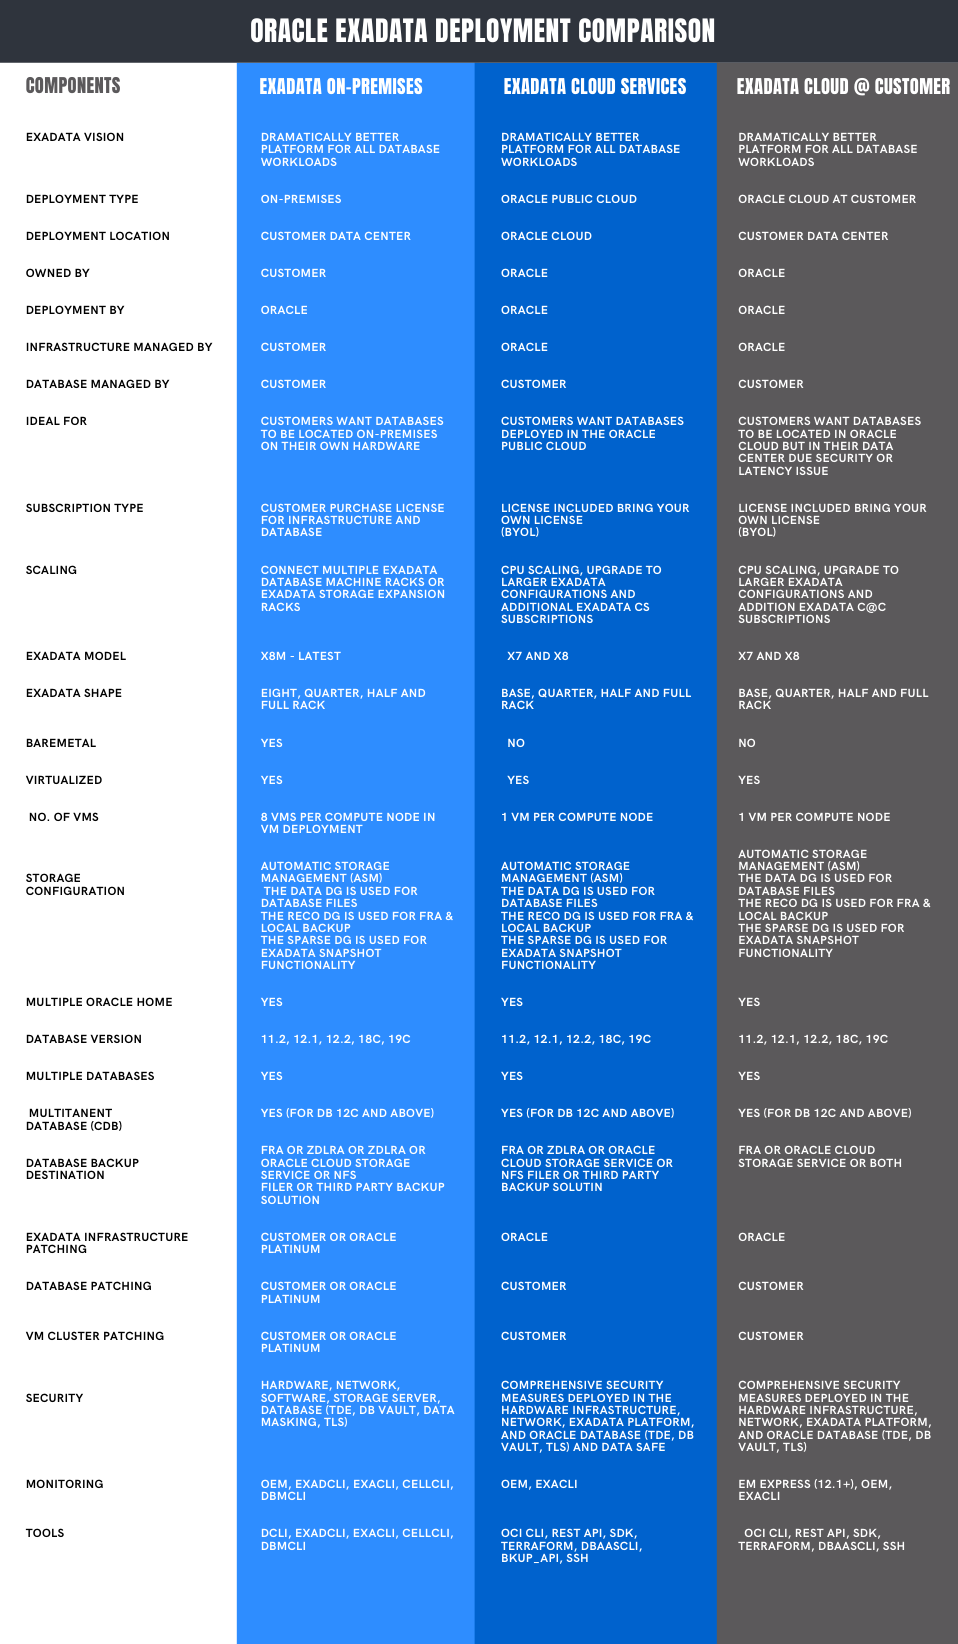
Oracle Exadata Deployment Comparison


Let’s compare each Exadata deployment to learn about them in detail so we can choose the right deployment option for our Business need.


Oracle Exadata Deployment Option Chart | Netsoftmate

eBook - Oracle Exadata X8M Patching Recipes | Netsoftmate
0

Oracle Transparent Data Encryption (TDE) enables the organizations to encrypt sensitive application data on storage media completely transparent to the application. TDE protects the data at rest. TDE encrypts the data in the datafiles so that in case they are obtained by hacker or theft it will not be possible to access the clear text data. In the databases where TDE is configured any user who has access on an encrypted table will be able to see the data in clear text because Oracle will transparently decrypt the data for any user having the necessary privileges. Oracle TDE is available by default in Oracle RDBMS Enteprise Edition. To be able to use this it is necessary to purchase an Oracle Advanced Security license.


In this article we will demonstrate how to implement TDE on Exadata Database Machine to protect sensitive data. Here we are setting up TDE for multiple database running on the same cluster. However same steps are valid for one single database as well.


Steps to configure or implement TDE


Step 1: Create Directories and Grant File Permissions

# dcli -g ~/dbs_group -l root mkdir -p /etc/oracle/wallets/

#dcli -g ~/dbs_group -l root -s “-q” ‘ls -l /etc/oracle/wallets’

#dcli -g ~/dbs_group -l root ‘cd /etc/oracle/wallets;ls -l’

#dcli -g ~/dbs_group -l root ‘cd /etc;chown -R oracle:oinstall oracle’

#dcli -g ~/dbs_group -l root ‘cd /etc;chmod -R 700 oracle’

#dcli -g ~/dbs_group -l oracle ‘cd /etc/oracle/wallets;mkdir orcldb’

#dcli -g ~/dbs_group -l oracle ‘cd /etc/oracle/wallets;mkdir nsmdb’


Step 2: Set the ENCRYPTION_WALLET_LOCATION parameter in sqlnet.ora to the newly created directory.

– backup the sqlnet.ora file on all the nodes

$ dcli -g ~/dbs_group -l oracle ‘cd /u01/app/oracle/product/11.2.0.4/dbhome_1/network/admin;cp sqlnet.ora sqlnet.ora_bkp’

$ dcli -g ~/dbs_group -l oracle ‘cd /u01/app/oracle/product/11.2.0.4/dbhome_1/network/admin;ls -l sqlnet.ora*’

– Update the sqlnet.ora on node 1 add the below line to the sqlnet.ora file

$ cd /u01/app/oracle/product/11.2.0.4/dbhome_1/network/admin
$ vi sqlnet.ora

ENCRYPTION_WALLET_LOCATION = (SOURCE = (METHOD = FILE) (METHOD_DATA = (DIRECTORY = /etc/oracle/wallets/$ORACLE_UNQNAME/)))


Step 3: Copy sqlnet.ora to all the nodes from node 1

dm01db01-nsmdb1 {/home/oracle}:scp sqlnet.ora oracle@dm01db02:/u01/app/oracle/product/11.2.0.4/dbhome_1/network/admin/

dm01db01-nsmdb1 {/home/oracle}:dcli -g ~/dbs_group -l oracle ‘cd /u01/app/oracle/product/11.2.0.4/dbhome_1/network/admin;ls -l sqlnet.ora’

– Verify the contents of sqlnet.ora on all the nodes:

dm01db01-nsmdb1 {/home/oracle}:dcli -g ~/dbs_group -l oracle ‘cd /u01/app/oracle/product/11.2.0.4/dbhome_1/network/admin;cat sqlnet.ora’


Step 4: Initialize the wallet and add the master encryption key using the SQL*Plus command line interface:

 **************************VERY VERY IMPORTANT **************************

AT THE OS PROMPT SET THE ENVIRONMENT VARIABLE export ORACLE_UNQNAME=orcldb

dm01db01-nsmdb1 {/home/oracle}:export ORACLE_UNQNAME=orcldb

dm01db01-nsmdb1 {/home/oracle}: sqlplus / as sysdba

SQL> col WRL_PARAMETER for a60
SQL> set lines 200
SQL> select * from gv$encryption_wallet order by 1;

   INST_ID WRL_TYPE             WRL_PARAMETER                                                STATUS
———- ——————– ———————————————————— ——————
         1 file                 /etc/oracle/wallets/$ORACLE_UNQNAME/                         CLOSED
         2 file                 /etc/oracle/wallets/$ORACLE_UNQNAME/                         CLOSED
         3 file                 /etc/oracle/wallets/$ORACLE_UNQNAME/                         CLOSED
         4 file                 /etc/oracle/wallets/$ORACLE_UNQNAME/                         CLOSED
         5 file                 /etc/oracle/wallets/$ORACLE_UNQNAME/                         CLOSED
         6 file                 /etc/oracle/wallets/$ORACLE_UNQNAME/                         CLOSED
         7 file                 /etc/oracle/wallets/$ORACLE_UNQNAME/                         CLOSED
         8 file                 /etc/oracle/wallets/$ORACLE_UNQNAME/                         CLOSED

8 rows selected.

SQL> alter system set encryption key identified by “welcom1”;

System altered.

SQL> select * from gv$encryption_wallet order by 1;

   INST_ID WRL_TYPE             WRL_PARAMETER                                                STATUS
———- ——————– ———————————————————— ——————
         1 file                 /etc/oracle/wallets/$ORACLE_UNQNAME/                         OPEN
         2 file                 /etc/oracle/wallets/$ORACLE_UNQNAME/                         CLOSED
         3 file                 /etc/oracle/wallets/$ORACLE_UNQNAME/                         CLOSED
         4 file                 /etc/oracle/wallets/$ORACLE_UNQNAME/                         CLOSED
         5 file                 /etc/oracle/wallets/$ORACLE_UNQNAME/                         CLOSED
         6 file                 /etc/oracle/wallets/$ORACLE_UNQNAME/                         CLOSED
         7 file                 /etc/oracle/wallets/$ORACLE_UNQNAME/                         CLOSED
         8 file                 /etc/oracle/wallets/$ORACLE_UNQNAME/                         CLOSED


Step 5: Copy the wallet file ewallet.p12 to all the nodes:

dm01db01-orcldb1 {/home/oracle}:cd /etc/oracle/wallets/orcldb/

dm01db01-orcldb1 {/etc/oracle/wallets/orcldb}:ls -ltr
total 8
-rw——- 1 oracle oinstall 1837 Feb 22 08:28 ewallet.p12_20130226
-rw-r–r– 1 oracle oinstall 1309 Feb 26 05:14 ewallet.p12

dm01db01-orcldb1 {/etc/oracle/wallets/orcldb}:scp ewallet.p12 oracle@dm01db02:/etc/oracle/wallets/orcldb/
ewallet.p12                                                 100% 1309     1.3KB/s   00:00


Step 6: verify at the wallet is opened on all the nodes. This is the default behavior after you copy the wallet file to all the nodes

dm01db01-nsmdb1 {/home/oracle}: sqlplus / as sysdba

SQL> col WRL_PARAMETER for a60
SQL> set lines 200
SQL> select * from gv$encryption_wallet order by 1;

   INST_ID WRL_TYPE             WRL_PARAMETER                                                STATUS
———- ——————– ———————————————————— ——————
         1 file                 /etc/oracle/wallets/$ORACLE_UNQNAME/                         OPEN
         2 file                 /etc/oracle/wallets/$ORACLE_UNQNAME/                         OPEN
         3 file                 /etc/oracle/wallets/$ORACLE_UNQNAME/                         OPEN
         4 file                 /etc/oracle/wallets/$ORACLE_UNQNAME/                         OPEN
         5 file                 /etc/oracle/wallets/$ORACLE_UNQNAME/                         OPEN
         6 file                 /etc/oracle/wallets/$ORACLE_UNQNAME/                         OPEN
         7 file                 /etc/oracle/wallets/$ORACLE_UNQNAME/                         OPEN
         8 file                 /etc/oracle/wallets/$ORACLE_UNQNAME/                         OPEN

8 rows selected.


– IF FOR SOME REASON IF THE WALLET IS NOT OPENED, FOLLOW THE BELOW STEPS

A) set the variable
export ORACLE_UNQNAME=orcldb

B) login to the database
sqlplus / as sysdba

c) open the wallet
ALTER SYSTEM SET WALLET OPEN IDENTIFIED BY “welcome1”;

D) Repeat the A,B and C for all the instances in the cluster.


Step 7: Whenever you bounce the database you must open the wallet manually as follows:

dm01db02-orcldb2 {/home/oracle}:srvctl stop database -d orcldb
dm01db01-orcldb1 {/home/oracle}:srvctl start database -d orcldb

dm01db01-orcldb1 {/home/oracle}:export ORACLE_UNQNAME=orcldb
dm01db01-orcldb1 {/home/oracle}:sqlplus / as sysdba

SQL*Plus: Release 11.2.0.4.0 Production on Tue Feb 26 05:23:02 2013

Copyright (c) 1982, 2011, Oracle.  All rights reserved.

Connected to:
Oracle Database 11g Enterprise Edition Release 11.2.0.4.0 – 64bit Production
With the Partitioning, Real Application Clusters, Automatic Storage Management, OLAP,
Data Mining and Real Application Testing options

SQL> select name,open_mode,database_role from gv$database;

NAME      OPEN_MODE            DATABASE_ROLE
——— ——————– —————-
orcldb   READ WRITE           PRIMARY

8 rows selected.

SQL> col WRL_PARAMETER for a60
SQL> set lines 200
SQL> select * from gv$encryption_wallet order by 1;

   INST_ID WRL_TYPE             WRL_PARAMETER                                                STATUS
———- ——————– ———————————————————— ——————
         1 file                 /etc/oracle/wallets/$ORACLE_UNQNAME/                         CLOSED
         2 file                 /etc/oracle/wallets/$ORACLE_UNQNAME/                         CLOSED
         3 file                 /etc/oracle/wallets/$ORACLE_UNQNAME/                         CLOSED
         4 file                 /etc/oracle/wallets/$ORACLE_UNQNAME/                         CLOSED
         5 file                 /etc/oracle/wallets/$ORACLE_UNQNAME/                         CLOSED
         6 file                 /etc/oracle/wallets/$ORACLE_UNQNAME/                         CLOSED
         7 file                 /etc/oracle/wallets/$ORACLE_UNQNAME/                         CLOSED
         8 file                 /etc/oracle/wallets/$ORACLE_UNQNAME/                         CLOSED

8 rows selected.


SQL> ALTER SYSTEM SET WALLET OPEN IDENTIFIED BY “welcome1”;

System altered.

SQL> select * from gv$encryption_wallet order by 1;

   INST_ID WRL_TYPE             WRL_PARAMETER                                                STATUS
———- ——————– ———————————————————— ——————
         1 file                 /etc/oracle/wallets/$ORACLE_UNQNAME/                         OPEN
         2 file                 /etc/oracle/wallets/$ORACLE_UNQNAME/                         OPEN
         3 file                 /etc/oracle/wallets/$ORACLE_UNQNAME/                         OPEN
         4 file                 /etc/oracle/wallets/$ORACLE_UNQNAME/                         OPEN
         5 file                 /etc/oracle/wallets/$ORACLE_UNQNAME/                         OPEN
         6 file                 /etc/oracle/wallets/$ORACLE_UNQNAME/                         OPEN
         7 file                 /etc/oracle/wallets/$ORACLE_UNQNAME/                         OPEN
         8 file                 /etc/oracle/wallets/$ORACLE_UNQNAME/                         OPEN

8 rows selected.


Step 8:  Making the wallet Auto-Login. If you have a auto-login wallet you don’t need to open the wallet after a database bounce. This is done automatic for you.

dm01db01-orcldb1 {/home/oracle} export ORACLE_UNQNAME=orcldb
   
dm01db01-orcldb1 {/home/oracle}:ls -l /etc/oracle/wallets/$ORACLE_UNQNAME
total 8
-rw-r–r– 1 oracle oinstall 1309 Feb 26 05:14 ewallet.p12

dm01db01-orcldb1 {/home/oracle}:orapki wallet create -wallet /etc/oracle/wallets/$ORACLE_UNQNAME -auto_login
Oracle PKI Tool : Version 11.2.0.4.0 – Production
Copyright (c) 2004, 2011, Oracle and/or its affiliates. All rights reserved.

Enter wallet password:

dm01db01-orcldb1 {/home/oracle}:ls -l /etc/oracle/wallets/$ORACLE_UNQNAME
total 12
-rw——- 1 oracle oinstall 1387 Feb 26 05:26 cwallet.sso
-rw-r–r– 1 oracle oinstall 1309 Feb 26 05:14 ewallet.p12

dm01db01-orcldb1 {/home/oracle}:cd /etc/oracle/wallets/orcldb/
dm01db01-orcldb1 {/etc/oracle/wallets/orcldb}:ls -ltr
total 12
-rw-r–r– 1 oracle oinstall 1309 Feb 26 05:14 ewallet.p12
-rw——- 1 oracle oinstall 1387 Feb 26 05:26 cwallet.sso

– Copy the cwallet.sso to all the nodes:

dm01db01-orcldb1 {/etc/oracle/wallets/orcldb}:scp cwallet.sso oracle@dm01db02:/etc/oracle/wallets/orcldb/

cwallet.sso                                  100% 1387     1.4KB/s   00:00

dm01db01-orcldb1 {/etc/oracle/wallets/orcldb}:sqlplus / as sysdba

SQL*Plus: Release 11.2.0.4.0 Production on Tue Feb 26 05:28:26 2013

Copyright (c) 1982, 2011, Oracle.  All rights reserved.

Connected to:
Oracle Database 11g Enterprise Edition Release 11.2.0.4.0 – 64bit Production
With the Partitioning, Real Application Clusters, Automatic Storage Management, OLAP,
Data Mining and Real Application Testing options

SQL> col WRL_PARAMETER for a60
SQL> set lines 200
SQL> select * from gv$encryption_wallet order by 1;

   INST_ID WRL_TYPE             WRL_PARAMETER                                                STATUS
———- ——————– ———————————————————— ——————
         1 file                 /etc/oracle/wallets/$ORACLE_UNQNAME/                         OPEN
         2 file                 /etc/oracle/wallets/$ORACLE_UNQNAME/                         OPEN
         3 file                 /etc/oracle/wallets/$ORACLE_UNQNAME/                         OPEN
         4 file                 /etc/oracle/wallets/$ORACLE_UNQNAME/                         OPEN
         5 file                 /etc/oracle/wallets/$ORACLE_UNQNAME/                         OPEN
         6 file                 /etc/oracle/wallets/$ORACLE_UNQNAME/                         OPEN
         7 file                 /etc/oracle/wallets/$ORACLE_UNQNAME/                         OPEN
         8 file                 /etc/oracle/wallets/$ORACLE_UNQNAME/                         OPEN

8 rows selected.

SQL> exit
Disconnected from Oracle Database 11g Enterprise Edition Release 11.2.0.4.0 – 64bit Production
With the Partitioning, Real Application Clusters, Automatic Storage Management, OLAP,
Data Mining and Real Application Testing options

– Verify that the wallet is opened following a database bounce:

dm01db01-orcldb1 {/etc/oracle/wallets/orcldb}:srvctl stop database -d orcldb

dm01db01-orcldb1 {/etc/oracle/wallets/orcldb}:srvctl start database -d orcldb

dm01db01-orcldb1 {/etc/oracle/wallets/orcldb}:srvctl status database -d orcldb
Instance orcldb1 is running on node dm01db01
Instance orcldb2 is running on node dm01db02
Instance orcldb3 is running on node dm01db03
Instance orcldb4 is running on node dm01db04
Instance orcldb5 is running on node dm01db05
Instance orcldb6 is running on node dm01db06
Instance orcldb7 is running on node dm01db07
Instance orcldb8 is running on node dm01db08

dm01db01-orcldb1 {/etc/oracle/wallets/orcldb}:sqlplus / as sysdba

SQL*Plus: Release 11.2.0.4.0 Production on Tue Feb 26 05:32:19 2013

Copyright (c) 1982, 2011, Oracle.  All rights reserved.

Connected to:
Oracle Database 11g Enterprise Edition Release 11.2.0.4.0 – 64bit Production
With the Partitioning, Real Application Clusters, Automatic Storage Management, OLAP,
Data Mining and Real Application Testing options

SQL> col WRL_PARAMETER for a60
SQL> set lines 200
SQL> select * from gv$encryption_wallet order by 1;

   INST_ID WRL_TYPE             WRL_PARAMETER                                                STATUS
———- ——————– ———————————————————— ——————
         1 file                 /etc/oracle/wallets/$ORACLE_UNQNAME/                         OPEN
         2 file                 /etc/oracle/wallets/$ORACLE_UNQNAME/                         OPEN
         3 file                 /etc/oracle/wallets/$ORACLE_UNQNAME/                         OPEN
         4 file                 /etc/oracle/wallets/$ORACLE_UNQNAME/                         OPEN
         5 file                 /etc/oracle/wallets/$ORACLE_UNQNAME/                         OPEN
         6 file                 /etc/oracle/wallets/$ORACLE_UNQNAME/                         OPEN
         7 file                 /etc/oracle/wallets/$ORACLE_UNQNAME/                         OPEN
         8 file                 /etc/oracle/wallets/$ORACLE_UNQNAME/                         OPEN

8 rows selected.


############ REAPEAT THE SAME STEPS FOR ALL THE DATABASES #############


Testing Tablespace Encryption (TSE)

Step 1: Create an Encrypted tablespace and grant the users permissions on the tablespace

SQL> CREATE TABLESPACE enc_tbs DATAFILE ‘+DATA’ SIZE 1000M ENCRYPTION USING ‘AES256’ DEFAULT STORAGE(ENCRYPT);

Tablespace created.

SQL> select TABLESPACE_NAME, ENCRYPTED from dba_tablespaces where tablespace_name in (‘USERS’,’ENC_TBS’) order by 1;

TABLESPACE_NAME                ENC
—————————— —
ENC_TBS                        YES
USERS                          NO


SQL> select TABLESPACE_NAME, FILE_NAME from dba_data_files where TABLESPACE_NAME in (‘USERS’,’ENC_TBS’);

TABLESPACE_NAME FILE_NAME
—————————— ——————————
USERS +DATA/nsmdb/datafile/users.529.762113429
ENC_TBS +DATA/nsmdb/datafile/enc_tbs.540.804301513


SQL> alter user test quota unlimited on  ENC_TBS;

User altered.

SQL> alter user test quota unlimited on  USERS;

User altered.


Step 2: Create tables in encypted and non-encrypted tablespaces

SQL> create table test.nonenc(data varchar2(100)) tablespace users;

Table created.

SQL> insert into test.nonenc values (‘ABCDEFGHIJKLMNOPQRSTUVWZYZ’);

1 row created.

SQL> commit;

Commit complete.


SQL> create table test.encrypted(data varchar2(100)) tablespace enc_tbs;

Table created.

SQL> insert into test.encrypted values (‘ABCDEFGHIJKLMNOPQRSTUVWZYZ’);

1 row created.

SQL> commit;

Commit complete.

SQL> alter system checkpoint;

System altered.


Step 3: Verify that the data is encrypted

dm01db01-nsmdb1 {/u01/dba}:asm

dm01db01-+ASM1 {/u01/dba}:asmcmd -p
ASMCMD [+] > cd +DATA/NSMDB/DATA*
ASMCMD [+DATA/NSMDB/DATAFILE] > ls -l

ASMCMD [+DATA/NSMDB/DATAFILE] > cp USERS.529.762113429 /u01/dba/
copying +DATA/NSMDB/DATAFILE/USERS.529.762113429 -> /u01/dba//USERS.529.762113429

ASMCMD [+DATA/NSMDB/DATAFILE] > cp ENC_TBS.540.804301513 /u01/dba/
copying +DATA/NSMDB/DATAFILE/ENC_TBS.540.804301513 -> /u01/dba//ENC_TBS.540.804301513

dm01db01-+ASM1 {/u01/dba}:ls -ltr
-rw-r—– 1 oracle oinstall  703602688 Jan 10 01:30 USERS.529.762113429
-rw-r—– 1 oracle oinstall 1048584192 Jan 10 01:31 ENC_TBS.540.804301513


dm01db01-nsmdb1 {/u01/dba}:strings /u01/dba/USERS.529.762113429 | grep ABCD
89:;<=>?@ABCDEFGHIJKLMNOPQR|STUVWXYZ[]^_`abcdefghijklmnopqrstuvwxyz
ABCDEFGHIJKLMNOPQRSTUVWZYZ

dm01db01-nsmdb1 {/u01/dba}:strings /u01/dba/ENC_TBS.540.804301513 | grep ABCD

– From the above 2 string commands it is clear that the tablespace encryption is indeed working for us.


Conclusion

In this article we have learned how to encrypt sensitive data using Transparent Data Encryption (TDE). TDE protects the data at rest. In the databases where TDE is configured any user who has access on an encrypted table will be able to see the data in clear text because Oracle will transparently decrypt the data for any user having the necessary privileges.

0

Cloud security, Cloud Services, Database Management Services, Oracle Databases
Overview
 
Amazon Web Services is a comprehensive, evolving cloud computing platform provided by Amazon. Amazon Relational Database Service (Amazon RDS) is a web service that makes it easier to set up, operate, and scale a relational database in the cloud.
 
In this article we demonstrate how to establish connection to AWS RDS Oracle Database Using SQL Client.

Prerequisites
  • Install Oracle SQL Client on your client machine (Windows/Linux)
  • Use can also use Oracle SQL*Developer tool to establish connection


Procedure to Connect to AWS RDS Oracle Database

  • Put tns entry in tnsnames.ora file client machine. 
    • Review the blog article on how to find end point details of AWS RDS instance at http://netsoftmate.blogspot.com/2018/07/how-to-find-hostname-from-aws-console.html

nsmprd =
  (DESCRIPTION =
    (ADDRESS = (PROTOCOL = TCP)(HOST = nsmprd.cjhtbujgykil.us-east-1.rds.amazonaws.com)(PORT = 1521))
    (CONNECT_DATA =
      (SERVER = DEDICATED)
      (SERVICE_NAME = nsmprd)
    )
  )

  • Check connectivity to AWS RDS Oracle instance using tnsping utility
C:Users>tnsping nsmprd

TNS Ping Utility for 64-bit Windows: Version 12.2.0.1.0 – Production on 13-JUN-2018 16:19:34

Copyright (c) 1997, 2016, Oracle.  All rights reserved.

Used parameter files:
D:oracle12cproduct12.2.0dbhome_1networkadminsqlnet.ora

Used TNSNAMES adapter to resolve the alias
Attempting to contact (DESCRIPTION = (ADDRESS = (PROTOCOL = TCP)(HOST = nsmprd.cjhtbujgykil.us-east-1.rds.amazonaws.com)(PORT = 1521)) (CONNECT_DATA = (SERVER = DEDICATED) (SERVICE_NAME = nsmprd)))
TNS-12535: TNS:operation timed out


Follow the steps below to resolve the timed out issue. 

  • Check security group and add rules to VPC security group. While Database instance creation if it is default security group then this instance firewall prevents connections.

To know more about security group please go through following link
https://docs.aws.amazon.com/AmazonRDS/latest/UserGuide/Overview.RDSSecurityGroups.html

Add rule to security group

  • Login to console and click on VPC under Networking and content delivery


  • Under vpc dashboard navigation pane click on security group 


  • Select the security group for update.


    • Click on inbound rules and edit to add new rules.


  • Click on add another rule.


  • Select from drop down list


  • Choose oracle port in in-bound traffic


  • Click on save

Now check the connectivity again using tnsping

C:Users>tnsping nsmprd

TNS Ping Utility for 64-bit Windows: Version 12.2.0.1.0 – Production on 13-JUN-2018 18:37:22

Copyright (c) 1997, 2016, Oracle.  All rights reserved.

Used parameter files:
D:oracle12cproduct12.2.0dbhome_1networkadminsqlnet.ora


Used TNSNAMES adapter to resolve the alias
Attempting to contact (DESCRIPTION = (ADDRESS = (PROTOCOL = TCP)(HOST = nsmprd.cjhtbujgykil.us-east-1.rds.amazonaws.com)(PORT = 1521)) (CONNECT_DATA = (SERVER = DEDICATED) (SERVICE_NAME = nsmprd)))
OK (1500 msec)

We can see that the tnsping is now successful.


  • Now Establish the connection to AWS RDS Oracle Instance

C:Users>sqlplus

SQL*Plus: Release 12.2.0.1.0 Production on Wed Jun 13 18:37:30 2018

Copyright (c) 1982, 2016, Oracle.  All rights reserved.

Enter user-name: nsmsystem@nsmprd
Enter password:
Last Successful login time: Wed Jun 13 2018 14:31:06 +05:30

Connected to:
Oracle Database 12c Enterprise Edition Release 12.1.0.2.0 – 64bit Production
With the Partitioning, OLAP, Advanced Analytics and Real Application Testing options

SQL> select name,INSTANCE_NAME,OPEN_MODE,HOST_NAME,DATABASE_STATUS,logins,to_char(STARTUP_TIME,’DD-MON-YYYY HH24:MI:SS’) “UP TIME”from v$database,v$instance;

NAME      INSTANCE_NAME    OPEN_MODE            HOST_NAME                      DATABASE_STATUS   LOGINS     UP TIME
——— —————- ——————– —————————— —————– ———- ————————-
NSMPRD    NSMPRD           READ WRITE           ip-10-1-2-24                   ACTIVE            ALLOWED    10-JUN-2018 09:27:22


Conclusion

In this article we have learned that how to establish connection to to AWS RDS Oracle Instance using SQL Client and also we have seen how to add rules to the VPC security group.

eBook - Oracle Exadata X8M Patching Recipes | Netsoftmate 
2

Uncategorized
While creating a tablespace on Oracle Database 11g I ran into a issue related to DB_CREATE_FILE_DEST (OMF parameter).  The DB_CREATE_FILE_DEST parameter was pointing to incorrect ASM Disk Group name which doesn’t existing. The issues was fixed by correcting the DB_CREATE_FILE_DEST parameter to point to the correct ASM Disk Group name.

In this article I would like to demonstrate how to fix create tablespace error which is to incorrect DB_CREATE_FILE_DEST parameter.

Create Tablespace ran the into the issue as below:


The create tablespace failed as the ASM Disk Group +DATA doesn’t existing.

ORA Errors:
 
ORA-01119: error in creating database file ‘+DATA’
ORA-17502: ksfdcre:4 Failed to create file +DATA
ORA-15001: diskgroup “DATA” does not exist or is not mounted
 
Reason for above error:

The above error is due to initialization parameter DB_CREATE_FILE_DEST pointing to incorrect value. Change/Modify the parameter to fix the issue. 
 

Check  parameter db_create_file_dest Value:


About DB_CREATE_FILE_DEST

DB_CREATE_FILE_DEST specifies the default location for Oracle-managed datafiles.

DB_CREATE_FILE_DEST : directory or disk group
Default value : NO Default value.
Modifiable :  ALTER SESSION, ALTER SYSTEM

Identify the ASM Disk Group


Here the Data Disk Group name is +DATA_DM01


Modify the parameter DB_CREATE_FILE_DEST parameter to point it to correct ASM Disk Group name. You can use ALTER SYSTEM SET command to make it permanent as well.


Now you can Create a Tablespace again as follows:


This time the tablespace was created successfully without errors as the default OMF datafile location is pointing to correct ASM Disk Group

Conclusion:

In this article we have demonstrated how to fix ORA errors “ORA-15001”, “ORA-17502″,”ORA-01119” which due to incorrect defualt ASM Diskgroup set at Database using parameter DB_CREATE_FILE_DEST. 


eBook - Oracle Exadata X8M Patching Recipes | Netsoftmate
0

Oracle Database Cloud Service (DBCS) provides you the ability to deploy Oracle databases in the Oracle Cloud. Each database deployment contains a single Oracle database in a Virtual machine image. You can’t create multiple databases in one database deployment if you want to create multiple databases then you create a 12c Container database with multiple Pluggable databases. Oracle DBCS or also known as DBaaS is part of Platform as a Service (PaaS) offering. The compute, virtual machine, storage, network, optionally tools to simplify routine database maintenance and management operations are provided by Oracle. You will have full access to the features and options available with Oracle Databases.

When you create a database deployment, Database Cloud Service creates compute nodes to host the database, using computing, storage and networking resources provided by various Oracle Cloud infrastructure services.

Service Level

Service Level
Details
Oracle Database Cloud Service – Virtual Image
Compute Allocated
Storage Allocated
Virtual Machine Image Installed
Included software to create Oracle Database
Connect to VM and run DBCA to create Database
You are responsible for maintenance operations such as Backup , Patching and Upgrade
Oracle Database Cloud Service
Compute Allocate
Storage Allocate
Virtual Machine Image Installed
Set Keys and Privileges
Install and Configure Database
Configure Backup
Configure Tools
Configure Access

Note: Oracle Database 12c Release 2 (12.2) is not available for Oracle Database Cloud Service – Virtual Image service level.

Selecting Service Level During Database Deployment


Metering Frequency

Frequency
Description
Hourly
Pay only for the number of hours used during your billing period.
You cannot switch a deployment from hourly to monthly metering frequency after it is created.

Monthly
Pay one price for the full month irrespective of the number of hours used.
You cannot switch a deployment from hourly to monthly metering frequency after it is created.

Selecting Metering Frequency During Database Deployment


Cloud Tooling for Database Cloud Service

Purpose
Tool
Description
Automated Backup
bkup_api
To perform on-demand backup and change how automatic backups are configured. Use raccli for Real Application Clusters deployment.
Automated Recovery
dbaascli
To perform restore/recovery. Use raccli for RAC deployment.
Automated Patching
dbaascli
To apply patches. Use raccli for RAC deployment
Database Monitoring
DBaaS Monitor
To monitor Oracle Database and Computing Resources

Oracle Database Software Release

When creating a database deployment on Oracle Database Cloud Service (DBCS), you choose one of the following Oracle Database software releases:
  • Oracle Database 11g Release 2
  • Oracle Database 12c Release 1
  • Oracle Database 12c Release 2
Selecting Software Release During Database Deployment


Oracle Database Software Edition

Edition
Options Included
Packs Included
Standard Edition
None
None
Enterprise Edition
None
None
Enterprise Edition – High Performance
Advanced Analytics, Advanced Compression, Advanced Security, Database Vault, Label Security, Multitenant, OLAP, Partitioning, Real Application Testing, Spatial and Graph
Cloud Management for Oracle Database, Database Life Cycle Management, Data Masking and Subsetting, Diagnostics, Tuning
Enterprise Edition – Extreme Performance
Active Data Guard, Advanced Analytics, Advanced Compression, Advanced Security, Database In-Memory, Database Vault, Label Security, Multitenant, OLAP, RAC, Partitioning, Real Application Testing, Spatial and Graph
Cloud Management for Oracle Database, Database Life Cycle Management, Data Masking and Subsetting, Diagnostics, Tuning
  
Selecting Software Edition During Database Deployment


Oracle Database Type

Database Type
Description
Single Instance
A single Oracle Database instance and database data store hosted on one compute node.
Database Clustering with RAC
A two-node clustered database using Oracle Real Application Clusters technology; two compute nodes each host an Oracle Database instance, and the two instances access the same shared database data store.
Single Instance with Data Guard Standby
Two single-instance databases, one acting as the primary database and one acting as the standby database in an Oracle Data Guard configuration.
Database Clustering with RAC and Data Guard Standby
Two two-node Oracle RAC databases, one acting as the primary database and one acting as the standby database in an Oracle Data Guard configuration.
Data Guard Standby for Hybrid DR
Single-instance database acting as the standby database in an Oracle Data Guard configuration. The primary database is on your own system.

Selecting Database Type During Database Deployment


Automatic Backup Configuration

When you create a new database deployment on DBCS, you can choose whether you want to configure automatic backup for your database.

Backup Option
Description
Both Cloud Storage and Local Storage
30 days worth of backups are kept, with the 7 days most recent backups available directly on the compute node’s local storage.
Cloud Storage Only
30 days worth of backups are kept, with all backups on cloud storage.
None
No automatic backups are configured

Selecting Backup Destination during Database deployment

Conclusion

In this article we have learned about Oracle Database Cloud Services (DBCS). Oracle Database Cloud Service (DBCS) provides you the ability to deploy Oracle databases in the Oracle Cloud. When you create a database deployment, Database Cloud Service creates compute nodes to host the database, using computing, storage and networking resources provided by various Oracle Cloud infrastructure services.


1

Introduction:
In Oracle databases, it is recommended to multiplex you controlfile to safeguard against different failures like corruption, accidentally removing control file and so on.

In this article I will demonstrate how to multiplex/duplicating a controlfile into Automatic Storage Management (ASM).

Current Setup

Exadata 8-node RAC using ASM.
Current controlfile is stored in ASM.
Database is using SPFILE.
There are diffferent ASM Disk Groups available such as DATA, RECO, DBFS_DG, ACFS_DG.
 

dm01db01-orcldb1 {/home/oracle}:srvctl status database -d orcldb
Instance orcldb1 is running on node dm01db01
Instance orcldb2 is running on node dm01db02
Instance orcldb3 is running on node dm01db04
Instance orcldb4 is running on node dm01db05
Instance orcldb5 is running on node dm01db07
Instance orcldb6 is running on node dm01db06
Instance orcldb7 is running on node dm01db03
Instance orcldb8 is running on node dm01db08

SQL> show parameter spfile

NAME                                 TYPE        VALUE
———————————— ———– ——————————
spfile                               string      +DATA/ORCLDB/PARAMETERFILE/spfile.431.939367673

SQL> select name from v$controlfile;

NAME
——————————————————————————–
+DATA/ORCLDB/CONTROLFILE/current.384.939367517


dm01db01-+ASM1 {/home/oracle}:asmcmd lsdg
State    Type    Rebal  Sector  Logical_Sector  Block       AU  Total_MB   Free_MB  Req_mir_free_MB  Usable_file_MB  Offline_disks  Voting_files  Name
MOUNTED  NORMAL  Y         512             512   4096  4194304  10092544       424           315392         -157484              1             N  ACFS_DG/
MOUNTED  NORMAL  Y         512             512   4096  4194304   7208960       532           225280         -112374              1             N  DATA/
MOUNTED  HIGH    N         512             512   4096  4194304  12390400  12012736           450560         3854058              0             N  RECO/
MOUNTED  NORMAL  N         512             512   4096  4194304   2106432   2104640            30528         1037056              0             Y  DBFS_DG/


Steps to multiplex controlfile in ASM When Database is using SPFILE

  • Update the control_files to include the location for second control file.  The second controlfile is going to be created on different diskgroup RECO.
SQL> alter system set control_files=’+DATA/ORCLDB/CONTROLFILE/current.384.939367517′,‘+RECO’ scope=spfile sid=’*’;

System altered.

  • Stop and start the instance on node 1 in NOMOUNT state.
dm01db01-orcldb1 {/home/oracle}:srvctl status database -d orcldb
Instance orcldb1 is running on node dm01db01
Instance orcldb2 is running on node dm01db02
Instance orcldb3 is running on node dm01db04
Instance orcldb4 is running on node dm01db05
Instance orcldb5 is running on node dm01db07
Instance orcldb6 is running on node dm01db06
Instance orcldb7 is running on node dm01db03
Instance orcldb8 is running on node dm01db08


dm01db01-orcldb1 {/home/oracle}:srvctl stop database -d orcldb

dm01db01-orcldb1 {/home/oracle}:srvctl status database -d orcldb
Instance orcldb1 is not running on node dm01db01
Instance orcldb2 is not running on node dm01db02
Instance orcldb3 is not running on node dm01db04
Instance orcldb4 is not running on node dm01db05
Instance orcldb5 is not running on node dm01db07
Instance orcldb6 is not running on node dm01db06
Instance orcldb7 is not running on node dm01db03
Instance orcldb8 is not running on node dm01db08

dm01db01-orcldb1 {/home/oracle}:srvctl start instance -d orcldb -i orcldb1 -o nomount

SQL> set lines 200
SQL> select * from v$instance;

INSTANCE_NUMBER INSTANCE_NAME    HOST_NAME                                                        VERSION           STARTUP_T STATUS       PAR    THREAD# ARCHIVE LOG_SWITCH_WAIT LOGINS     SHU
————— —————- —————————————————————- —————– ——— ———— — ———- ——- ————— ———- —
DATABASE_STATUS   INSTANCE_ROLE      ACTIVE_ST BLO     CON_ID INSTANCE_MO EDITION FAMILY                                                                           DATABASE_TYPE
—————– —————— ——— — ———- ———– ——- ——————————————————————————– —————
              1 orcldb1          dm01db01                                  12.2.0.1.0        09-MAY-17 STARTED      YES          0 STOPPED                 ALLOWED    NO
ACTIVE            UNKNOWN            NORMAL    NO           0 REGULAR     EE                                                                                       RAC

  • Connect to RMAN and duplicate the controlfile
dm01db01-orcldb1 {/home/oracle}:rman target /

Recovery Manager: Release 12.2.0.1.0 – Production on Tue May 9 05:07:45 2017

Copyright (c) 1982, 2017, Oracle and/or its affiliates.  All rights reserved.

connected to target database: ORCLDB (not mounted)

RMAN> restore controlfile from ‘+DATA/ORCLDB/CONTROLFILE/current.384.939367517’;

Starting restore at 09-MAY-17
using target database control file instead of recovery catalog
allocated channel: ORA_DISK_1
channel ORA_DISK_1: SID=372 instance=orcldb1 device type=DISK

channel ORA_DISK_1: copied control file copy
output file name=+DATA/ORCLDB/CONTROLFILE/current.384.939367517
output file name=+RECO/ORCLDB/CONTROLFILE/current.1003.943506471
Finished restore at 09-MAY-17

RMAN> exit

Recovery Manager complete.

  • update the control_file parameter with the full path and name.
SQL> alter system set control_files=’+DATA/ORCLDB/CONTROLFILE/current.384.939367517′,’+RECO/ORCLDB/CONTROLFILE/current.1003.943506471′ scope=spfile sid=’*’;

System altered.

  • Shutdown and start database
SQL> shutdown immediate;
ORA-01507: database not mounted


ORACLE instance shut down.
SQL> exit

dm01db01-orcldb1 {/home/oracle}:srvctl start database -d orcldb

dm01db01-orcldb1 {/home/oracle}:srvctl status database -d orcldb
Instance orcldb1 is running on node dm01db01
Instance orcldb2 is running on node dm01db02
Instance orcldb3 is running on node dm01db04
Instance orcldb4 is running on node dm01db05
Instance orcldb5 is running on node dm01db07
Instance orcldb6 is running on node dm01db06
Instance orcldb7 is running on node dm01db03
Instance orcldb8 is running on node dm01db08

  • verify that both controlfiles are in ASM now.
SQL> select name from v$controlfile;

NAME
——————————————————————————–
+DATA/ORCLDB/CONTROLFILE/current.384.939367517
+RECO/ORCLDB/CONTROLFILE/current.1003.943506471

SQL> show parameter control_files

NAME                                 TYPE        VALUE
———————————— ———– ——————————
control_files                        string      +DATA1/ORCLDB/CONTROLFILE/current.384.939367517, +RECO/ORCLDB/CONTROLFILE/current.1003.943506471


Conclusion
In this article we have learned how to duplicate a control file in ASM. Multiplexing control file is recommended to safeguard against controlfil failures.
0