Good Contents Are Everywhere, But Here, We Deliver The Best of The Best.Please Hold on!
Database Management Services, Oracle Database Management Solution, Oracle Exadata, Remote Database Management
What are the different Exadata Deployment Option available?


– Exadata On-Premises

– Exadata Cloud Service

– Exadata Cloud at Customer


What is Oracle Exadata Database Machine?


Exadata Database Machine is an Engineered System which consists of Compute nodes, Storage cells and Infiniband Switches or RoCE Switches (starting X8M).


Exadata Database Machine or simply known as Exadata is:

  • – An Engineered System

    – A preconfigured combination of balanced Hardware and unique software

    – A unique platform for running Oracle Databases

    – Consists of Compute Grid, Storage Grid and Network Grid

    – A fully integrated platform for Oracle Database

    – Ideal for Database Consolidation platform

    – It provides High Availability and High Performance for all types of Workloads


The Oracle Exadata Database Machine is an Engineered System designed to deliver extreme performance and high availability for all type of Oracle database workloads (OLTP, OLAP & Mixed Workload).


Exadata Database Machine Components

  • 1. Compute nodes (Database Server Grid)
  •  
  • 2. Exadata Storage Server (Storage Server Grid)
  •  
  • 3. Network (Network Grid)
  •  
    •             – Exadata Infiniband switches
    •  
    •             – Exadata RoCE switches – From Exadata X8M
    •  
  • 4. Other Components
  •  
    •             – Cisco Switch, PDUs


Oracle Exadata Cloud Service

Oracle Database Exadata Cloud Service delivers the world’s most advanced database cloud by combining the world’s #1 database technology and Exadata, the most powerful database platform, with the simplicity, agility and elasticity of a cloud-based deployment.


Oracle Exadata Cloud @ Customer

Exadata C@C is ideal for customers desiring cloud benefits but cannot move their databases to the public cloud due to sovereignty laws, industry regulations, corporate policies, security requirements, network latency, or organizations that find it impractical to move databases away from other tightly coupled on-premises IT infrastructure. Oracle Exadata C@C delivers the world’s most advanced database cloud to customers who require their databases to be located on-premises. It is identical to Oracle’s Exadata Cloud Service but located in customers’ own data centers and managed by Oracle.


Oracle Exadata Deployment Comparison


Let’s compare each Exadata deployment to learn about them in detail so we can choose the right deployment option for our Business need.
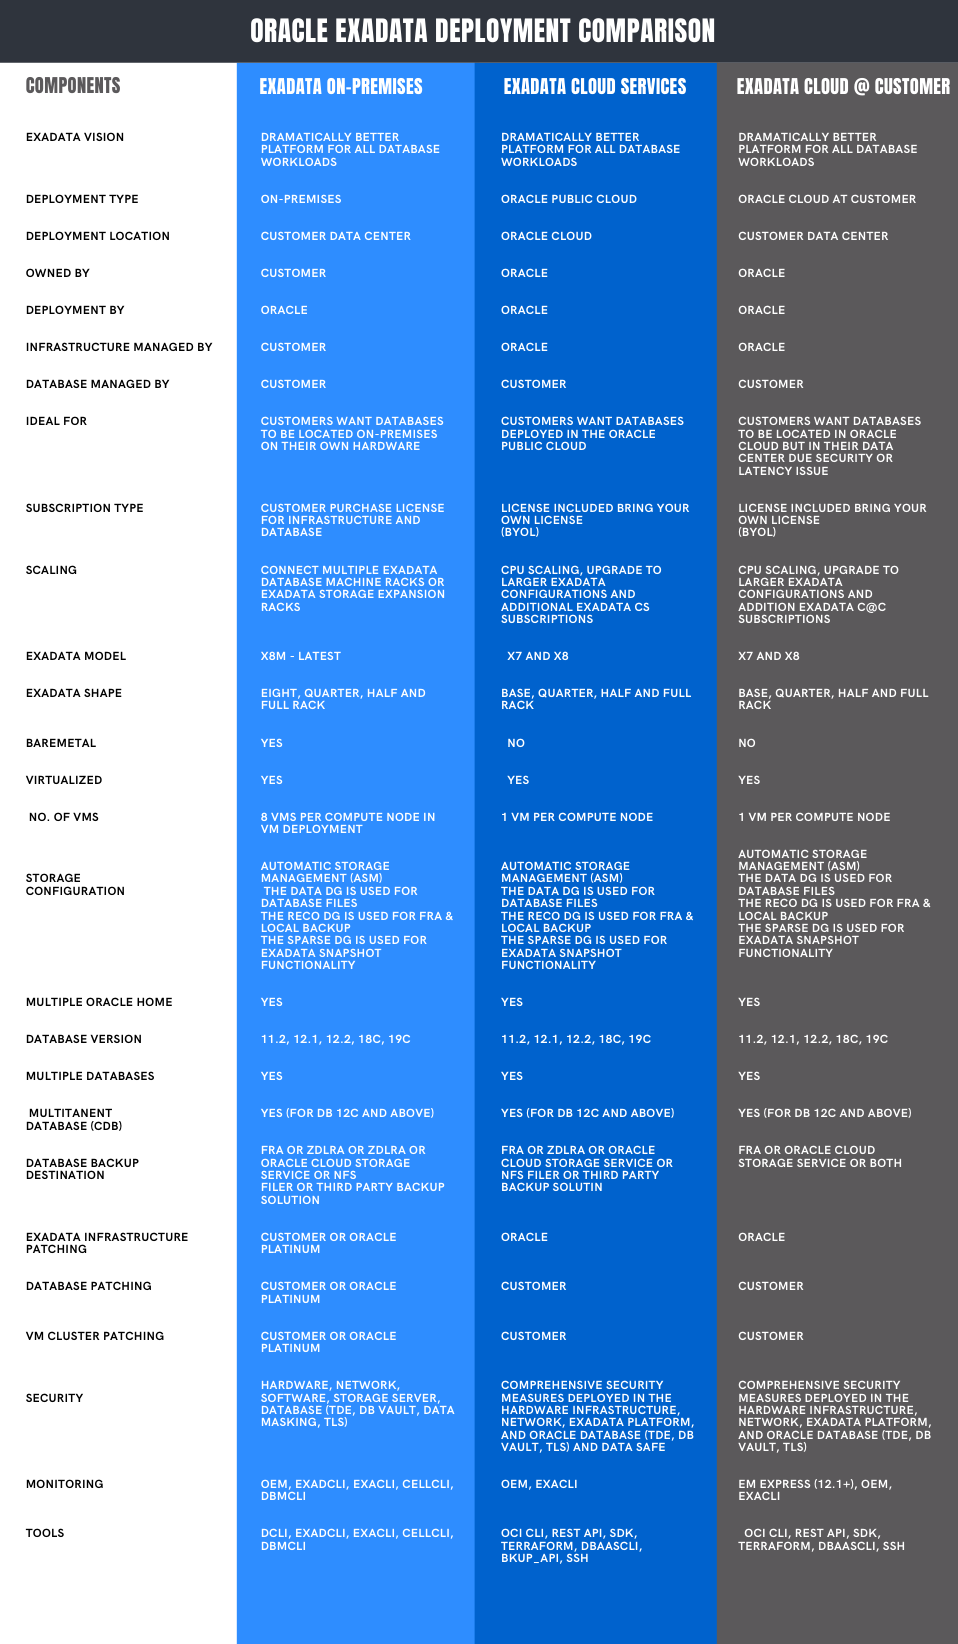

Oracle Exadata Deployment Option Chart | Netsoftmate

eBook - Oracle Exadata X8M Patching Recipes | Netsoftmate
0

Database Management Services, Oracle Exadata, Oracle Exadata X8M, Remote Database Management

If you are looking for highest levels of database performance for your Oracle database then, Oracle Exadata is an outstanding solution. It delivers finest performance for mixed data, data warehousing (DW), analytics, and OLTP (online transaction processing) workloads. Enriched with a variety of deployment options, it lets you run your Oracle Database and other data workloads anywhere you need, whether its on-premises or in the Oracle Cloud. Oracle Exadata storage provides a cutting-edge technology which is simple to use, manage and provides mission-critical accessibility and reliability. Here are 5 reasons stating why should you run the Oracle Database on Oracle Exadata.


5 Reasons Why you Should Run Your Oracle Database on Oracle Exadata | Netsoftmate


1. Bespoke for Oracle Database


Following a standard approach to build your database infrastructure will hamper your business growth. With time, databases grow, which means, your business needs more servers, more storage solutions and more labor to manage it. As a result, the management cost will go up and there is a huge exposure to risk of errors, ultimately hampering your business growth. That’s why each business, big or small, needs a new approach that’s engineered to cater the critical database workloads.
The only technique to handle these critical database workloads is through Oracle Exadata. It is specially equipped to provide high storage bandwidth to seamlessly manage the Oracle Database and other data workloads. Oracle Exadata, as a part of Oracle Engineered System offers a highly integrated platform that delivers more power with less hardware. It eliminates the IT complexity while supplying greater performance, scalability, security and data protection.


5 Reasons Why you Should Run Your Oracle Database on Oracle Exadata | Netsoftmate


2. Increase Employee Productivity


Timely delivery of persuasive data that supports business operations and lessens the time required to deliver new business applications will surely result in better revenue. Oracle Exadata’s congregated and optimized infrastructure platform for database workloads helps the IT staff to spend less time on everyday operations and work more towards other IT development efforts. Accidental outages have less effect on employees and business operations that have lesser database related failures.
The consolidated Oracle Exadata platform provides an economical base for Oracle database operations. It increases employee productivity and helps grow revenues with less cost and complexity. With an enhanced performance up to 100X faster, accessing the data becomes easy and you can engage with customers quickly. With the same power, you can consolidate your databases onto a single platform, and deliver more than four times the density


5 Reasons Why you Should Run Your Oracle Database on Oracle Exadata | Netsoftmate


3. Achieve Operational Benefits


Businesses that rely on multiple vendors may face problems in managing a complex database infrastructure. Retaining and managing each database and server overstrains IT staff, and establishing new applications can take longer than usual. You may also need IT specialists to take care of each different component. As the number of applications and their associated databases increases, your admin costs go up, and so will your data center footprint.
Oracle Exadata delivers greater database and application performance with less hardware—and fewer licenses. Oracle Exadata, from Oracle Engineered Systems means easier upgrades, tuning, patching, observing and support, so you can manage your costs. They process transactions faster, complete queries in less time, and have decreased load and backup recovery times.


5 Reasons Why you Should Run Your Oracle Database on Oracle Exadata | Netsoftmate


4. Maximize Accessibility


Positive data security and database uptime are critical components that directly impact the business operations and revenue progress. Database collapse makes it tough to establish dependable security, plan and policies for sensitive data. There are too many points of control to monitor and maintain. A larger base is vulnerable to attack and there’s hardly enough budget for the specialist skills vital to manage it.
That’s the reason; businesses use Oracle Exadata to run their most important Oracle database and other data workloads. With software and hardware operational together, Oracle Exadata eliminates system downtime, using its in-built flexibility and redundancy. With Oracle Maximum Availability Architecture, you can get the ultimate in invincible uptime. The benefits include, less business impact from outages, less IT impact in managing downtime and reliable application and developer productivity.


5 Reasons Why you Should Run Your Oracle Database on Oracle Exadata | Netsoftmate


5. Invest in the Cloud


Businesses always plan for a simple and comprehensive cloud strategy and application. Ideally, businesses strategize to invest in an architecture offering an apt pathway to a cloud consumption model for the future. A full-proof plan that is flexible to mix and match on-premises deployment with a well-matched public cloud option, whether that’s for development, improvement and testing or ensuring business endurance.
Oracle Exadata offers the best of both worlds for the database and the business. Businesses can either purchase and manage on-premises Oracle Exadata or choose an Oracle Database Cloud Exadata Service. Oracle Cloud service is equivalent to an on-premises Oracle Exadata, just with a different consumption model. That’s why all the components of Oracle Engineered System are a powerful set of options. They are designed with the same architecture, with all the same benefits. All you need to do is choose which consumption model works best for you.


About Netsoftmate Technologies Inc.

Netsoftmate is an Oracle Gold Partner and a boutique IT services company specializing in installation, implementation and 24/7 support for Oracle Engineered Systems like Oracle Exadata, Oracle Database Appliance, Oracle ZDLRA, Oracle ZFS Storage and Oracle Private Cloud Appliance. Apart from OES, we have specialized teams of  experts providing round the clock remote database administration support for any type of database and cyber security compliance and auditing services.


Feel free to get in touch with us by signing up on the link below –


Priority Suport for Oracle Engineered Systems | Netsoftmate
0

Database Management Services, Oracle Exadata, Oracle Exadata X8M, Remote Database Management

The Oracle Exadata X8M release implements 100 Gb/sec RoCE network fabric, making the world’s fastest database machine even faster.

Oracle Exadata Database Machine X8M introduces a brand new high-bandwidth low-latency 100 Gb/sec RDMA over Converged Ethernet (RoCE) Network Fabric that connects all the components inside an Exadata Database Machine. Specialized database networking protocols deliver much lower latency and higher bandwidth than is possible with generic communication protocols for faster response time for OLTP operations and higher throughput for analytic workloads.

The ORacle Exadata X8M release provides the next generation in ultra-fast cloud scale networking fabric, RDMA over Converged Ethernet (RoCE). RDMA (Remote Direct Memory Access) allows one computer to directly access data from another without Operating System or CPU involvement, for high bandwidth and low latency. The network card directly reads/writes memory with no extra copying or buffering and very low latency.


RDMA is an integral part of the Exadata high-performance architecture, and has been tuned and enhanced over the past decade, underpinning several Exadata-only technologies such as Exafusion Direct-to-Wire Protocol and Smart Fusion Block Transfer. As the RoCE API infrastructure is identical to InfiniBand’s, all existing Exadata performance features are available on RoCE.


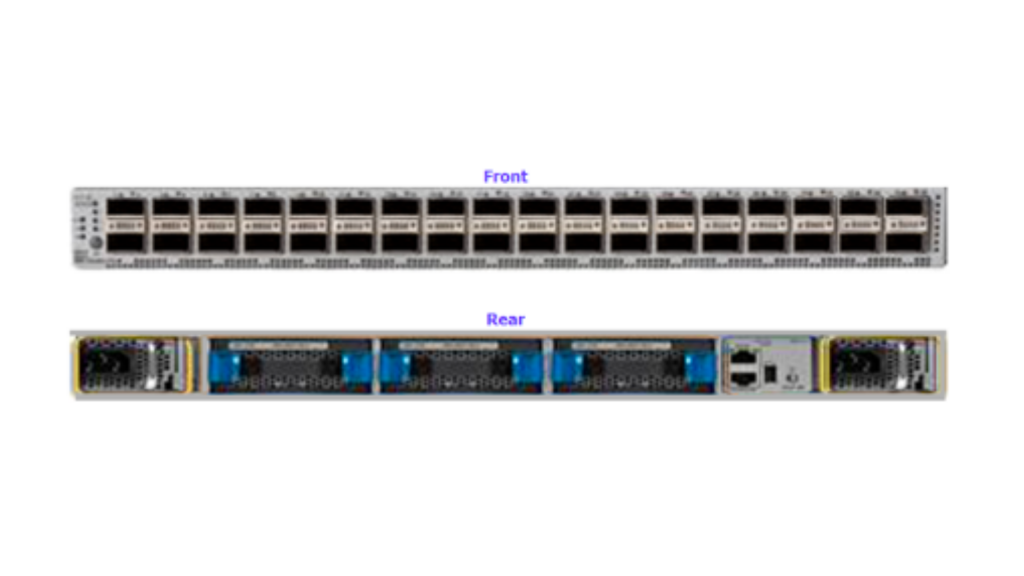
Oracle Exadata RoCE Switch Image:Oracle Exadata RoCE Switch Front & Back | Netsoftmate
In this article we see practically how to patch Exadata X8M RoCE Switches


1. Create a file containing RoCE switch hostname

[root@dm01dbadm01 ~]# cat roce_list

dm01sw-rocea01

dm01sw-roceab1


2. Get the current RoCE Switch software version

[root@dm01dbadm01 ~]# ssh admin@dm01sw-rocea01 show version

User Access Verification

Cisco Nexus Operating System (NX-OS) Software

TAC support: http://www.cisco.com/tac

Copyright (C) 2002-2019, Cisco and/or its affiliates.

All rights reserved.

The copyrights to certain works contained in this software are

owned by other third parties and used and distributed under their own

licenses, such as open source.  This software is provided “as is,” and unless

otherwise stated, there is no warranty, express or implied, including but not

limited to warranties of merchantability and fitness for a particular purpose.

Certain components of this software are licensed under

the GNU General Public License (GPL) version 2.0 or

GNU General Public License (GPL) version 3.0  or the GNU

Lesser General Public License (LGPL) Version 2.1 or

Lesser General Public License (LGPL) Version 2.0.

A copy of each such license is available at

http://www.opensource.org/licenses/gpl-2.0.php and

http://opensource.org/licenses/gpl-3.0.html and

http://www.opensource.org/licenses/lgpl-2.1.php and

http://www.gnu.org/licenses/old-licenses/library.txt.


Software

  BIOS: version 05.39

  NXOS: version 7.0(3)I7(6)

  BIOS compile time:  08/30/2019

  NXOS image file is: bootflash:///nxos.7.0.3.I7.6.bin

  NXOS compile time:  3/5/2019 13:00:00 [03/05/2019 22:04:55]


Hardware

  cisco Nexus9000 C9336C-FX2 Chassis

  Intel(R) Xeon(R) CPU D-1526 @ 1.80GHz with 24571632 kB of memory.

  Processor Board ID FDO23380VQS


  Device name: dm01sw-rocea01

  bootflash:  115805708 kB

Kernel uptime is 8 day(s), 3 hour(s), 14 minute(s), 49 second(s)


Last reset at 145297 usecs after Wed Apr  1 09:29:43 2020

  Reason: Reset Requested by CLI command reload

  System version: 7.0(3)I7(6)

  Service:

plugin

  Core Plugin, Ethernet Plugin


Active Package(s):

[root@dm01dbadm01 ~]#  ssh admin@dm01sw-rocea01 show version | grep “System version:”

User Access Verification

  System version: 7.0(3)I7(6)
eBook - Oracle Exadata X8M Patching Recipes | Netsoftmate

3. Download the the RoCE switch software from MOS note 888828.1 and copy it Exadata compute node 1

[root@dm01dbadm01 ~]# cd /u01/stage/ROCE/


[root@dm01dbadm01 ROCE]# ls -ltr

total 2773832

-rw-r–r– 1 root root 2840400612 Apr  9 00:42 p30893922_193000_Linux-x86-64.zip


4. Unzip the RoCE patch

[root@dm01dbadm01 ROCE]# unzip p30893922_193000_Linux-x86-64.zip

Archive:  p30893922_193000_Linux-x86-64.zip

   creating: patch_switch_19.3.6.0.0.200317/

  inflating: patch_switch_19.3.6.0.0.200317/dcli

  inflating: patch_switch_19.3.6.0.0.200317/exadata.img.hw

  inflating: patch_switch_19.3.6.0.0.200317/sundcs_36p_repository_2.2.7_2.pkg

  inflating: patch_switch_19.3.6.0.0.200317/imageLogger

  inflating:

 patch_switch_19.3.6.0.0.200317/roce_switch_templates/roce_leaf_switch_multi.cfg

  inflating: patch_switch_19.3.6.0.0.200317/sundcs_36p_repository_2.2.14_1.pkg

  inflating: patch_switch_19.3.6.0.0.200317/README.txt


5. Verify the patch directory content after unzip

[root@dm01dbadm01 ROCE]# cd patch_switch_19.3.6.0.0.200317/


[root@dm01dbadm01 patch_switch_19.3.6.0.0.200317]# ls -ltr

total 2794980

-r-xr-x— 1 root root      50674 Mar 18 05:48 exadata.img.hw

-r–r–r– 1 root root       8664 Mar 18 05:48 exadata.img.env

-r–r–r– 1 root root      45349 Mar 18 05:48 imageLogger

-r–r—– 1 root root       6133 Mar 18 05:48 ExaXMLNode.pm

-r–r—– 1 root root      51925 Mar 18 05:48 exadata_img_pylogger.py

-r-xr-xr-x 1 root root      17482 Mar 18 05:48 libxcp.so.1

-r-xr-xr-x 1 root root       4385 Mar 18 05:48 kernelupgrade_oldbios.sh

-r-xr-xr-x 1 root root     176994 Mar 18 05:48 installfw_exadata_ssh

-r-xr-xr-x 1 root root        426 Mar 18 05:48 fwverify

-r-xr-xr-x 1 root root       1570 Mar 18 05:48 ExadataSendNotification.pm

-r-xr-xr-x 1 root root      62499 Mar 18 05:48 ExadataImageNotification.pl

-r-xr-xr-x 1 root root      51616 Mar 18 05:48 dcli

-rw-r–r– 1 root root 1011037696 Mar 18 05:48 nxos.7.0.3.I7.6.bin

-r-xr-xr-x 1 root root      16544 Mar 18 05:48 patchmgr_functions

-rwxr-xr-x 1 root root      11600 Mar 18 05:48 patch_bug_26678971

-rw-r–r– 1 root root  975383040 Mar 18 05:48 nxos.7.0.3.I7.7.bin

-r-xr-xr-x 1 root root  171545108 Mar 18 05:48 sundcs_36p_repository_2.2.13_2.pkg

-r-xr-xr-x 1 root root  172863012 Mar 18 05:48 sundcs_36p_repository_2.2.14_1.pkg

-rwxr-xr-x 1 root root  172946493 Mar 18 05:48 sundcs_36p_repository_2.2.7_2.pkg

-rwxr-xr-x 1 root root  172947929 Mar 18 05:48 sundcs_36p_repository_2.2.7_2_signed.pkg

-r-xr-xr-x 1 root root      15001 Mar 18 05:48 xcp

-rwxr-xr-x 1 root root  184111553 Mar 18 05:48 sundcs_36p_repository_upgrade_2.1_to_2.2.7_2.pkg

-r-xr-xr-x 1 root root     168789 Mar 18 06:05 upgradeIBSwitch.sh

drwxr-xr-x 2 root root        103 Mar 18 06:05 roce_switch_templates

drwxr-xr-x 2 root root         98 Mar 18 06:05 roce_switch_api

drwxr-xr-x 6 root root       4096 Mar 18 06:05 ibdiagtools

drwxrwxr-x 3 root root         20 Mar 18 06:05 etc

-r-xr-xr-x 1 root root     457738 Mar 18 06:05 patchmgr

-rw-rw-r– 1 root root       5156 Mar 18 06:05 md5sum_files.lst

-rwxrwxrwx 1 root root        822 Mar 18 07:15 README.txt


6. Navigate to the patch directory and execute the following to get the patch syntax

[root@dm01dbadm01 patch_switch_19.3.6.0.0.200317]# ./patchmgr -h

Usage:

./patchmgr –roceswitches [roceswitch_list_file]

           –upgrade [–verify-config [yes|no]] [–roceswitch-precheck] [–force]  |

           –downgrade [–verify-config [yes|no]]  [–roceswitch-precheck] [–force]  |

           –verify-config [yes|no]

           [-log_dir <fullpath> ]


./patchmgr –ibswitches [ibswitch_list_file]

          <–upgrade | –downgrade> [–ibswitch_precheck] [–unkey] [–force [yes|no]]


7. Execute the following command to perform configuration verification

Note:  The patching should be performed by a non-root user. In this case I am using oracle user to perform the patching


[root@dm01dbadm01 stage]# chown -R oracle:oinstall ROCE/


[root@dm01dbadm01 stage]# su – oracle

Last login: Thu Apr  9 16:17:25 +03 2020


[oracle@dm01dbadm01 ~]$ cd /u01/stage/ROCE/


[oracle@dm01dbadm01 ROCE]$ ls -ltr

total 2773836

-rw-r–r– 1 oracle oinstall 2840400612 Apr  9 00:42 p30893922_193000_Linux-x86-64.zip

drwxrwxr-x 6 oracle oinstall       4096 Apr  9 16:31 patch_switch_19.3.6.0.0.200317

[oracle@dm01dbadm01 ROCE]$ cd patch_switch_19.3.6.0.0.200317/


[oracle@dm01dbadm01 ~]$ vi roce_list

dm01sw-rocea01

dm01sw-roceab1


[oracle@dm01dbadm01 ~]$ cd /u01/stage/ROCE/patch_switch_19.3.6.0.0.200317


[oracle@dm01dbadm01 patch_switch_19.3.6.0.0.200317]$ ./patchmgr –roceswitches ~/roce_list –verify-config –log_dir /u01/stage/ROCE


2020-04-09 16:59:52 +0300        :Working: Initiate config verify on RoCE switches from . Expect up to 6 minutes for each switch


2020-04-09 16:59:53 +0300 1 of 2 :Verifying config on switch dm01sw-rocea01


2020-04-09 16:59:53 +0300:        [INFO     ] Dumping current running config locally as file: /u01/stage/ROCE/run.dm01sw-rocea01.cfg

2020-04-09 16:59:54 +0300:        [SUCCESS  ] Backed up switch config successfully

2020-04-09 16:59:54 +0300:        [INFO     ] Validating running config against template [1/3]: /u01/stage/ROCE/patch_switch_19.3.6.0.0.200317/roce_switch_templates/roce_leaf_switch.cfg

2020-04-09 16:59:54 +0300:        [INFO     ] Config matches template: /u01/stage/ROCE/patch_switch_19.3.6.0.0.200317/roce_switch_templates/roce_leaf_switch.cfg

2020-04-09 16:59:54 +0300:        [SUCCESS  ] Config validation successful!


2020-04-09 16:59:54 +0300 2 of 2 :Verifying config on switch dm01sw-roceb01


2020-04-09 16:59:54 +0300:        [INFO     ] Dumping current running config locally as file: /u01/stage/ROCE/run.dm01sw-roceb01.cfg

2020-04-09 16:59:55 +0300:        [SUCCESS  ] Backed up switch config successfully

2020-04-09 16:59:55 +0300:        [INFO     ] Validating running config against template [1/3]: /u01/stage/ROCE/patch_switch_19.3.6.0.0.200317/roce_switch_templates/roce_leaf_switch.cfg

2020-04-09 16:59:55 +0300:        [INFO     ] Config matches template: /u01/stage/ROCE/patch_switch_19.3.6.0.0.200317/roce_switch_templates/roce_leaf_switch.cfg

2020-04-09 16:59:55 +0300:        [SUCCESS  ] Config validation successful!


2020-04-09 16:59:55 +0300        :SUCCESS: Config check on RoCE switch(es)

2020-04-09 16:59:56 +0300        :SUCCESS: Completed run of command: ./patchmgr –roceswitches /home/oracle/roce_list –verify-config –log_dir /u01/stage/ROCE

2020-04-09 16:59:56 +0300        :INFO   : config attempted on nodes in file /home/oracle/roce_list: [dm01sw-rocea01 dm01sw-roceb01]

2020-04-09 16:59:56 +0300        :INFO   : For details, check the following files in /u01/stage/ROCE:

2020-04-09 16:59:56 +0300        :INFO   :  – updateRoceSwitch.log

2020-04-09 16:59:56 +0300        :INFO   :  – updateRoceSwitch.trc

2020-04-09 16:59:56 +0300        :INFO   :  – patchmgr.stdout

2020-04-09 16:59:56 +0300        :INFO   :  – patchmgr.stderr

2020-04-09 16:59:56 +0300        :INFO   :  – patchmgr.log

2020-04-09 16:59:56 +0300        :INFO   :  – patchmgr.trc

2020-04-09 16:59:56 +0300        :INFO   : Exit status:0

2020-04-09 16:59:56 +0300        :INFO   : Exiting.


8. Execute the following command to perform prerequisite checks.

Note: During this step it will prompt you setup the SSH between oracle user and RoCE switch. Please enter the admin user password of RoCE switch.


[oracle@dm01dbadm01 patch_switch_19.3.6.0.0.200317]$ ./patchmgr –roceswitches ~/roce_list –upgrade –roceswitch-precheck –log_dir /u01/stage/ROCE


[NOTE     ] Password equivalency is NOT setup for user ‘oracle’ to dm01sw-rocea01 from ‘dm01dbadm01.netsoftmate.com’. Set it up? (y/n): y


enter switch ‘admin’ password:


checking if ‘dm01sw-rocea01’ is reachable… [OK]

setting up SSH equivalency for ‘oracle’ from dm01dbadm01.netsoftmate.com to ‘dm01sw-rocea01’… [OK]


[NOTE     ] Password equivalency is NOT setup for user ‘oracle’ to dm01sw-roceb01 from ‘dm01dbadm01.netsoftmate.com’. Set it up? (y/n): y


enter switch ‘admin’ password:


checking if ‘dm01sw-roceb01’ is reachable… [OK]

setting up SSH equivalency for ‘oracle’ from dm01dbadm01.netsoftmate.com to ‘dm01sw-roceb01’… [OK]

2020-04-09 16:47:46 +0300        :Working: Initiate pre-upgrade validation check on 2 RoCE switch(es).


2020-04-09 16:47:47 +0300 1 of 2 :Updating switch dm01sw-rocea01


2020-04-09 16:47:49 +0300:        [INFO     ] Switch dm01sw-rocea01 will be upgraded from nxos.7.0.3.I7.6.bin to nxos.7.0.3.I7.7.bin

2020-04-09 16:47:49 +0300:        [INFO     ] Checking for free disk space on switch

2020-04-09 16:47:50 +0300:        [INFO     ] disk is 96.00% free,  available: 112371744768 bytes

2020-04-09 16:47:50 +0300:        [SUCCESS  ] There is enough disk space to proceed

2020-04-09 16:47:52 +0300:        [INFO     ] Copying nxos.7.0.3.I7.7.bin onto dm01sw-rocea01 (eta: 1-5 minutes)

2020-04-09 16:50:40 +0300:        [SUCCESS  ] Finished copying image to switch

2020-04-09 16:50:40 +0300:        [INFO     ] Verifying sha256sum of bin file on switch

2020-04-09 16:50:54 +0300:        [SUCCESS  ] sha256sum matches: dce664f1a90927e9dbd86419681d138d3a7a83c5ea7222718c3f6565488ac6d0

2020-04-09 16:50:54 +0300:        [INFO     ] Performing FW install pre-check of nxos.7.0.3.I7.7.bin (eta: 2-3 minutes)

2020-04-09 16:52:55 +0300:        [SUCCESS  ] FW install pre-check completed successfully


2020-04-09 16:52:55 +0300 2 of 2 :Updating switch dm01sw-roceb01


2020-04-09 16:58:26 +0300:        [INFO     ] Dumping current running config locally as file: /u01/stage/ROCE/run.dm01sw-roceb01.cfg

2020-04-09 16:58:27 +0300:        [SUCCESS  ] Backed up switch config successfully

2020-04-09 16:58:27 +0300:        [INFO     ] Validating running config against template [1/3]: /u01/stage/ROCE/patch_switch_19.3.6.0.0.200317/roce_switch_templates/roce_leaf_switch.cfg

2020-04-09 16:58:27 +0300:        [INFO     ] Config matches template: /u01/stage/ROCE/patch_switch_19.3.6.0.0.200317/roce_switch_templates/roce_leaf_switch.cfg

2020-04-09 16:58:27 +0300:        [SUCCESS  ] Config validation successful!


2020-04-09 16:58:27 +0300        :SUCCESS: Config check on RoCE switch(es)


2020-04-09 16:58:27 +0300        :SUCCESS: Initiate pre-upgrade validation check on RoCE switch(es).

2020-04-09 16:58:27 +0300        :SUCCESS: Completed run of command: ./patchmgr –roceswitches /home/oracle/roce_list –upgrade –roceswitch-precheck –log_dir /u01/stage/ROCE

2020-04-09 16:58:27 +0300        :INFO   : upgrade attempted on nodes in file /home/oracle/roce_list: [dm01sw-rocea01 dm01sw-roceb01]

2020-04-09 16:58:27 +0300        :INFO   : For details, check the following files in /u01/stage/ROCE:

2020-04-09 16:58:27 +0300        :INFO   :  – updateRoceSwitch.log

2020-04-09 16:58:27 +0300        :INFO   :  – updateRoceSwitch.trc

2020-04-09 16:58:27 +0300        :INFO   :  – patchmgr.stdout

2020-04-09 16:58:27 +0300        :INFO   :  – patchmgr.stderr

2020-04-09 16:58:27 +0300        :INFO   :  – patchmgr.log

2020-04-09 16:58:27 +0300        :INFO   :  – patchmgr.trc

2020-04-09 16:58:27 +0300        :INFO   : Exit status:0

  • 6:58:27 +0300 :INFO : Exiting.


9. Execute the following command to patch RoCE switches.


[oracle@dm01dbadm01 patch_switch_19.3.6.0.0.200317]$ ./patchmgr –roceswitches ~/roce_list –upgrade –log_dir /u01/stage/ROCE


[NOTE     ] Password equivalency is NOT setup for user ‘oracle’ to dm01sw-rocea01 from ‘dm01dbadm01.netsoftmate.com’. Set it up? (y/n): y


enter switch ‘admin’ password:


checking if ‘dm01sw-rocea01’ is reachable… [OK]

setting up SSH equivalency for ‘oracle’ from dm01dbadm01.netsoftmate.com to ‘dm01sw-rocea01’… [OK]


[NOTE     ] Password equivalency is NOT setup for user ‘oracle’ to dm01sw-roceb01 from ‘dm01dbadm01.netsoftmate.com’. Set it up? (y/n): y


enter switch ‘admin’ password:


checking if ‘dm01sw-roceb01’ is reachable… [OK]

setting up SSH equivalency for ‘oracle’ from dm01dbadm01.netsoftmate.com to ‘dm01sw-roceb01’… [OK]

2020-04-09 17:02:26 +0300        :Working: Initiate upgrade of 2 RoCE switches to 7.0(3)I7(7) Expect up to 15 minutes for each switch


2020-04-09 17:02:26 +0300 1 of 2 :Updating switch dm01sw-rocea01


2020-04-09 17:02:28 +0300:        [INFO     ] Switch dm01sw-rocea01 will be upgraded from nxos.7.0.3.I7.6.bin to nxos.7.0.3.I7.7.bin

2020-04-09 17:02:28 +0300:        [INFO     ] Checking for free disk space on switch

2020-04-09 17:02:28 +0300:        [INFO     ] disk is 95.00% free,  available: 111395401728 bytes

2020-04-09 17:02:28 +0300:        [SUCCESS  ] There is enough disk space to proceed

2020-04-09 17:02:29 +0300:        [INFO     ] Found  nxos.7.0.3.I7.7.bin on switch, skipping download

2020-04-09 17:02:29 +0300:        [INFO     ] Verifying sha256sum of bin file on switch

2020-04-09 17:02:43 +0300:        [SUCCESS  ] sha256sum matches: dce664f1a90927e9dbd86419681d138d3a7a83c5ea7222718c3f6565488ac6d0

2020-04-09 17:02:43 +0300:        [INFO     ] Performing FW install pre-check of nxos.7.0.3.I7.7.bin (eta: 2-3 minutes)

2020-04-09 17:04:44 +0300:        [SUCCESS  ] FW install pre-check completed successfully

2020-04-09 17:04:44 +0300:        [INFO     ] Performing FW install of nxos.7.0.3.I7.7.bin on dm01sw-rocea01 (eta: 3-7 minutes)

2020-04-09 17:09:51 +0300:        [SUCCESS  ] FW install completed

2020-04-09 17:09:51 +0300:        [INFO     ] Waiting for switch to come back online (eta: 6-8 minutes)

2020-04-09 17:17:51 +0300:        [INFO     ] Verifying if FW install is successful

2020-04-09 17:17:53 +0300:        [SUCCESS  ] dm01sw-rocea01 has been successfully  upgraded to nxos.7.0.3.I7.7.bin!


2020-04-09 17:17:53 +0300 2 of 2 :Updating switch dm01sw-roceb01


2020-04-09 17:17:56 +0300:        [INFO     ] Switch dm01sw-roceb01 will be upgraded from nxos.7.0.3.I7.6.bin to nxos.7.0.3.I7.7.bin

2020-04-09 17:17:56 +0300:        [INFO     ] Checking for free disk space on switch

2020-04-09 17:17:57 +0300:        [INFO     ] disk is 95.00% free,  available: 111542112256 bytes

2020-04-09 17:17:57 +0300:        [SUCCESS  ] There is enough disk space to proceed

2020-04-09 17:17:58 +0300:        [INFO     ] Found  nxos.7.0.3.I7.7.bin on switch, skipping download

2020-04-09 17:17:58 +0300:        [INFO     ] Verifying sha256sum of bin file on switch

2020-04-09 17:18:12 +0300:        [SUCCESS  ] sha256sum matches: dce664f1a90927e9dbd86419681d138d3a7a83c5ea7222718c3f6565488ac6d0

2020-04-09 17:18:12 +0300:        [INFO     ] Performing FW install pre-check of nxos.7.0.3.I7.7.bin (eta: 2-3 minutes)

2020-04-09 17:20:12 +0300:        [SUCCESS  ] FW install pre-check completed successfully

2020-04-09 17:20:12 +0300:        [INFO     ] Checking if previous switch dm01sw-rocea01 is fully up before proceeding (attempt 1 of 3)

2020-04-09 17:20:13 +0300:        [SUCCESS  ] dm01sw-rocea01 switch is fully up and running

2020-04-09 17:20:13 +0300:        [INFO     ] Performing FW install of nxos.7.0.3.I7.7.bin on dm01sw-roceb01 (eta: 3-7 minutes)

2020-04-09 17:23:20 +0300:        [SUCCESS  ] FW install completed

2020-04-09 17:23:20 +0300:        [INFO     ] Waiting for switch to come back online (eta: 6-8 minutes)

2020-04-09 17:31:20 +0300:        [INFO     ] Verifying if FW install is successful

2020-04-09 17:31:22 +0300:        [SUCCESS  ] dm01sw-roceb01 has been successfully  upgraded to nxos.7.0.3.I7.7.bin!

2020-04-09 17:31:22 +0300        :Working: Initiate config verify on RoCE switches from . Expect up to 6 minutes for each switch


2020-04-09 17:31:25 +0300 1 of 2 :Verifying config on switch dm01sw-rocea01


2020-04-09 17:31:25 +0300:        [INFO     ] Dumping current running config locally as file: /u01/stage/ROCE/run.dm01sw-rocea01.cfg

2020-04-09 17:31:26 +0300:        [SUCCESS  ] Backed up switch config successfully

2020-04-09 17:31:26 +0300:        [INFO     ] Validating running config against template [1/3]: /u01/stage/ROCE/patch_switch_19.3.6.0.0.200317/roce_switch_templates/roce_leaf_switch.cfg

2020-04-09 17:31:26 +0300:        [INFO     ] Config matches template: /u01/stage/ROCE/patch_switch_19.3.6.0.0.200317/roce_switch_templates/roce_leaf_switch.cfg

2020-04-09 17:31:26 +0300:        [SUCCESS  ] Config validation successful!


2020-04-09 17:31:26 +0300 2 of 2 :Verifying config on switch dm01sw-roceb01


2020-04-09 17:31:26 +0300:        [INFO     ] Dumping current running config locally as file: /u01/stage/ROCE/run.dm01sw-roceb01.cfg

2020-04-09 17:31:27 +0300:        [SUCCESS  ] Backed up switch config successfully

2020-04-09 17:31:27 +0300:        [INFO     ] Validating running config against template [1/3]: /u01/stage/ROCE/patch_switch_19.3.6.0.0.200317/roce_switch_templates/roce_leaf_switch.cfg

2020-04-09 17:31:27 +0300:        [INFO     ] Config matches template: /u01/stage/ROCE/patch_switch_19.3.6.0.0.200317/roce_switch_templates/roce_leaf_switch.cfg

2020-04-09 17:31:27 +0300:        [SUCCESS  ] Config validation successful!


2020-04-09 17:31:27 +0300        :SUCCESS: Config check on RoCE switch(es)


2020-04-09 17:31:27 +0300        :SUCCESS: upgrade 2 RoCE switch(es) to 7.0(3)I7(7)

2020-04-09 17:31:27 +0300        :SUCCESS: Completed run of command: ./patchmgr –roceswitches /home/oracle/roce_list –upgrade –log_dir /u01/stage/ROCE

2020-04-09 17:31:27 +0300        :INFO   : upgrade attempted on nodes in file /home/oracle/roce_list: [dm01sw-rocea01 dm01sw-roceb01]

2020-04-09 17:31:27 +0300        :INFO   : For details, check the following files in /u01/stage/ROCE:

2020-04-09 17:31:27 +0300        :INFO   :  – updateRoceSwitch.log

2020-04-09 17:31:27 +0300        :INFO   :  – updateRoceSwitch.trc

2020-04-09 17:31:27 +0300        :INFO   :  – patchmgr.stdout

2020-04-09 17:31:27 +0300        :INFO   :  – patchmgr.stderr

2020-04-09 17:31:27 +0300        :INFO   :  – patchmgr.log

2020-04-09 17:31:27 +0300        :INFO   :  – patchmgr.trc

2020-04-09 17:31:27 +0300        :INFO   : Exit status:0

2020-04-09 17:31:27 +0300        :INFO   : Exiting.


10. Verify the new patch version on both RoCE switches

[oracle@dm01dbadm01 patch_switch_19.3.6.0.0.200317]$  ssh admin@dm01sw-rocea01 show version

The authenticity of host ‘dm01sw-rocea01 (dm01sw-rocea01)’ can’t be established.

RSA key fingerprint is SHA256:N3/OT3xe4A8xi1zd+bkTfDyqE6yibk2zVlhXHvCk/Jk.

RSA key fingerprint is MD5:c4:1f:ef:f5:f5:ab:f1:29:c0:de:42:19:0e:f3:14:8c.

Are you sure you want to continue connecting (yes/no)? yes

Warning: Permanently added ‘dm01sw-rocea01’ (RSA) to the list of known hosts.

User Access Verification

Password:

Cisco Nexus Operating System (NX-OS) Software

TAC support: http://www.cisco.com/tac

Copyright (C) 2002-2019, Cisco and/or its affiliates.

All rights reserved.

The copyrights to certain works contained in this software are

owned by other third parties and used and distributed under their own

licenses, such as open source.  This software is provided “as is,” and unless

otherwise stated, there is no warranty, express or implied, including but not

limited to warranties of merchantability and fitness for a particular purpose.

Certain components of this software are licensed under

the GNU General Public License (GPL) version 2.0 or

GNU General Public License (GPL) version 3.0  or the GNU

Lesser General Public License (LGPL) Version 2.1 or

Lesser General Public License (LGPL) Version 2.0.

A copy of each such license is available at

http://www.opensource.org/licenses/gpl-2.0.php and

http://opensource.org/licenses/gpl-3.0.html and

http://www.opensource.org/licenses/lgpl-2.1.php and

http://www.gnu.org/licenses/old-licenses/library.txt.


Software

  BIOS: version 05.39

  NXOS: version 7.0(3)I7(7)

  BIOS compile time:  08/30/2019

  NXOS image file is: bootflash:///nxos.7.0.3.I7.7.bin

  NXOS compile time:  3/5/2019 13:00:00 [03/05/2019 22:04:55]


Hardware

  cisco Nexus9000 C9336C-FX2 Chassis

  Intel(R) Xeon(R) CPU D-1526 @ 1.80GHz with 24571632 kB of memory.

  Processor Board ID FDO23380VQS


  Device name: dm01sw-rocea01

  bootflash:  115805708 kB

Kernel uptime is 8 day(s), 5 hour(s), 1 minute(s), 41 second(s)


Last reset at 145297 usecs after Wed Apr  1 09:29:43 2020

  Reason: Reset Requested by CLI command reload

  System version: 7.0(3)I7(7)

  Service:


plugin

  Core Plugin, Ethernet Plugin


Active Package(s):


[oracle@dm01dbadm01 patch_switch_19.3.6.0.0.200317]$ ssh admin@dm01sw-rocea01 show version | grep “System version:”

User Access Verification

Password:

  System version: 7.0(3)I7(7)


Conclusion


In this article we have learned how to patch an Exadata X8M RoCE switches. Oracle continues to use the patchmgr utility to patch the Exadata RoCE switch to simplify the process. The Exadata X8M 100 Gb/sec RoCE network fabric, making the world’s fastest database machine even faster.


About Netsoftmate: 

Netsoftmate is an Oracle Gold Partner and a boutique IT services company specializing in installation, implementation and 24/7 support for Oracle Engineered Systems like Oracle Exadata, Oracle Database Appliance, Oracle ZDLRA, Oracle ZFS Storage and Oracle Private Cloud Appliance. Apart from OES, we have specialized teams of  experts providing round the clock remote database administration support for any type of database and cyber security compliance and auditing services.


Feel free to get in touch with us by signing up on the link below – 


Priority Suport for Oracle Engineered Systems | Netsoftmate
4

Database Management Services, Oracle Database Management Solution, Oracle Databases, Oracle Exadata, Oracle Exadata X8M

Cloud is an innovative operational model for IT and its transforming the business coordination. Attain superior results today and plan for better tomorrow with the help of a cloud-ready IT infrastructure. Oracle engineered systems are fabricated, integrated, tested, and optimized to work collectively. They are co-created with Oracle software for cloud-engineered integration. Oracle Exadata as a part of Oracle Engineered Systems is the only channel that provides optimal database performance and proficiency for analytics, mixed data and OLTP workloads.


Here are five top reasons stating why Oracle Exadata is important for Business Continuity.


5 Reasons why Exadata is Important for Your Business Continuity | Netsoftmate

Oracle Exadata for Business

Information is an important component of a business and most of it is available in the databases that power the business’ growth. Cloud-ready Oracle Exadata makes sure that your business is getting the most from your valuable information. Exadata for business provides amplified database performance, improved efficiency and operational flexibility for your business strategy around IoT, digital transformation, or agile IT. It diminishes the complexity of your database infrastructure and arranges for cloud migration, improving effectiveness and efficiency and helping you show a financial return.

5 Reasons why Exadata is Important for Your Business Continuity | Netsoftmate

Enhance Business Operations

Database Management is a crucial effort and includes appropriate administration of database infrastructure. However, generic infrastructure can create problems that delay application deployment and query revert times, affecting business and revenue growth.

Oracle Exadata enhances business operations and makes application development teams more productive. It also ensures that database administrator teams become more efficient. It helps in providing more value by establishing new business applications quickly and getting data that supports business operations. Oracle Exadata also improves database management, accessibility and dependability to enhance business operations altogether.


5 Reasons why Exadata is Important for Your Business Continuity | Netsoftmate


Massively Reduce Capital Expenses

With increasing demand for more data storage, there are more chances of increasing complexity, greater costs and less efficiency. A larger data center requires more power, floor space to pay for without any assurance of error-free management.

Oracle engineered systems’ Exadata is an engineered system that delivers more database and application performance with less hardware and reduced licenses. This means, you can get increased productivity, better services and massively reduce capital expenses. Oracle Exadata makes it possible without any increase in headcount or IT specialization. It reduces capital expenditure and operational costs, so you get the most from Oracle Database licenses.


5 Reasons why Exadata is Important for Your Business Continuity | Netsoftmate


Deliver Greater Business Value

Oracle Exadata increases business value by reducing deployment time, delivering better performance and enabling deeper customer insights. The long-term costs of DIY infrastructure are 53% higher than the integrated Oracle Exadata system. It integrates exceptional capabilities and operational mechanization to enable extreme performance, and significant cost savings. It empowers a business to revolutionize, drive innovative digital transformations and deliver greater business value. According to IDC, Exadata delivers 94% less unplanned downtime with the help of its built-in resilience and redundancy. Oracle Engineered System’s Exadata is a single entity closed system, making it more secure by design, with integral encryption.


5 Reasons why Exadata is Important for Your Business Continuity | Netsoftmate

Get the Benefits of Cloud


Exadata Cloud Service delivers the most advanced database cloud by combining the world’s top database technology and Exadata. It is the most powerful database platform, with the simplicity, agility and resistance of a cloud-based deployment. Businesses can now access Oracle databases on Oracle Exadata without capital investments for IT infrastructure such as space, power, compute servers, storing, networks and software. Exadata Cloud Service is fully compatible with on-premises Oracle databases and all existing applications. With Exadata Cloud Service, businesses can easily embrace a pure cloud or hybrid cloud strategy. Choose the Oracle Engineered System’s Exadata Cloud Service that’s equal to an on-premises Exadata, but in a cloud form.


About Netsoftmate Technologies Inc.

Netsoftmate is an Oracle Gold Partner and a boutique IT services company specializing in installation, implementation and 24/7 support for Oracle Engineered Systems like Oracle Exadata, Oracle Database Appliance, Oracle ZDLRA, Oracle ZFS Storage and Oracle Private Cloud Appliance. Apart from OES, we have specialized teams of  experts providing round the clock remote database administration support for any type of database and cyber security compliance and auditing services.


Feel free to get in touch with us by signing up on the link below – 


Priority Suport for Oracle Engineered Systems | Netsoftmate
0

Database Management Services, Oracle Databases, Oracle Exadata, Oracle Exadata X8M

Oracle has provided the verify_roce_cables.py to verify if the rack is cabled correctly for Transport Layer systems based on a RDMA over Converged Ethernet (RoCE) Network Layer network on Exadata Database Machine X8M-2/X8M-8 and later hardware.


Here is the step by step procedure to verify RoCE cabling on Oracle Exadata X8M Database Machine.


Exadata Infrastrure details:


Exadata Model : Exadata X8M-2 half rack

Exadata Software version: 19.3.3.0.0


Step 1: Download 30323660 for your Exadata smart software. In my case I have downloaded it for 19.3.3


Step 2: Copy the patch to staging area and unzip


[root@dm01db01 ~]# cd /u01/app/oracle/software


[root@dm01db01 software]# ls -l

total 8

-rw-r–r– 1 root root 8143 Feb 10 08:12 p30323660_193300_Linux-x86-64.zip


[root@dm01db01 software]# unzip p30323660_193300_Linux-x86-64.zip

Archive:  p30323660_193300_Linux-x86-64.zip

  inflating: setup_roce_switch_passwordless.sh

  inflating: verify_roce_cables.py

  inflating: README.txt


[root@dm01db01 software]# ls -ltr

total 40

-r-xr-xr-x 1 root root  2895 Oct  1 17:38 setup_roce_switch_passwordless.sh

-rwxr-xr-x 1 root root 22637 Jan 28 07:51 verify_roce_cables.py

-rw-r–r– 1 root root   673 Jan 28 08:45 README.txt

-rw-r–r– 1 root root  8143 Feb 10 08:12 p30323660_193300_Linux-x86-64.zip


Step 3: Read the readme.html file carefully


Step 4: setup password-less ssh to RoCE switches


[root@dm01db01 software]# ./setup_roce_switch_passwordless.sh dm01sw-rocea01

enter switch ‘dm01sw-rocea01’ ‘admin’ password:

checking if ‘dm01sw-rocea01’ is reachable… [OK]

setting up SSH equivalency for ‘admin’ on ‘dm01sw-rocea01’… [OK]


[root@dm01db01 software]# ./setup_roce_switch_passwordless.sh dm01sw-roceb01

enter switch ‘dm01sw-roceb01’ ‘admin’ password:

checking if ‘dm01sw-roceb01’ is reachable… [OK]

setting up SSH equivalency for ‘admin’ on ‘dm01sw-roceb01’… [OK]


“RECOMMENDED READ: HERE’S EVERYTHING YOU NEED TO KNOW ABOUT ORACLE AUTONOMOUS DATABASE CLOUD”


Step 5: setup passwordless ssh to all compute nodes and storage cells


[root@dm01db01 software]# cd /opt/oracle.SupportTools/


[root@dm01db01 oracle.SupportTools]# ls -ltr setup_ssh_eq.sh

-r-xr-x— 1 root root 1518 Dec 11 22:53 setup_ssh_eq.sh


[root@dm01db01 oracle.SupportTools]# ./setup_ssh_eq.sh ~/all_group root welcome1


[root@dm01db01 oracle.SupportTools]# dcli -g ~/all_group -l root uptime

dm01cel01: 09:11:46 up 5 days, 21:30,  0 users,  load average: 2.44, 2.31, 2.05

dm01cel02: 09:11:46 up 5 days, 21:30,  0 users,  load average: 2.31, 1.74, 1.97

dm01cel03: 09:11:46 up 5 days, 21:30,  0 users,  load average: 2.97, 2.67, 2.60

dm01cel04: 09:11:46 up 5 days, 21:30,  0 users,  load average: 2.78, 1.95, 1.71

dm01cel05: 09:11:46 up 5 days, 21:30,  0 users,  load average: 3.83, 2.54, 2.05

dm01cel06: 09:11:46 up 5 days, 21:30,  0 users,  load average: 0.82, 1.30, 1.68

dm01cel07: 09:11:46 up 5 days, 21:30,  0 users,  load average: 1.55, 1.67, 1.71

dm01db01: 09:11:46 up 5 days, 21:37,  1 user,  load average: 0.63, 0.48, 0.39

dm01db02: 09:11:46 up 5 days, 21:36,  0 users,  load average: 0.23, 0.39, 0.34

dm01db03: 09:11:46 up 5 days, 21:36,  0 users,  load average: 0.41, 0.32, 0.34

dm01db04: 09:11:46 up 5 days, 21:36,  0 users,  load average: 0.19, 0.32, 0.29


Step 6: Create the file with compute nodes and storage cells in the formate given below


Lines in in nodes_list should be of format

adm<num>: <db1-hostname>

or

celadm<num>: <cell1-hostname>


[root@dm01db01 ~]# cat nodes_list

adm01: dm01db01

adm02: dm01db02

adm03: dm01db03

adm04: dm01db04

celadm01: dm01cel01

celadm02: dm01cel02

celadm03: dm01cel03

celadm04: dm01cel04

celadm05: dm01cel05

celadm06: dm01cel06

celadm07: dm01cel07


[root@dm01db01 ~]# cat roce_list

dm01sw-rocea01

dm01sw-roceb01eBook - Oracle Exadata X8M Patching Recipes | Netsoftmate

Step 7: Execute the RoCE Verify tool


[root@dm01db01 software]# cd /u01/app/oracle/software


[root@dm01db01 software]# ./verify_roce_cables.py -n ~/nodes_list -s ~/roce_list

Enter dm01sw-rocea01 admin password

User Access Verification

Enter dm01sw-roceb01 admin password

User Access Verification

Enter dm01sw-rocea01 admin password

User Access Verification

Enter dm01sw-roceb01 admin password

User Access Verification

SWITCH PORT (EXPECTED PEER)                      LEAF-1 (dm01sw-rocea01) : CABLE OK?                    LEAF-2 (dm01sw-roceb01) : CABLE OK?

———– —————             ——————————– : ——–            ——————————– : ———

    Eth1/4 (ISL peer switch)   :               dm01sw-roceb01 Ethernet1/4 : OK                       dm01sw-rocea01 Ethernet1/4 : OK

    Eth1/5 (ISL peer switch)   :               dm01sw-roceb01 Ethernet1/5 : OK                         dm01sw-rocea01 Ethernet1/5 : OK

    Eth1/6 (ISL peer switch)   :               dm01sw-roceb01 Ethernet1/6 : OK                         dm01sw-rocea01 Ethernet1/6 : OK

    Eth1/7 (ISL peer switch)   :               dm01sw-roceb01 Ethernet1/7 : OK                         dm01sw-rocea01 Ethernet1/7 : OK

    Eth1/8 ()                  :                                       – : –                                                  – : –

    Eth1/9 ()                  :                                       – : –                                                  – : –

   Eth1/10 ()                  :                                       – : –                                                  – : –

   Eth1/11 ()                  :                                       – : –                                                  – : –

   Eth1/12 ()                  :                                       – : –                                                  – : –

   Eth1/13 ()                  :                                       – : –                                                  – : –

   Eth1/14 ()                  :                                       – : –                                                  – : –

   Eth1/15 ()                  :                                       – : –                                                  – : –

   Eth1/16 ()                  :                                       – : –                                                  – : –

   Eth1/17 ()                  :                                       – : –                                                  – : –

   Eth1/18 ()                  :                                       – : –                                                  – : –

   Eth1/19 (adm04)             :                         dm01db04 port-1 : OK                                   dm01db04 port-2 : OK

   Eth1/20 (adm03)             :                         dm01db03 port-1 : OK                                   dm01db03 port-2 : OK

   Eth1/21 (adm02)             :                         dm01db02 port-1 : OK                                   dm01db02 port-2 : OK

   Eth1/22 (adm01)             :                         dm01db01 port-1 : OK                                   dm01db01 port-2 : OK

   Eth1/23 (celadm07)          :                        dm01cel07 port-1 : OK                                  dm01cel07 port-2 : OK

   Eth1/24 (celadm06)          :                        dm01cel06 port-1 : OK                                  dm01cel06 port-2 : OK

   Eth1/25 (celadm05)          :                        dm01cel05 port-1 : OK                                  dm01cel05 port-2 : OK

   Eth1/26 (celadm04)          :                        dm01cel04 port-1 : OK                                  dm01cel04 port-2 : OK

   Eth1/27 (celadm03)          :                        dm01cel03 port-1 : OK                                  dm01cel03 port-2 : OK

   Eth1/28 (celadm02)          :                        dm01cel02 port-1 : OK                                  dm01cel02 port-2 : OK

   Eth1/29 (celadm01)          :                        dm01cel01 port-1 : OK                                  dm01cel01 port-2 : OK

   Eth1/30 (ISL peer switch)   :             dm01sw-roceb01 Ethernet1/30 : OK                         dm01sw-rocea01 Ethernet1/30 : OK

   Eth1/31 (ISL peer switch)   :              dm01sw-roceb01 Ethernet1/31 : OK                        dm01sw-rocea01 Ethernet1/31 : OK

   Eth1/32 (ISL peer switch)   :              dm01sw-roceb01 Ethernet1/32 : OK                        dm01sw-rocea01 Ethernet1/32 : OK

   Eth1/33 (ISL peer switch)   :              dm01sw-roceb01 Ethernet1/33 : OK                        dm01sw-rocea01 Ethernet1/33 : OK


From the above output we can see the cabling is OK  which means it is good. There are no errors/failure reported for cabling.


The following states are applicable for “CABLE OK”


OK : Cabling looks good

SWAPPED : Cables have been crossed on same host

FAIL : Cabling check failed due to cabling error, discovery issues, etc.

 – : If any of the table entry has a ‘-‘, it can be treated as a don’t care or not applicable


Conclusion


In this article we have learned how to verify the cabling for Transport Layer systems based on a RDMA over Converged Ethernet (RoCE) Network Layer network on Exadata Database Machine X8M-2/X8M-8 and later hardware.


Have more queries related Exadata Database Machines?  Get in touch with Netsoftmate’s Oracle Engineered Systems experts to get the best solution on how to implement and maintain your Oracle Exadata Database Machines. Sign-up for a 30 mins free consultation by clicking the image below –


Expert Support for Oracle Exadata | Netsoftmate
0

Database Management Services, Oracle Database Management Solution, Oracle Exadata

Netsoftmate experts are back again with another interesting article which will help you setup and restore compute node from snapshot backup of Oracle Exadata. In our previous blog we have demonstrated a step-by-step process of how to take a snapshot based back-up of compute node to NFS share.

If you haven’t yet read the previous article, here’s the link for reference – 

Step-by-step guide of exadata sanpshot based backup of compute node to nfs share

In this article, we will be focussing on how to setup and restore the compute node from the snapshot backup on a live Oracle Exadata Database Machine. 


Introduction


You have Oracle Exadata compute snapshot backup, but you don’t know the procedure to restore the compute node. How would you restore your compute node?

Snapshot backup is very helpful in case of OS failure or any other failure that causes Compute node failure. With the snapshot backup you can restore the compute node with few simple steps without having to go through the complex Oracle Exadata BareMetal restore.


Environment Details


Exadata Model

X5-2 Full Rack

Exadata Components

8 – Compute nodes, 14 – Storage cells & 2 – IB switches

Exadata Storage cells

DBM01CEL01 – DBM01CEL14

Exadata Compute nodes

DBM01DB01 – DBM01DB08

Exadata Software Version

12.1.2.3

Exadata DB Version

11.2.0.4.180717


Prerequisites


  • – Root user access on Compute nodes
  • – Snapshot backup taken before the failure
  • – NFS mount storing the snapshot backup
  •  

Note: We can’t use Infiniband interface to mount the NFS file system. Only Management interface can be used to mount the NFS file system.


Step 1  


Copy snapshot backup to the NFS mount mounted using management interface.

In this example: I have mounted the NFS share using the following directory


/nfssa/dm01/os_snapshot


[root@dm01db07 os_snapshot]# cd /nfssa/dm01/os_snapshot


[root@dm01db07 os_snapshot]# ls -lrt|grep Rt_U01

-rw-r–r– 1 4294967294 4294967294 24268161485 Jun 17 04:36 Rt_U01_20190617_dm01db07_bkp.tar.bz2


Step 2

Copy diag.iso from MOS or from another goo compute node to the NFS mount.


[root@dm01db07 os_snapshot]# cd /nfssa/dm01/os_snapshot


 [root@dm01db07 os_snapshot]# ls -lrt|grep diag.iso

-r–r—– 1 4294967294 4294967294    78139392 Jul 12  2019 diag.iso


Step 3:


During the restore process you will be prompted to provide the following details. Make a note of these inputs before proceeding to the next step


i. The full path of the backup 

10.10.2.21:/export/dm01/os_snapshot/ Rt_U01_20190617_dm01db07_bkp.tar.bz2

ii. Host IP:  10.2.15

  • iii. Netmask: 255.255.192
  •  
  • iii. Gateway: 10.2.100


Step 4


Login to the serial ILOM server of the node in question, load the diag.iso image and reboot the server as follows:


a) Log in to the Oracle ILOM CLI


[root@dm01db06 ~]# ssh dm01db06-ilom

Password:

Oracle(R) Integrated Lights Out Manager

Version 3.2.8.24 r114580

Copyright (c) 2016, Oracle and/or its affiliates. All rights reserved.

Warning: HTTPS certificate is set to factory default.

Hostname: dm01db06-ilom


b) Run the following command on CLI to mount ISO from NFS server


-> cd /SP/services/kvms/host_storage_device/remote/

/SP/services/kvms/host_storage_device/remote


-> set server_URI=nfs://10.10.2.21:/export/dm01/os_snapshot/diag.iso

Set ‘server_URI’ to ‘nfs://10.10.2.21:/export/dm01/os_snapshot/diag.iso’


-> show server_URI

  /SP/services/kvms/host_storage_device/remote

    Properties:

        server_URI = nfs://10.10.2.21:/export/dm01/os_snapshot/diag.iso


c) Enable storage redirection by typing:


-> set /SP/services/kvms/host_storage_device/ mode=remote

Set ‘mode’ to ‘remote’


To view the status of redirection, type the command:


-> show /SP/services/kvms/host_storage_device/ status

  /SP/services/kvms/host_storage_device

    Properties:

        status = operational


Note – Redirection is active if the status is set to either Operational or Connecting.


d) Set the next boot device to cdrom


-> set /HOST boot_device=cdrom

Set ‘boot_device’ to ‘cdrom’


To ensure next boot device, check


-> show /HOST


 /HOST

    Targets:

        console

        diag

        provisioning


    Properties:

        boot_device = cdrom

        generate_host_nmi = (Cannot show property)


    Commands:

        cd

        set

        show


e) Reboot Server


-> reset /SYS

Are you sure you want to reset /SYS (y/n)? y

Performing hard reset on /SYS


Step 5


Start the serial console using the command below:


-> start /SP/console
Are you sure you want to start /SP/console (y/n)? y


Serial console started. To stop, type ESC (


Note: optionally you can also start the Remote direction using Web ILOM.


Wait for the server to boot from the diag.iso

On both the Remote Console window and the putty/SSH session window you will see the server going through  BIOS POST, then the kernel boot messages.

At the end of the boot up sequence, there should be the menu prompt such as the one below.:

  • – Input (r) for restore
  • – ‘y’ to continue
  • – Rescue password: sos1Exadata


Next prompt would be for path of backup file provide as follows from Step 3:

10.10.2.21:/export/dm01/os_snapshot/ Rt_U01_20190617_dm01db07_bkp.tar.bz2

Restore Compute node from Snapshot Backup


Next prompt for LVM schema say (y). Type y and hit return

Restore Compute node from Snapshot Backup


Next prompt input interface, IP address of host and gateway taken from Step 3

Restore Compute node from Snapshot Backup


At the end of this step, the server would enter recovery phase which may take about 3 hours.

Restore Compute node from Snapshot Backup


Step 6:


When the recovery completes, the login screen appears. Verify the file system.

Restore Compute node from Snapshot Backup

This concludes a successful recovery


Step 7:


Disable cd redirection


-> set /SP/services/kvms/host_storage_device/ mode=disabled

Set ‘mode’ to ‘disabled’


-> show /SP/services/kvms/host_storage_device/ mode


  /SP/services/kvms/host_storage_device

    Properties:

        mode = disabled


-> set /SP/services/kvms/host_storage_device/remote server_URI=”

Set ‘server_URI’ to ”


-> show /SP/services/kvms/host_storage_device/remote server_URI


  /SP/services/kvms/host_storage_device/remote

    Properties:

        server_URI = (none)


-> show /HOST


/HOST

    Targets:

        console

        diag

        provisioning


    Properties:

        boot_device = default

        generate_host_nmi = (Cannot show property)


    Commands:

        cd

        set

        show


Reboot server to use default BIO image


-> reset /SYS

Are you sure you want to reset /SYS (y/n)? y

Performing hard reset on /SYS


Step 8:


Verify server


[root@dm01db07 ~]# imageinfo 
Kernel version: 2.6.39-400.294.1.el6uek.x86_64 #1 SMP Wed Jan 11 08:46:38 PST 2017 x86_64 
Image kernel version: 2.6.39-400.294.1.el6uek 
Image version: 12.1.2.3.4.170111 
Image activated: 2017-09-19 13:23:57 -0500 
Image status: success
System partition on device: /dev/mapper/VGExaDb-LVDbSys1 

If the image status post restore shows failure then perform the following addition steps to make it success.


Image status: failure


  • # /usr/sbin/ubiosconfig export all -x /tmp/bios_current.xml –expert_mode -y
  • If it still fails, then try reset the SP and try above the command again.
  • If the command ran successful without error, then reboot the system.
  • After system comes back up, wait for approximately 10min, and check and confirm that the output of imageinfo command is “Image status: success”


Conclusion:

In this article we have learned how to restore an Exadata Compute node from Exadata Compute node snapshot backup


0

Cloud Services, Database Management Services, Oracle Exadata, Training


Backing up file systems on Oracle Exadata compute can be a daunting task if you are unaware of the prerequisites and best practices. To help you backup your file systems effectively and with least discrepancies, we are bringing you this interesting step-by-step guide on how to back up your file system using Oracle Exadata Sanpshot Based Backup of Compute Node to NFS Share    


It is very important to take file system backup on Oracle Exadata compute nodes before we make any major changes to the operating system or critical software. On Oracle Exadata Compute nodes / (root) and /u01 file systems contains the operating system and GI/DB software respectively. These are the most critical file systems on Oracle Exadata computes.


By default, the / (root) and /u01 file system are sized 30GB and 100GB respectively.


Scenarios in which we must take file system backup are:


  • – Operating System Patching or Upgrade
  •  
  • – Grid Infrastructure Patching or Upgrade
  •  
  • – Database Patching or Upgrade
  •  
  • – Operating System configuration changes
  •  
  • – Increasing/decreasing file system size


In this article, we will demonstrate how to backup file system on Oracle Exadata Compute nodes running Linux Operating System to external storage NFS Share.

eBook - Oracle Exadata X8M Patching Recipes | Netsoftmate

Environment Details


Exadata Model

X4-2 Half Rack HP 4 TB

Exadata Components

4 – Compute nodes, 7 – Storage cells & 2 – IB switches

Exadata Storage cells

DBM01CEL01 – DBM01CEL07

Exadata Compute nodes

DBM01DB01 – DBM01DB04

Exadata Software Version

19.2.3.0

Exadata DB Version

11.2.0.4.180717


Prerequisites


  • – Root user access on Compute nodes
  •  
  • – NFS mount with sufficient storage to storing file system backup


Current root and /u01 file system sizes


[root@ip01db01 ~]# df -h / /u01

Filesystem Size  Used Avail Use% Mounted on

/dev/mapper/VGExaDb-LVDbSys1   59G   39G   18G  70% /

/dev/mapper/VGExaDb-LVDbOra1  197G  171G   17G  92% /u01


NFS share details


10.10.10.1:/nfs/backup/


  • 1. As root user, log in to the Exadata Compute node you wish to backup


[root@ip01db01 ~]# id root

uid=0(root) gid=0(root) groups=0(root),1(bin),2(daemon),3(sys),4(adm),6(disk),10(wheel)


  • 2. Create a mount point to mount NFS share


[root@dm01db01 ~]# mkdir -p /mnt/backup

[root@dm01db01 ~]# mount -t nfs -o rw,intr,soft,proto=tcp,nolock 10.10.10.1:/nfs/backup/ /mnt/backup


3. Determine the file system type extension root and u01 file system


[root@ip01db01 ~]# mount -l

sysfs on /sys type sysfs (rw,relatime)

proc on /proc type proc (rw,relatime)

devtmpfs on /dev type devtmpfs (rw,nosuid,size=131804372k,nr_inodes=32951093,mode=755)

securityfs on /sys/kernel/security type securityfs (rw,nosuid,nodev,noexec,relatime)

tmpfs on /dev/shm type tmpfs (rw,size=264225792k)

/dev/mapper/VGExaDb-LVDbSys1 on / type ext3 (rw,relatime,errors=continue,barrier=1,data=ordered) [DBSYS]

/dev/mapper/VGExaDb-LVDbOra1 on /u01 type ext3 (rw,nodev,relatime,errors=continue,barrier=1,data=ordered) [DBORA]

/dev/sda1 on /boot type ext3 (rw,nodev,relatime,errors=continue,barrier=1,data=ordered) [BOOT]


4.  Note down the file system type for root and /u01: ext3. Take a snapshot-based of the root and u01 directories, Label the snapshot and Mount the snapshot


[root@dm01db01 ~]# lvcreate -L5G -s -n root_snap /dev/VGExaDb/LVDbSys1

  Logical volume “root_snap” created.


[root@dm01db01 ~]# lvcreate -L5G -s -n u01_snap /dev/VGExaDb/LVDbOra1

  Logical volume “u01_snap” created.


[root@dm01db01 ~]# e2label /dev/VGExaDb/root_snap DBSYS_SNAP

[root@dm01db01 ~]# e2label /dev/VGExaDb/u01_snap DBORA_SNAP


[root@dm01db01 ~]# mkdir -p /mnt/snap/root

[root@dm01db01 ~]# mkdir -p /mnt/snap/u01


[root@dm01db01 ~]# mount /dev/VGExaDb/root_snap /mnt/snap/root -t ext3

[root@dm01db01 ~]# mount /dev/VGExaDb/u01_snap /mnt/snap/u01 -t ext3


[root@dm01db01 ~]# df -h /mnt/snap/root

[root@dm01db01 ~]# df -h /mnt/snap/u01


  • 5. Change to the directory for the backup and Create the backup file


[root@dm01db01 ~]#  cd /mnt/backup


[root@dm01db01 ~]#  tar -pjcvf /mnt/backup/mybackup.tar.bz2 * /boot –exclude /mnt/backup/mybackup.tar.bz2 > /tmp/backup_tar.stdout 2> /tmp/backup_tar.stderr


  • 6. Monitor the /tmp/backup_tar.stderr file for errors. Errors such as failing to tar open sockets can be ignored.


  • 7. Unmount the snapshots and remove the snapshots for the root and /01 directories.


[root@dm01db01 ~]# cd /


[root@dm01db01 /]# umount /mnt/snap/u01


[root@dm01db01 /]# umount /mnt/snap/root


[root@dm01db01 /]# df -h /mnt/snap/u01

[root@dm01db01 /]# df -h /mnt/snap/root


[root@dm01db01 /]# ls -l /mnt/snap


[root@dm01db01 /]# rm -rf /mnt/snap


[root@dm01db01 /]# lvremove /dev/VGExaDb/u01_snap

Do you really want to remove active logical volume u01_snap? [y/n]: y

  Logical volume “u01_snap” successfully removed


[root@dm01db01 /]# lvremove /dev/VGExaDb/root_snap

Do you really want to remove active logical volume root_snap? [y/n]: y

  Logical volume “root_snap” successfully removed


  • 8. Unmount the NFS share


[root@dm01db01 /] umount /mnt/backup


  • Repeat the above steps on the remaining compute nodes to backup root & u01 file system


We hope this article helps you smoothly backup your file system on Oracle Exadata Compute node running Oracle Linux using NFS Share. Stay tuned for more step-by-step guides on implementing and using Oracle Database Systems exclusively on Netsoftmate


Netsoftmate provides the best standard services when it comes to Oracle databases management, covering all comples database products. Sign-up for a free 30 minutes call by clicking on the link below –


Click here and fill the contact us form for a free 30 minutes consultation


3

Cloud Services, Oracle Database Management Solution, Oracle Databases, Oracle Exadata


  • What is Oracle Autonomous Database?


    Oracle Autonomous Database allows you rapidly & easily create mission critical databases, It protects data from both external and internal threats, automates all infrastructure & database maintenance, recovers from any failure without downtime and scales online for highest performance & lower cost.


    Components of Oracle Autonomous Database:

    An Oracle Autonomous database comprises of 3 components:

    Oracle Exadata
    Oracle database
    Automated Data Center Operations and Machine Learning


    How Does Oracle Database Works:

    An Oracle Autonomous Database is self driving, self securing and self repairing.

  • Self Driving: It Automates all databases and infrastructure management, Patching, tune Queries and Monitoring

  • Self Securing: Protects database from both external and malicious internal users by automatically encrypting data both at rest and in transit

  • Self Repairing: Automatically recover from any failure. Protects from all downtime including planned maintenance


    Machine Learning:

    Automation  built up on the revolutionary machine learning platform enables the Customers with greater database autonomy and capabilities.

  • Workload Optimization: Automatically adapts to the changing workload and optimization of query execution. So Customers doesn’t have to tune queries manually.

  • Monitoring & Diagnostics: Detects anomalies and fixes issues ensuring optimal performance and availability. So Customers doesn’t have to install or waiting for monitoring and alerting notification.

  • Security: Protects database from both external attacks and malicious internal users by automatically encrypting data and apply security updates.


    Oracle Autonomous Database Family:

  • Oracle Autonomous Data Warehouse (ADW): It is optimized for Data Warehouse, Data Mart & Data lake. Easy provision, connect, load data and execute queries.

  • Oracle Autonomous Transaction Processing (ATP): It is optimized for Transaction processing, batch, Report, Mixed workload, IoT & Application Development. Easy provision, connect, load data and execute queries.
  •  


  •  

    Benefits of Autonomous Database:

  • Fast Provisioning: Create the database in minutes, load data & execute queries
  •  
  • Autonomous: Automatically tune queries without DBA intervention
  •  
  • Extreme Performance: Run Oracle workload up to 13x faster on Oracle Exadata


    Steps to create an Autonomous Database:

    It just takes 4 steps to create an Autonomous Database (DW, Data mart or OLTP) and in few minutes the customers can have Autonomous database ready to connect and load data and start using it. 


    Migrating to Oracle Autonomous Database:

  • Oracle Database is same in the cloud as on-premises. You can move it to the cloud without having to change application code.Quickly obtain environments for testing and development. Take on-premises data, move onto the cloud storage for fast analysis, backup or archiving. Get an enterprise production ready database in minutes for fast migration to cloud. Tuning, patching, backup, disaster recovery, high availability for them automatically.


    Oracle Autonomous database Security Capabilities:

  • Autonomous database automatically applies patches and upgrades eliminating human error, keeping the system protected. Oracle Database Vault protects the database from internal administrator access, allows administrators to perform their job, but not access the data itself. By default, Oracle Autonomous database uses TDE to protect data at rest. It also protects data in transit when the client uses SSL/TLS 1.2.


    Oracle Autonomous Database Deployment option:

  • Autonomous Database Serverless: Simple & Elastic. Oracle automates and manages everything. You just choose the compute , storage and region. Start with minimum 1 OCPU & 1 hour minimum commitment time and Instantly grow or shrink online.

  • Autonomous Database Dedicated: Provides a Private database cloud running on a dedicated Exadata cloud infrastructure in the Public cloud. Highly isolated and Customizable operation policies. Available as Cloud at Customer solution.


    Which Autonomous Database Deployment is best for me?

    Regardless of which Autonomous Database deployment you chose you will get the same great features, functionality, security and performance you have grown to expect from the Oracle Database.

    For users that are simply looking for a database for a specific application or project and don’t want to be involved in choosing any database details like versions, patching, etc., Serverless is right choice. Whereas users that want to rethink their IT strategy and care about things like patching schedules, software versions, workload isolation, and want to be involved in choosing these, then Dedicated is the right choice.


    Conclusion:

    In this article we have learned about Oracle Autonomous database cloud, its components, benefits and capabilities and different autonomous database deployment options available.


3

Database Management Services, Oracle Database Management Solution, Oracle Databases, Oracle Exadata
 
You will end up performing storage cell rescue under the following situations:

  • Improper Battery Replacement
  • Improper Card Seating
  • Card Damage During Battery Replacement
  • Corrupted Root File System

In this article we will demonstrate step by step process to Rescue an Exadata Storage Cell or server.
 
Open a browser and enter the ILOM hostname or IP address of the Storage cell you want to rescue
https://dm01cel02-ilom.netsoftmate.com
 
Enter root crendentials

 
On the left pane under “Remote Control”, click “Redirection”. Select “Use video redirection” and click “Launch Remote Console” button

 
Click OK
 
 Click OK

 
Click Continue

 
Click Run

 
Click Continue (not recommended)

 
From the ILOM video console we can see that the root file system can’t be mounted due to corruption and it will be rebooted again in 60 seconds

 
On the left pane under “Host Management” click on “Power Control”. From the drop down list Select “Power Cycle”

 
Click Save

 
Click OK

 
Rebooting in progress

 
Server is no rebooting


Immediately press Ctrl+S on keyboard 

 
Select the “CELL_USB_BOOT_CELLBOOT_usb_in_rescue_mode

 
At the point, we will have continue the rescue process using serial ILOM

 
As root, ssh to the storage cell ILOM and start the serial console

 
Enter r and hit return

 
Enter y and hit return

 
Enter the rescue password sos1exadata. Enter n and hit return

 
Enter the root user password 

 
We are into the rescue mode. At this moment check to make sure that the there are no file system issue. Fix any other issue you may have. Consult Oracle if required
 
Reboot the server again to complete the rescue process

 
Hit return

 
The server is powered off

 
Power on the server using web ILOM as shown below

 
Rescue process is completed and we got the root login prompt


Login to the server as root user and perform the post rescue steps

  
Verify the image version of the storage cell


Post Storage Cell Rescue steps:
 
[root@dm01cel02 ~]# imageinfo

Kernel version: 4.1.12-94.8.4.el6uek.x86_64 #2 SMP Sat May 5 16:14:51 PDT 2018 x86_64
Cell version: OSS_18.1.7.0.0AUG_LINUX.X64_180821
Cell rpm version: cell-18.1.7.0.0_LINUX.X64_180821-1.x86_64

Active image version: 18.1.7.0.0.180821
Active image kernel version: 4.1.12-94.8.4.el6uek
Active image activated: 2019-03-17 03:27:41 -0500
Active image status: success
Active system partition on device: /dev/md5
Active software partition on device: /dev/md7

Cell boot usb partition: /dev/sdm1
Cell boot usb version: 18.1.7.0.0.180821

Inactive image version: undefined
Rollback to the inactive partitions: Impossible


CellCLI> import celldisk all force
No cell disks qualified for this import operation

CellCLI> list physicaldisk
         12:0            PST0XV          normal
         12:1            PZNDSV          normal
         12:2            PT5Z4V          normal
         12:3            PU3XLV          normal
         12:4            PYAKLV          normal
         12:5            PV828V          normal
         12:6            PZE5NV          normal
         12:7            PYV0YV          normal
         12:8            PZKUXV          normal
         12:9            PYD86V          normal
         12:10           PZL15V          normal
         12:11           PZPLAV          normal
         FLASH_1_1       S2T7NCAHA00958  normal
         FLASH_2_1       S2T7NCAHA00986  normal
         FLASH_4_1       S2T7NCAHA00956  normal
         FLASH_5_1       S2T7NCAHA00947  normal

CellCLI> list celldisk
         CD_00_dm01cel02        normal
         CD_01_dm01cel02        normal
         CD_02_dm01cel02        normal
         CD_03_dm01cel02        normal
         CD_04_dm01cel02        normal
         CD_05_dm01cel02        normal
         CD_06_dm01cel02        normal
         CD_07_dm01cel02        normal
         CD_08_dm01cel02        normal
         CD_09_dm01cel02        normal
         CD_10_dm01cel02        normal
         CD_11_dm01cel02        normal
         FD_00_dm01cel02        normal
         FD_01_dm01cel02        normal
         FD_02_dm01cel02        normal
         FD_03_dm01cel02        normal

CellCLI> list griddisk
         DATA_DM01_CD_00_dm01cel02     active
         DATA_DM01_CD_01_dm01cel02     active
         DATA_DM01_CD_02_dm01cel02     active
         DATA_DM01_CD_03_dm01cel02     active
         DATA_DM01_CD_04_dm01cel02     active
         DATA_DM01_CD_05_dm01cel02     active
         DATA_DM01_CD_06_dm01cel02     active
         DATA_DM01_CD_07_dm01cel02     active
         DATA_DM01_CD_08_dm01cel02     active
         DATA_DM01_CD_09_dm01cel02     active
         DATA_DM01_CD_10_dm01cel02     active
         DATA_DM01_CD_11_dm01cel02     active
         DBFS_DG_CD_02_dm01cel02       active
         DBFS_DG_CD_03_dm01cel02       active
         DBFS_DG_CD_04_dm01cel02       active
         DBFS_DG_CD_05_dm01cel02       active
         DBFS_DG_CD_06_dm01cel02       active
         DBFS_DG_CD_07_dm01cel02       active
         DBFS_DG_CD_08_dm01cel02       active
         DBFS_DG_CD_09_dm01cel02       active
         DBFS_DG_CD_10_dm01cel02       active
         DBFS_DG_CD_11_dm01cel02       active
         RECO_DM01_CD_00_dm01cel02     active
         RECO_DM01_CD_01_dm01cel02     active
         RECO_DM01_CD_02_dm01cel02     active
         RECO_DM01_CD_03_dm01cel02     active
         RECO_DM01_CD_04_dm01cel02     active
         RECO_DM01_CD_05_dm01cel02     active
         RECO_DM01_CD_06_dm01cel02     active
         RECO_DM01_CD_07_dm01cel02     active
         RECO_DM01_CD_08_dm01cel02     active
         RECO_DM01_CD_09_dm01cel02     active
         RECO_DM01_CD_10_dm01cel02     active
         RECO_DM01_CD_11_dm01cel02     active


[root@dm01cel02 ~]# cellcli -e list flashcache detail
         name:                   dm01cel02_FLASHCACHE
         cellDisk:               FD_03_dm01cel02,FD_01_dm01cel02,FD_02_dm01cel02,FD_00_dm01cel02
         creationTime:           2019-03-17T03:19:43-05:00
         degradedCelldisks:
         effectiveCacheSize:     11.64312744140625T
         id:                     574c3bd1-7a35-42ba-a03b-75f3a93edac7
         size:                   11.64312744140625T
         status:                 normal

[root@dm01cel02 ~]# cellcli -e list flashlog detail
         name:                   dm01cel02_FLASHLOG
         cellDisk:               FD_03_dm01cel02,FD_00_dm01cel02,FD_01_dm01cel02,FD_02_dm01cel02
         creationTime:           2019-03-17T03:19:43-05:00
         degradedCelldisks:
         effectiveSize:          512M
         efficiency:             100.0
         id:                     73cd8288-c6d8-42c3-95a1-97ce287cf7d0
         size:                   512M
         status:                 normal
 
SQL> select a.name,b.path,b.state,b.mode_status,b.failgroup
    from v$asm_diskgroup a, v$asm_disk b
    where a.group_number=b.group_number
    and b.failgroup=’dm01cel02′
    order by 2,1;

no rows selected


SQL> alter diskgroup DBFS_DG add disk ‘o/192.168.1.1;192.168.1.2/DBFS_DG_*_dm01cel02’ force;

Diskgroup altered.

 
SQL> alter diskgroup DATA_DM01 add disk ‘o/192.168.1.1;192.168.1.2/DATA_DM01_*_dm01cel02’ force;

Diskgroup altered.

 
SQL> alter diskgroup RECO_DM01 add disk ‘o/192.168.1.1;192.168.1.2/RECO_DM01_*_dm01cel02’ force;

Diskgroup altered.

 
SQL> select * from v$asm_operation;

GROUP_NUMBER OPERA STAT      POWER     ACTUAL      SOFAR   EST_WORK   EST_RATE EST_MINUTES ERROR_CODE
———— —– —- ———- ———- ———- ———- ———- ———– ——————————————–
           1 REBAL RUN           4          4     204367    3521267      13041         254
           3 REBAL WAIT          4


SQL> select * from v$asm_operation;

no rows selected


SQL> col path for a70
SQL> set lines 200
SQL> set pages 200
SQL> select a.name,b.path,b.state,b.mode_status,b.failgroup
    from v$asm_diskgroup a, v$asm_disk b
    where a.group_number=b.group_number
    and b.failgroup=’dm01cel02′
    order by 2,1;  2    3    4    5

NAME                           PATH                                                                   STATE    MODE_ST FAILGROUP
—————————— ———————————————————————- ——– ——- ——————————
DATA_DM01                     o/192.168.1.1;192.168.1.2/DATA_DM01_CD_00_dm01cel02              NORMAL   ONLINE  dm01cel02
DATA_DM01                     o/192.168.1.1;192.168.1.2/DATA_DM01_CD_01_dm01cel02              NORMAL   ONLINE  dm01cel02
DATA_DM01                     o/192.168.1.1;192.168.1.2/DATA_DM01_CD_02_dm01cel02              NORMAL   ONLINE  dm01cel02
DATA_DM01                     o/192.168.1.1;192.168.1.2/DATA_DM01_CD_03_dm01cel02              NORMAL   ONLINE  dm01cel02
DATA_DM01                     o/192.168.1.1;192.168.1.2/DATA_DM01_CD_04_dm01cel02              NORMAL   ONLINE  dm01cel02
DATA_DM01                     o/192.168.1.1;192.168.1.2/DATA_DM01_CD_05_dm01cel02              NORMAL   ONLINE  dm01cel02
DATA_DM01                     o/192.168.1.1;192.168.1.2/DATA_DM01_CD_06_dm01cel02              NORMAL   ONLINE  dm01cel02
DATA_DM01                     o/192.168.1.1;192.168.1.2/DATA_DM01_CD_07_dm01cel02              NORMAL   ONLINE  dm01cel02
DATA_DM01                     o/192.168.1.1;192.168.1.2/DATA_DM01_CD_08_dm01cel02              NORMAL   ONLINE  dm01cel02
DATA_DM01                     o/192.168.1.1;192.168.1.2/DATA_DM01_CD_09_dm01cel02              NORMAL   ONLINE  dm01cel02
DATA_DM01                     o/192.168.1.1;192.168.1.2/DATA_DM01_CD_10_dm01cel02              NORMAL   ONLINE  dm01cel02
DATA_DM01                     o/192.168.1.1;192.168.1.2/DATA_DM01_CD_11_dm01cel02              NORMAL   ONLINE  dm01cel02
DBFS_DG                        o/192.168.1.1;192.168.1.2/DBFS_DG_CD_02_dm01cel02                 NORMAL   ONLINE  dm01cel02
DBFS_DG                        o/192.168.1.1;192.168.1.2/DBFS_DG_CD_03_dm01cel02                 NORMAL   ONLINE  dm01cel02
DBFS_DG                        o/192.168.1.1;192.168.1.2/DBFS_DG_CD_04_dm01cel02                 NORMAL   ONLINE  dm01cel02
DBFS_DG                        o/192.168.1.1;192.168.1.2/DBFS_DG_CD_05_dm01cel02                 NORMAL   ONLINE  dm01cel02
DBFS_DG                        o/192.168.1.1;192.168.1.2/DBFS_DG_CD_06_dm01cel02                 NORMAL   ONLINE  dm01cel02
DBFS_DG                        o/192.168.1.1;192.168.1.2/DBFS_DG_CD_07_dm01cel02                 NORMAL   ONLINE  dm01cel02
DBFS_DG                        o/192.168.1.1;192.168.1.2/DBFS_DG_CD_08_dm01cel02                 NORMAL   ONLINE  dm01cel02
DBFS_DG                        o/192.168.1.1;192.168.1.2/DBFS_DG_CD_09_dm01cel02                 NORMAL   ONLINE  dm01cel02
DBFS_DG                        o/192.168.1.1;192.168.1.2/DBFS_DG_CD_10_dm01cel02                 NORMAL   ONLINE  dm01cel02
DBFS_DG                        o/192.168.1.1;192.168.1.2/DBFS_DG_CD_11_dm01cel02                 NORMAL   ONLINE  dm01cel02
RECO_DM01                     o/192.168.1.1;192.168.1.2/RECO_DM01_CD_00_dm01cel02              NORMAL   ONLINE  dm01cel02
RECO_DM01                     o/192.168.1.1;192.168.1.2/RECO_DM01_CD_01_dm01cel02              NORMAL   ONLINE  dm01cel02
RECO_DM01                     o/192.168.1.1;192.168.1.2/RECO_DM01_CD_02_dm01cel02              NORMAL   ONLINE  dm01cel02
RECO_DM01                     o/192.168.1.1;192.168.1.2/RECO_DM01_CD_03_dm01cel02              NORMAL   ONLINE  dm01cel02
RECO_DM01                     o/192.168.1.1;192.168.1.2/RECO_DM01_CD_04_dm01cel02              NORMAL   ONLINE  dm01cel02
RECO_DM01                     o/192.168.1.1;192.168.1.2/RECO_DM01_CD_05_dm01cel02              NORMAL   ONLINE  dm01cel02
RECO_DM01                     o/192.168.1.1;192.168.1.2/RECO_DM01_CD_06_dm01cel02              NORMAL   ONLINE  dm01cel02
RECO_DM01                     o/192.168.1.1;192.168.1.2/RECO_DM01_CD_07_dm01cel02              NORMAL   ONLINE  dm01cel02
RECO_DM01                     o/192.168.1.1;192.168.1.2/RECO_DM01_CD_08_dm01cel02              NORMAL   ONLINE  dm01cel02
RECO_DM01                     o/192.168.1.1;192.168.1.2/RECO_DM01_CD_09_dm01cel02              NORMAL   ONLINE  dm01cel02
RECO_DM01                     o/192.168.1.1;192.168.1.2/RECO_DM01_CD_10_dm01cel02              NORMAL   ONLINE  dm01cel02
RECO_DM01                     o/192.168.1.1;192.168.1.2/RECO_DM01_CD_11_dm01cel02              NORMAL   ONLINE  dm01cel02

34 rows selected.


Conclusion
 
In this article we have demonstrated step by step procedure to perform Storage Cell Rescue. You may have to perform the Storage cell rescue for multiple reasons such as root file system corrupted, Kernel panic, server rebooting continuously and so on. With the help of CELLBOOT usb one can perform the storage cell rescue very easily.
 
0

Database Management Services, Oracle Databases, Oracle Exadata
In this article we will demonstrate quick steps to deploy Exadata Database Machine in Oracle Cloud Infrastructure (OCI). 

Prerequisites:

  • Exadata Cloud Subscription
  • Credentials to Login Oracle Cloud
  • Access to Deploy Exadata in OCI
  • Compartment
  • VCN & Subnet

Steps to Deploy Exadata on OCI

  • Open a browser and enter the URL you have received from Oracle to connect to the Oracle Cloud
  •  

  • Enter your Oracle Cloud credentials
  •  

  • Click on “Create Instance”
  •  

  • Click on “All Services” and search for Exadata keyword. Click on Create.
  •  

  • Select your “Compartment” on left and Click on “Launch DB System”
  •  

  • Enter the details as per your requirement and the Exadata subscription procured
  •  


  • Browse and upload the public key
  •  

  • Choose your desired storage allocation and timezone
  •  

  • Fill in the required VCN and Subnet details. Work with your network engineer to gather the correct details on VCN and Subnet created for your environment
  •  

  • Fill the database details, name, version, CDB and Password
  •  

  • Select the Workload type and database character set for your database
  •  

  • Optionally specify the TAG Key and click “Launch DB System” to deploy Exadata DBM
  •  


Conclusion

In this article we have learned how to deploy an Exadata Database Machine in Oracle Cloud Infrastructure (OCI).


Expert Support for Oracle Exadata | Netsoftmate


1

PREVIOUS POSTSPage 1 of 2NO NEW POSTS